
Tutorial
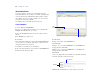
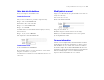

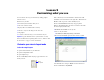
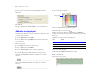
Table Of Contents
- Lesson 1 FileMaker Pro basics
- Lesson 2 Browsing information
- Lesson 3 Finding and sorting records
- Lesson 4 Creating a database and entering records
- Lesson 5 Customizing what you see
- Lesson 6 Creating lists, mailing labels, and form letters
- Lesson 7 Simplifying data entry
- Lesson 8 Automating tasks with buttons and scripts
- Lesson 9 Creating and running reports
- Lesson 10 Making databases relational
- Lesson 11 Keeping your data safe

Lesson 5
Customizing what you see
You can enhance the way your data looks by adding graphics
and other effects.
In this lesson, you will:
1 learn how layouts determine what you see
1 add, resize, and move fields
1 display values in a number field as currency
1 add text to a layout, and change its size and color
1 add graphics
1 see where to find other ways you can customize a layout
Important Copy the Tutorial folder to your hard drive or verify
that it is installed before beginning this lesson. See “Where to find
the lesson files” on page 7 for more information.
Customize your view in Layout mode
Look at the sample layouts
1. Open the Tutorial folder on your hard drive.
2. Open the Sample Files folder.
3. Open Sample05.fp7.
4. Choose Data Entry from the Layout pop-up menu if it is not
already selected.
Notice that the layout is structured like a standard form, with
field labels on the left and data on the right. Also, all fields in the
Members table are present on the Data Entry layout.
5. Choose Fee Information from the Layout pop-up menu.
6. Notice that although this is the same record in the same table,
the data is displayed differently:
1 First Name and Last Name are side by side
1 You see only five fields:
1 First Name, Last Name, City, Country, and Fee Paid
1 The amount in Fee Paid is prefaced with a currency symbol.
You will make these changes to MyFile05 later in this lesson.
7. Choose View menu > Layout Mode.
Layout
pop-up menu