
Tutorial
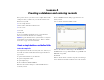
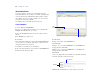
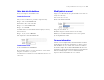

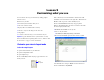
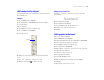
Table Of Contents
- Lesson 1 FileMaker Pro basics
- Lesson 2 Browsing information
- Lesson 3 Finding and sorting records
- Lesson 4 Creating a database and entering records
- Lesson 5 Customizing what you see
- Lesson 6 Creating lists, mailing labels, and form letters
- Lesson 7 Simplifying data entry
- Lesson 8 Automating tasks with buttons and scripts
- Lesson 9 Creating and running reports
- Lesson 10 Making databases relational
- Lesson 11 Keeping your data safe

Creating a database and entering records 23
Enter data into the database
Now you can begin to enter members’ data.
Create the first record
1. If you don’t see field boxes, press Tab to begin data entry.
2. Type Jane in the First Name field.
3. Press Tab to move to the next field.
4. Type Doe in the Last Name field.
5. Type 25 in Fee Paid.
You will learn how to format number fields to display as currency
in the next lesson.
6. Type 11/11/2004 in Date Paid.
The completed record should look like this:
Create another record
1. Choose Records menu > New Record.
2. As you did for Jane Doe’s record, enter data for John Smith,
who paid
75 dollars on 2/2/2004.
Your database now contains two records. Click the book icon to see
each record.
Modify data in a record
Suppose you realize that Jane Doe paid 75 dollars, not 25. You can
easily correct the entry.
1. Go to Jane Doe’s record.
2. Select the amount in Fee Paid.
3. Type the new amount, 75.
4. Click an empty area outside a field to save the change.
5. When you are finished with this lesson, close each open file
by choosing File menu > Close.
For more information
You have created a simple database and defined fields, and added
and modified records. For more information, see chapters 1 and 2
in the FileMaker Pro User’s Guide. You can also use or build on
the database template files included with FileMaker Pro. For more
information on entering data in different field types and by different
methods, including import, see lesson 7 in this tutorial and
chapters 1 and 4 in the FileMaker Pro User’s Guide.