FileMaker Pro 8.
© 2004–2006 FileMaker, Inc. All Rights Reserved. FileMaker, Inc. 5201 Patrick Henry Drive Santa Clara, California 95054 FileMaker is a trademark of FileMaker, Inc., registered in the U.S. and other countries, and ScriptMaker and the file folder logo are trademarks of FileMaker, Inc. All persons and companies listed in the examples are purely fictitious and any resemblance to existing persons and companies is purely coincidental. FileMaker documentation is copyrighted.
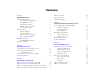
Contents Lesson 1 FileMaker Pro basics How to use this tutorial We begin with a demonstration We explain how it works You build the structures Where to find the lesson files If you need to start over Database concepts What is a database? Why use a database? How is a database organized? How is field data displayed? FileMaker Pro basics About FileMaker Pro modes For more information 7 7 7 7 7 8 8 8 8 8 9 9 9 9 Lesson 2 Browsing information Open a database and move between records View information in differe
FileMaker Pro Tutorial Add custom text to a layout Add text Change text size and color Add a graphic to the layout For more information 29 29 29 29 30 Lesson 6 Creating lists, mailing labels, and form letters Create a columnar list Look at the sample list Create a columnar list Create mailing labels Look at the sample labels About label layouts Create a label layout Create a form letter Look at the sample letter About form letter layouts Create a form letter For more information 31 31 31 32 32 32 33
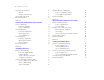
Contents Lesson 10 Making databases relational View data from one related record See how relationships work in the sample files About related tables Display a related record in a file View data from a list of related records Work with related records in the sample file About working with lists of related records Display a list of related records For more information 55 55 56 56 57 57 58 58 59 Lesson 11 Keeping your data safe How to back up your database When to back up For more information 61 61 61 5
FileMaker Pro Tutorial
Lesson 1 FileMaker Pro basics Welcome to the FileMaker® Pro tutorial. This tutorial shows you how you can manage your information in FileMaker Pro.
FileMaker Pro Tutorial The sample files illustrate the concepts explained in the lessons, and let you see how features work before you build them. Refer back to the sample file associated with each lesson if you need to. The working files mimic the sample files, except the features being taught in particular lessons have been removed. You will add these missing items and structures as you complete each lesson.
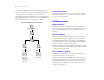
FileMaker Pro basics How is field data displayed? FileMaker Pro displays fields on layouts. Each layout is based on a single table, and displays records from that table. Imagine that your database has a Tasks table in addition to the Address Book table. A layout based on the Address Book table will display fields and records from the Address Book table. A layout based on the Tasks table will display fields and records from the Tasks table.
FileMaker Pro Tutorial
Lesson 2 Browsing information You view, enter, or change data in Browse mode. This is the simplest way to interact with your database. In the status area, notice that there are 30 records and that the first record is displayed.
FileMaker Pro Tutorial View information in different ways See a different layout Even though you enter information only once in FileMaker Pro, you can use that information in many ways. Layouts let you view some or all of your fields. To see some layouts in action, use the Sample02.fp7 sample file you just opened.
Browsing information 3. Choose the List of Members layout from the Layout pop-up menu. This layout shows each record as one row in a columnar list. Notice that the List of Members layout contains only four of the fields that were present in the Data Entry layout. Because fewer fields are present on this layout, some data is simply not displayed, however, no data has been removed from the database.
FileMaker Pro Tutorial For more information You have opened a database, browsed through records, switched layouts, and learned the differences between form view, list view, and table view. For more about browsing information in FileMaker Pro, see chapter 1 of the FileMaker Pro User’s Guide.
Lesson 3 Finding and sorting records Your database is a collection of records. Sometimes you’ll work with all of the records in the database (to mail out an annual catalog for each customer, for example). Often, however, you’ll work with a subset of your database—people who come from a particular city, for example, or records that fall within a particular range of dates. 5. Right-click (Windows) or Control-click (Mac OS) the City field. 6. From the shortcut menu, choose Find Matching Records.
FileMaker Pro Tutorial Find records based on criteria in separate fields You can find records that match multiple criteria, for example members who are both from the United States and are new members. This type of search is commonly referred to as an AND search. To perform an AND search in FileMaker Pro, type each search criterion directly into the appropriate field in Find mode. To find all members who live in the United States and are new members: Find button 1. Choose View menu > Find Mode.
Finding and sorting records To perform an OR search in FileMaker Pro, you will need to use multiple find requests. 1 Type the first search criterion into the appropriate field of the first find request. 1 Create a second find request and enter the second search criterion in the same field. To perform this type of search in FileMaker Pro, you use a special range symbol in your find request to specify the lower and upper limits of your find criteria.
FileMaker Pro Tutorial Narrow your search Sometimes, you might need to find records that match certain criteria while at the same time excluding others (for example, finding all of the records that were added in a given year except for those added in February, or finding all customers who reside in New York state except for those in New York City). You can perform these types of finds by using a combination of multiple find requests and omitting certain records.
Finding and sorting records Sort direction buttons become active when a field is selected Notice the sort direction symbol to the right of the Last Name field increases in size from left to right. This indicates that when the database is sorted by this field, the data will be in ascending order (from a to z). 5. Click Sort. The names in the List of Members are now in alphabetical order by last name. 6. When you are finished with this lesson, close each open file by choosing File menu > Close.
FileMaker Pro Tutorial
Lesson 4 Creating a database and entering records In the previous lessons, you saw how to use a simple database with existing data. Now you will create your own file and add records. 6. Choose Members from the Table pop-up menu if it is not In this lesson you will: You see all of the fields in the Members table. 1 1 1 1 1 already selected.
FileMaker Pro Tutorial About field definitions You create a field for each category of information you want, such as First Name or City. To find, sort, calculate, and display data correctly, the field type should match the kind of data it contains (text, number, date, and so on). For example, you can’t search for text values in a field of type Number. You will learn about other field types in later lessons. Create a database 1. Choose File menu > New Database. Name a field 2.
Creating a database and entering records 23 Enter data into the database Modify data in a record Now you can begin to enter members’ data. Suppose you realize that Jane Doe paid 75 dollars, not 25. You can easily correct the entry. Create the first record 1. If you don’t see field boxes, press Tab to begin data entry. 1. Go to Jane Doe’s record. 2. Select the amount in Fee Paid. 2. Type Jane in the First Name field. 3. Press Tab to move to the next field. 4. Type Doe in the Last Name field. 5.
FileMaker Pro Tutorial
Lesson 5 Customizing what you see You can enhance the way your data looks by adding graphics and other effects. In this lesson, you will: 1 1 1 1 1 1 learn how layouts determine what you see add, resize, and move fields display values in a number field as currency add text to a layout, and change its size and color add graphics see where to find other ways you can customize a layout Notice that the layout is structured like a standard form, with field labels on the left and data on the right.
FileMaker Pro Tutorial You use Layout mode to customize the appearance of your data. Although the data is still in the file, you do not see it here. Instead, you see the names of the fields. 5. Choose Fee Information from the Layout pop-up menu. You see a plain layout. You will modify this layout in different ways in the following sections. About layouts and tables Each layout is based on a single table, and shows records from that table.
Customizing what you see Move a field 27 Drag the new field 1. Choose View menu > Layout Mode. 2. Click inside the Last Name field and drag it beside the First Name field. In the next steps, you’ll align these fields. 3. Press Shift and click the First Name field to add it to your selection. Both the First Name and Last Name fields are selected. Field tool 3. In the Specify Field dialog box, select the City field. 4. Click OK. 4. Choose Arrange menu > Align > Top Edges.
FileMaker Pro Tutorial 9. Select options as shown in the following Number Format 7. Choose the fill color palette. dialog box. Fill color palette 10. Click OK. 11. Choose View menu > Browse Mode to see the formatted data. Add color to a layout part 8. Choose Other Color from the fill color palette. The header part uses a custom color. 9. Mac OS: Select the sliders icon You will change the color of the top of the layout to match the colors of other layouts in the file.
Customizing what you see Add custom text to a layout You will add the name of the organization to the top of the layout, then format the text. 29 Change text size and color 1. Click the Corporate Travelers Club text to select the text block. Add text 1. Choose Window menu > Sample05. 2. Choose Format menu > Text. 2. Choose View menu > Layout Mode and look at the heading at 3. Choose Times from the Font list. the top of the layout. 4. Choose Custom from the Size list, and type 28.
FileMaker Pro Tutorial 11. Choose View menu > Browse Mode to see the finished layout. 12. When you are finished with this lesson, close each open file by choosing File menu > Close. For more information You have learned how to enhance the appearance of your data by using graphics, custom text, field formatting, and creative positioning of objects on layouts. There are many other ways to customize the appearance of fields and layouts.
Lesson 6 Creating lists, mailing labels, and form letters You can easily create layouts to view and print information in many different ways. 4. Choose the List of Members layout from the Layout pop-up menu. In this lesson, you will create: 1 1 1 a list of your records Layout pop-up menu mailing labels a form letter Important Copy the Tutorial folder to your hard drive or verify that it is installed before beginning this lesson. See “Where to find the lesson files” on page 7 for more information.
FileMaker Pro Tutorial 6. For Layout Name, type List of Members. 7. Select Columnar list/report for the new layout type and click Next. 8. Select the Columnar list/report layout again, then click Next. The data in all records for the fields Last Name, First Name, Company, and Membership Type appears in the List of Members layout. The completed layout is displayed in Preview mode, which shows items as they will appear when printed. 9.
Creating lists, mailing labels, and form letters 33 Create a label layout In this section, you will use the New Layout/Report assistant to: 1 1 create a label layout select fields to include on the labels Create the label 1. Choose Window menu > MyFile06. 2. Choose View menu > Layout Mode. 3. Choose Layouts menu > New Layout/Report. 4. For Layout Name, type Labels. 5. Select Labels for the new layout type. 6. Click Next. 7. Choose Avery 5160 from the Use label measurements for list. 2.
FileMaker Pro Tutorial 11. Click View in Layout mode. Create a form letter 12. Click Finish. To create this letter, you will: 13. When you finish viewing your label layout, choose View menu > Preview Mode. Your labels should look like those in the sample file.
Creating lists, mailing labels, and form letters 10. Now drag the Body tab up to just above the page boundary. Add the address The page boundary line will disappear. Dragging the body tab above the page boundary limits your form letter to a single page. 1. Choose Insert menu > Merge Field. 11. Use the scroll bar at the bottom of the screen to scroll a few 3. Type a space. inches to the right. You see a heavy dotted line along the right side. This is the right-side page boundary.
FileMaker Pro Tutorial For more information Clear this checkbox to turn off underlining of misspelled words Customize the letter with the company name 1. Click after the word company in the first paragraph. 2. Type a comma and a space. 3. Insert a merge field for the company name. 4. Type another comma. Add the closing 1. Click at the end of the text and enter two line spaces. 2. Type With regards, then enter four line spaces. 3. Type John Jones and a comma. 4.
Lesson 7 Simplifying data entry You can simplify the way you enter data in FileMaker Pro and improve accuracy by using value lists, calculation fields, and data auto-entry. You see two radio buttons, one for New and one for Continuing. These correspond to the two choices in the Membership Types value list.
FileMaker Pro Tutorial 8. Click in the large box and enter the values for this list, New and Continuing, by typing each value on its own line. Select Radio Button Set Select Membership Types value list 6. Click OK. Your radio buttons should be visible in Layout mode. 9. Click OK to close the Edit Value List dialog box. 10. Click OK to finish. Assign a value list to a field and display it as radio buttons 1. Choose View menu > Layout Mode. 2. Select the Membership Type field. 3.
Simplifying data entry 39 Generate values with a calculation field Create a calculation field When you want FileMaker Pro to perform a calculation for you, for example to determine the amount of tax owed or the proper fee to be paid, you use a calculation field. Calculation fields are one of the FileMaker Pro field types. FileMaker Pro can perform simple and complex calculations. There are several different ways of formulating a calculation, each of which can yield the correct result.
FileMaker Pro Tutorial 7. Scroll through the list of formulas in the upper-right 10. Select the placeholder resultTwo, and type 200. corner of the Specify Calculation dialog box until you locate If (test ; resultOne ; resultTwo). Double-click this formula so that it appears in this dialog box. 11. Make sure the calculation result is set to Number. This formula has three parts: a test, a result if the test evaluates as true (result one), and a result if the test evaluates as false (result two).
Simplifying data entry Automatically enter a serial number FileMaker Pro lets you automatically enter certain types of data— for example, incremental numbers—when you create a new record. 41 8. Select Serial number on the Auto-Enter tab. You don’t need to change the Generate choice, or the amounts for next value or increment by for this exercise. Look at a serial number example 1. Choose Window menu > Sample07. 2. Go to the last record in the database. 3.
FileMaker Pro Tutorial
Lesson 8 Automating tasks with buttons and scripts FileMaker Pro lets you automate many database tasks with buttons and scripts. These powerful features can save you a lot of time by performing a series of actions with a single click.
FileMaker Pro Tutorial Run a script in the sample file 1. Choose Window menu > Sample08. 2. Choose Scripts menu > Preview Labels Layout. You should now see the Labels layout, in Preview mode. This script lets you preview labels before you print. Specify the List of Members layout Select Rounded button 11. Click OK. 12. Notice that the insertion point is now in the center of your button. Type Go to List of Members in your button to identify it.
Automating tasks with buttons and scripts 45 Assign a script to a button While buttons are generally more convenient for users, scripts are a more powerful feature, allowing you to combine many menu commands into a single executable action. Using a button to run a script gives you the best of both features. To assign the script you just created to the button you created earlier: Specify a target layout for the script step 7.
FileMaker Pro Tutorial Rename the button 1. Click the text tool . 2. Click the button once. The text insertion point appears in the button. 3. Type Preview Labels Layout to rename this button. It may be necessary to resize this button after renaming it. Test the button 1. In Browse mode, test the button by clicking it. Clicking this button performs the script, which displays the Labels layout and switches to Preview mode. 2.
Lesson 9 Creating and running reports The process of retrieving and organizing data from a database is called reporting. Summary reports present just the totals of your data; they do not break information into smaller groups. Subsummary reports, also referred to as reports with grouped data, categorize information by a particular field or fields, allowing you to group information hierarchically. This subsummarized information can then be subtotaled, averaged, or counted.
FileMaker Pro Tutorial About subsummary reports 7. Select Report with grouped data, and click Next. A report with grouped data requires a number of elements to work properly. Subsummary reports include: 1 a subsummary part in the report layout for each level of detail you want to break out. The New Layout/Report assistant creates these for you. 1 a field or fields to group records by. These fields are referred to as break fields.
Creating and running reports 5. Move the Membership Type field to the Report categories list to organize the records by membership type. 8. Click Next. Membership Type is referred to as a break field because you are using the contents of this field to break the records into categories for your report. Select a theme and create the header and footer 1. Select the Standard theme to set the text size, color, and style of the finished report. 6. Click Next. 2. Click Next. 7.
FileMaker Pro Tutorial 1. To view the finished sample report, choose Window menu > Sample09. 2. Choose Scripts menu > Membership Fee Report to generate the membership fee report. 3. Examine the resulting report. As in the previous example, the members are grouped by membership type. Additionally, the fees collected for each membership type are subtotaled beneath those members’ names, and a grand total of all fees appears at the bottom of the report. 6. Click Next.
Creating and running reports Two additional elements are also required: 1 1 a grand summary layout part summary field(s) to display totals, averages, or counts Create a report with grouped data and totals To create the Membership Fee Report: 1. Choose Window menu > MyFile09. 2. In Layout mode, choose Layouts menu > New Layout/Report. 51 Select the fields used in this report 1. Select the first field to be used in this report, Membership Type, and move it to the Layout fields list. 2.
FileMaker Pro Tutorial 3. For Subtotal placement, use the default value of Below record group. 4. Click Add Subtotal to add the Membership Revenue field as the subtotal. This tells FileMaker Pro to create a subtotal of the membership fees that are paid beneath each membership category. 8. Click Next. Select a theme and create the header and footer 1. Select the Standard theme to set the text size, color, and style of the finished report. 5. Click Next. 2. Click Next. 6.
Creating and running reports 53 Save and send a report as a PDF file For more information After you run a report, you can save it as a PDF file and send it as an email attachment. In this lesson, you generated reports with grouped data, and reports with grouped data and totals. You also saved a report as a PDF file and sent it as an email attachment. For more information on creating reports, see FileMaker Pro Help. To send the Membership Fee Report as a PDF file: 1.
FileMaker Pro Tutorial
Lesson 10 Making databases relational Relational databases let you easily view related data and streamline data entry. You can enter data once, then view and use that data in related tables or files. In this lesson, you will: 1 1 1 1 see how relational databases work define a relationship 4. Choose the Companies layout from Layout pop-up menu, and browse through the records. The Companies layout is based on the Companies table, and shows records from that table.
FileMaker Pro Tutorial About related tables The Companies table and Members table are related tables. 6. In the Members table, click the Company field and drag a line to the Company field in the Companies table. When you enter a company name in a record in the Members table, FileMaker Pro identifies the record for that company in the Companies table. FileMaker Pro then displays the address from this matching company record in the Members table.
Making databases relational 3. Using the Field tool , drag a field onto the layout. You see the Specify Field dialog box displaying the list of fields in this table. 4. Click Current Table (“Members”) and choose the Companies table 57 View data from a list of related records Suppose you want to show all club members for each company. You also want to add new members to the Members table without entering the company name for each. from the list.
FileMaker Pro Tutorial View the new record in the related table 1. Go to the Data Entry layout, which is based on the Members table. 2. Go to the last record. You see Joe Williams’ record, with the company information filled in. You automatically created this record when you typed Joe Williams into the list in the Companies table. Add a new record and view it in the list 1. In the Data Entry layout, create a record for a new member who works at ABC Company.
Making databases relational 6. Click OK, then click OK again to close the Define Database dialog box. 7. Choose View menu > Layout Mode. 8. Click the portal tool and draw a box to hold the list of names. 9. In the Portal Setup dialog box, show related records from the Members table. 10. Leave the Initial row value at 1. Change the Number of rows value to 7. Each row displays one matching member record. 11. Select Show vertical scroll bar. 12. Click OK. Add the fields in the portal 1.
FileMaker Pro Tutorial
Lesson 11 Keeping your data safe Power failures, disk problems, and other unexpected computer problems can happen to anyone at any time. To help prevent data loss, regularly back up all important documents on your computer, including your databases. Important Next time, back up to a different disk or volume. Never back up over the only or most recent copy of your file. You should have several different backups at all times.
FileMaker Pro Tutorial