
Instant Web Publishing Guide

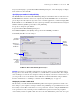


Table Of Contents
- Chapter 1 About publishing FileMaker Pro databases on the web
- Chapter 2 Publishing your database on the web
- Chapter 3 Working with FileMaker databases on the web
- Chapter 4 Designing a database for Instant Web Publishing
- Tips for designing layouts for Instant Web Publishing
- Tips for working with data in a web browser
- General database design considerations
- Working with graphics, sounds, and movies on the web
- Setting the initial layout and view
- Hiding the status area to customize the interface
- Specifying the sort order for web users
- Scripts and Instant Web Publishing
- Hosting databases with FileMaker Server Advanced: an overview
- Documenting your solution
- Chapter 5 Testing, monitoring, and securing your site
- Index
14 FileMaker Instant Web Publishing Guide
number between 1024 and 65535. For more information on creating an account with administrator
privileges, see the Mac OS X Help system.
Checking the maximum number of web connections
The number of simultaneous web users accessing your files depends on which application you use
to host your database. With FileMaker Pro, you can host to up to five concurrent web users. Use
FileMaker
Server Advanced to share files with more web users.
To view the maximum number of web connections allowed:
1. Open the Instant Web Publishing dialog box.
2. For Advanced Options, click Specify, then view the Maximum number of connections number.
3. Click OK, then OK.
When the maximum number is reached, additional web users see an error message in the web
browser when they try to access the database.
Important If you feel that you have reached the maximum number of users inappropriately, it’s
possible that a web user has not logged out of the database properly. You can wait for the sessions
to time out or close the file to disconnect web users from the database. For more information, see
“Logging out of a database and closing a web session” on page 21.
Restricting access except to specified IP addresses
You can restrict the IP addresses that can access your databases on the web. For example, you can
specify that only web users from the IP address 12.34.5.6 can access your databases.
To specify which IP addresses can access your databases:
1. In the Advanced Web Publishing Options dialog box, select Accessible only from these IP
addresses
and type the IP address that can access your files. Separate multiple IP addresses with a
comma (,).
2. Click OK, then OK to save the changes.
Note Type an asterisk (*) in the section of the IP address to grant access to web users with similar
IP addresses (for example:
12.34.5.* or 12.*). You can’t type an asterisk in the first section,
however.
Disconnecting inactive web accounts
You can specify the amount of time web users remain connected to the database when their session,
or connection to the web server, is idle. Sessions are considered idle when web users do not submit
requests from the web browser, such as finding, creating, or submitting changes, changing layouts,
and so on. A session also becomes idle when the web user closes the web browser window, moves
to another web site, or quits the web browser without clicking the
Log Out button.
To specify the duration that a session can be idle before it times out:
1. Open the Advanced Web Publishing Options dialog box.
2. For Disconnect inactive accounts, specify the amount of time before disconnecting idle web users
(from 1 to 60 minutes), then click
OK to save the changes.
If you are concerned that web users might not log out of the database properly, specify a short
session time out. You can also create a scripted button to automatically log web users off.