
Custom Templates Guide
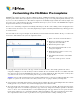
Table Of Contents

Customizing the FileMaker Pro templates
FileMaker
®
Pro
software provides a collection of Business, Home, and Education database file
templates
to help you begin
using the product. These data-ready templates let you track and manage people, assets, and products quickly and easily, even
if you’ve never used a database before. The database templates are beautifully designed, functional, relatively simple, and
best of all, can be easily modified to suit your needs. This document gives you an overview of the FileMaker Pro template
design elements and how you can modify them.
In some cases, customizing a template means making small changes to the file, such as adding a field or changing the name
of a field. You may also want to create a new file by duplicating a template and making substantial changes. Both approaches
are touched on here.
Let’s start with a look at a typical template layout. Each layout element is labeled with a number. We’ll go over what each
element does. The numbers are keyed to the explanations below.
1.
I
n the upper-left corner is the name of the type of items stored in the database. It is usually a plural noun, such as
Companies or Employees, because the many records in a database file store information about a set of similar items. The
same name may be used for the FileMaker Pro file itself, or for a table within the file. Repeating it here on the layout is
a good idea because it serves as an orientation point for the person who will use the file.
Suggestion
Copy an entire template and use it for a similar task. For instance, a salesperson could use the Purchase Orders
template as a Quotes file. You can remove the fields you don’t need, or repurpose fields by renaming them.
2.
Some templates contain buttons that switch to other layouts. For template files that contain multiple tables, these buttons
usually provide a way to switch to a layout that is displaying data from a different table.
3.
Also in the header part of the templates, scripts have been created for you to use or modify. The script names that appear
in the upper-right corner are text buttons separated by a pipe character (|). Script names usually begin with a verb such as
“Sort” or “View,” as in “View Faculty List” or “View Summary Report.” The pipe character is an accepted convention
in web design, and has less of a visual impact than three-dimensional buttons, such as the icon buttons at the left. The
other scripted buttons in the header are provided for more frequent tasks such as adding or finding records.
1
Name of the items stored in the database.
2
Buttons for switching to layouts that
display data from other tables.
3
Buttons that perform scripts.
4
The most important fields in the record,
enlarged for emphasis.
5
Fields important enough to occur on every
layout, above the tabs.
6
Tabs (buttons) that switch to other similar
layouts.
7
One or more fields specific to each tab.