
User manual


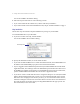
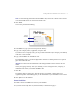
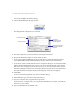
Table Of Contents

Getting started with FileMaker Pro in Mac OS X
3
Note
For late-breaking information about FileMaker Pro, browse the contents of the CD and
view the Read Me.txt file or visit www.filemaker.com.
3.
Click
Install
.
You see the personalization dialog.
4.
In the
Name
box, type your name and press the Tab key.
5.
Type your company name, if applicable, and press Tab.
If you don’t have a company name, you can put other information (for example, your address)
in the box or leave it blank.
6.
Type your FileMaker Pro installation code.
The installation code is a seventeen-digit number located on a multi-part label on a separate
paper sheet within the box.
Important
You must enter the installation code during installation or the software will not
install.
Check your typing carefully. After you click
OK
, you can’t change the name, company, or
installation code unless you reinstall FileMaker Pro.
7.
Click
OK
.
The Installer begins copying files. After all the files are installed, a dialog shows your
registration options. A final dialog tells you the installation on your hard disk was successful.
8.
Click
Quit
to leave the Installer.
Custom installation
To install a subset of FileMaker Pro files on your hard disk:
1.
If you have not already done so, start the Installer, as described on page 1.
Type your
name here
Type your
installation
code here