
User manual


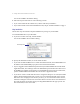
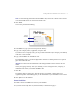
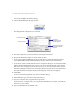
Table Of Contents

2
Getting started with FileMaker Pro in Mac OS X
You see the FileMaker Pro Installer dialog.
4.
Follow the steps described in one of the following sections:
1
If you want to install all the available files, continue with “Easy installation.”
1
If you want to install a subset of the FileMaker Pro files, skip to “Custom installation” on page 3.
Easy installation
Follow these steps to install the complete FileMaker Pro package on your hard disk.
To install FileMaker Pro on your hard disk:
1.
If you have not done so already, start the Installer.
You see the FileMaker Pro 5.5 Installer dialog.
2.
Specify the installation location, or use the default location.
1
If you want to install FileMaker Pro in a folder other than the default, choose
Select Folder
from
the bottom of the
Install Location
pop-up menu and select the desired folder.
1
If you’re logged in with an administrator password and you install FileMaker Pro into the default
Applications folder, users who log in with a non-administrator password will not be able to access
the FileMaker Pro template or tutorial files. If non-administrator users need to access these files,
perform a
Custom Install
and install these files into the User’s Application folder.
1
If you choose a disk or volume that doesn’t have enough free disk space or is locked, the
Install
button is dimmed and the dialog tells you why you can’t install onto that disk. If the selected
disk doesn’t have enough space for the files you select, you can switch to the Finder software,
and delete existing files to make more room on the disk. You can also choose not to install some
files (like the tutorial or template files) by selecting
Custom Install
from the pop-up menu. For
more information, see the next section.
Choose Easy Install