FileMaker Pro 5.5 Getting Started with FileMaker Pro in Mac OS X © 2001 FileMaker, Inc. All rights reserved. FileMaker is a trademark of FileMaker, Inc., registered in the U.S. and other countries. All other trademarks are the property of their respective owners. Mention of third party products and companies is for informational purposes only and does not constitute an endorsement or recommendation.
Contents Getting started with FileMaker Pro in Mac OS X Installing FileMaker Pro System requirements Easy installation Custom installation Where files are stored on your hard disk Adjusting the FileMaker Pro cache Using FileMaker Pro 5.5 in Mac OS X Menu location changes Keyboard command changes Design and functionality changes Status function changes Features not supported in FileMaker Pro 5.
Getting started with FileMaker Pro in Mac OS X This document gives you information on installing and using FileMaker Pro 5.5 in Mac OS X. For new feature information and instructions on installing FileMaker Pro 5.5 on other platforms, see the FileMaker Pro 5.5 Getting Started Guide. Important The FileMaker Pro 5.5 for Mac OS X application is intended for use with Mac OS X only. It will not run under Mac OS 9.x or earlier.
2 Getting started with FileMaker Pro in Mac OS X You see the FileMaker Pro Installer dialog. 4. Follow the steps described in one of the following sections: 1 If you want to install all the available files, continue with “Easy installation.” 1 If you want to install a subset of the FileMaker Pro files, skip to “Custom installation” on page 3. Easy installation Follow these steps to install the complete FileMaker Pro package on your hard disk. To install FileMaker Pro on your hard disk: 1.
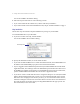
Getting started with FileMaker Pro in Mac OS X 3 Note For late-breaking information about FileMaker Pro, browse the contents of the CD and view the Read Me.txt file or visit www.filemaker.com. 3. Click Install. You see the personalization dialog. Type your name here Type your installation code here 4. In the Name box, type your name and press the Tab key. 5. Type your company name, if applicable, and press Tab.
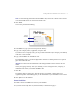
4 Getting started with FileMaker Pro in Mac OS X You see the FileMaker Pro Installer dialog. 2. Choose Custom Install from the pop-up menu. The dialog lists the components you can install. Choose Custom Install Items you can install Click here for information about the selected component Total amount of disk space required for the selected component 3. Select the components you want to install by selecting the checkboxes. 4. Specify the installation location, or use the default location.
Getting started with FileMaker Pro in Mac OS X 5 The installation code is a seventeen-digit number located on a multi-part label on a separate paper sheet within the box. Important You must enter the installation code during installation or the software will not install. Check your typing carefully. After you click OK, you can’t change the name, company, or installation code unless you reinstall FileMaker Pro. 9. Click OK. The Installer begins copying files.
6 Getting started with FileMaker Pro in Mac OS X FileMaker Pro 5.5 Folder File or folder Description Remote Data Access Companion Companion plug-in that enables remote ODBC access to FileMaker Pro TCP/IP OT Network Module that supports the TCP/IP network UKENGLSH.MPR UK Spelling dictionary USENGLSH.MPR US Spelling dictionary USER.
Getting started with FileMaker Pro in Mac OS X 7 FileMaker Pro package contents To view the contents of the FileMaker Pro package, Control-click the FileMaker Pro application icon, and choose Show package contents. Contents folder MacOS MacOS/Themes MacOS/Labels MacOS/FileMaker Templates File or folder Description Info-macos.
8 Getting started with FileMaker Pro in Mac OS X System Folder File or folder Description Resources FileMaker Help Folder containing FileMaker Pro Help system FMApp.icns Icon info for system FMDict.icns Icon info for system FMDoc.icns Icon info for system FMLabels.icns Icon info for system FMLang.icns Icon info for system FMNet.icns Icon info for system FMplug.icns Icon info for system FMPref.icns Icon info for system FMTemp.icns Icon info for system FMTheme.
Getting started with FileMaker Pro in Mac OS X 9 Consider decreasing the cache size if you plan to run several applications at the same time and you have a limited amount of memory (RAM) installed. To change the cache size that FileMaker Pro uses: 1. In FileMaker Pro, choose the FileMaker Pro application menu > Preferences > Application. 2. Click the Memory tab. 3. Type a number in the Attempt cache size of box. 4. Click OK. The next time you start FileMaker Pro, the new cache size is used.
10 Getting started with FileMaker Pro in Mac OS X Keyboard command changes Because Mac OS X reserves the keystrokes Command-M (Minimize) and Command-H (Hide), the keystrokes for the following FileMaker Pro commands have been changed for Mac OS X: Command Old keystrokes New keystrokes Print One Command-Option-T Command-Option-P Lock Command-H Command-Option-H Unlock Command-Shift-H Command-Option-Shift-H Paste Merge Field Command-M Command-Option-M Omit Record Command-M Command-T Omit Mult
Getting started with FileMaker Pro in Mac OS X 11 Design and functionality changes There are new layout themes for using with the Aqua interface. (These themes are also available when you’re running FileMaker Pro under Mac OS 9.x and earlier or in Windows.) Status function changes The following status functions have been changed for Mac OS X: 1 Status(CurrentPrinterName) is not supported. This function returns under Mac OS X. 1 Status(CurrentPlatform) returns -1 under Mac OS X. In Mac OS 9.
12 Getting started with FileMaker Pro in Mac OS X The Send Mail script step is supported using the following applications, which run in the Classic Mac environment: 1 Microsoft Outlook Express 5.0v2 1 Microsoft Entourage 2001 1 Eudora 5 Features with different requirements 1 Mac OS X requires QuickTime 5.0 or higher. 1 Plug-ins used with FileMaker Pro 5.5 for Windows and Mac OS 9.x (and earlier) aren’t compatible with FileMaker Pro for Mac OS X. You must use plug-ins specifically updated for Mac OS X.
Getting started with FileMaker Pro in Mac OS X 13 After you enable the Web Companion, you must specify which port, or virtual connection, the Web Companion will use to publish data. The first time you enable the Web Companion (or if you have previously enabled the Web Companion and are reinstalling FileMaker Pro), FileMaker Pro requests permission to make a one-time change to your computer’s setting to facilitate web publishing on ports below 1024.
14 Getting started with FileMaker Pro in Mac OS X 5. Enter an administrator name and password in the Authenticate dialog, and click OK. The administrator name and password you enter can be the same as the name and password used when Mac OS X was installed, or if you have administrator privileges but do not know an administrator password, you can create a new user and password with administrator privileges.
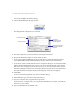
Getting started with FileMaker Pro in Mac OS X 15 4. Click Advanced. 5. Click Change Port. You see the Web Companion Configuration dialog. Note If you click Enter Password in the above dialog, you are brought to the Authenticate dialog and asked to enter an administrator password to enable the use of ports below number 1024, as described in the previous section. 6. Enter a port number between 1024 and 65535 in the TCP/IP Port Number box. Enter the TCP/IP port number here 7.
16 Getting started with FileMaker Pro in Mac OS X Accessing databases that are published to the Web When you publish a database to the Web, your users access that database by entering the host machine’s URL in their web browser. If the FileMaker Pro Web Companion is configured to use port number 80, the default port, the URL your users will enter will look like this: http://12.34.56.78/ The number “12.34.56.78” is an example; in its place, your users would enter the actual URL of your host machine.
Getting started with FileMaker Pro in Mac OS X To use FileMaker Pro 5.5 Help, choose it from the Help Center or from the Help menu in FileMaker Pro. Choose an item from the table of contents or enter text you’d like to search for in the Ask box.