
Installation and New Features Guide (Mac OS)


Installing FileMaker Pro
1-5
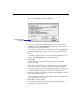
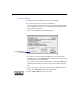
You see the FileMaker Pro Installer dialog box.
1
If you don’t see the name of the hard disk where you want to install
FileMaker Pro, click the
Switch Disk
button, which appears only when you
have more than one volume mounted.
If you switch to a disk that isn’t a hard disk or is locked, the
Install
button
is dimmed and the dialog box tells you why you can’t install onto that
disk.
1
To select the folder in which you want to install the FileMaker Pro 3.0
Folder, click
Select Folder
and select the desired folder.
2.
Click
Install
.
The Installer begins copying files. A dialog box tells you what the
Installer is doing.
You receive a message if the selected drive doesn’t have enough space.
You can delete files in the Finder
to make more room on the disk or
choose not to install some files (like the tutorial or template files) by doing
a custom installation. (See the next section, “Custom installation.”)
3.
Follow the instructions provided on the screen. Click
Stop
if you want to
cancel the installation process.
After all the files are installed, a final dialog box tells you the installation
on your hard disk was successful.
4.
Click
Quit
to leave the Installer.
5.
If you turned off virus protection and file sharing before installing,
remember to turn them back on now.
Disk where FileMaker Pro
will be installed