Contents III Contents Welcome to FileMaker Pro About this guide Using this book Getting customer support V V VI Chapter 1: Installing FileMaker Pro What you need Minimum hardware and software requirements Networking requirements Before you begin Lock the FileMaker Pro disks Turn off virus protection and file sharing Installing FileMaker Pro Installing from the FileMaker Pro CD-ROM disc Installing from the FileMaker Pro floppy disk set Easy installation Custom installation Where files are stored on your
IV FileMaker Pro Installation & New Features Guide New options in Layout mode More powerful file handling Automatic database creation Expanded import and export New ways to limit user access 2-4 2-5 2-5 2-5 2-6 Appendix A: MacIPX control panel Using an Ethernet or token-ring network interface for MacIPX Selecting a frame type Using an AppleTalk interface for MacIPX Setting advanced MacIPX parameters A-1 A-2 A-4 A-6
Welcome to FileMaker Pro Welcome to the FileMaker Pro application from Claris Corporation. FileMaker Pro is designed to help you manage information easily and effectively. This installation guide, the FileMaker Pro User’s Guide, and the onscreen Help system work together to give you the information you need to know as you learn about FileMaker Pro. For a complete description of what’s in the documentation set, see “Getting Help” in the FileMaker Pro User’s Guide.
VI FileMaker Pro Installation & New Features Guide Getting customer support To learn about Claris Technical Support and Claris Customer Assistance, their hours of operation, and their telephone numbers, see the Claris Service Directory included in the product package.
Chapter 1: Installing FileMaker Pro This chapter gives step-by-step instructions for installing the FileMaker Pro application and associated files on your Macintosh computer. Note These instructions assume that you’re familiar with standard mouse techniques such as clicking and dragging. If you need more information about mouse techniques or working with disks, see the documentation that came with your Macintosh.
1-2 FileMaker Pro Installation & New Features Guide Networking requirements To share files among users on a network, you can use AppleTalk, IPX/SPX, or TCP/IP networking. You can use one of the following solutions to share files on a mixed Macintosh and PC network. Macintosh platform Windows platform MacIPX version 1.2.1 IPX/SPX or compatible protocol MacTCP 2.0.6 or later or Open Transport 1.0.
Installing FileMaker Pro 1-3 Installing FileMaker Pro You must use the installation program to install FileMaker Pro—you can’t install the application by dragging files to your hard disk. The FileMaker Pro CD-ROM contains information, such as additional templates and support information, that is not found in the disk set. If you have a CD-ROM drive, you should use the CD-ROM disc; you do not need to use the floppy disks.
1-4 FileMaker Pro Installation & New Features Guide Installing from the FileMaker Pro floppy disk set Important Because the CD-ROM contains additional templates and other information not available on floppy disk, you should install from the floppy disks only if you do not have a CD-ROM drive. To start the FileMaker Pro Installer: 1. Disable virus protection and file sharing if you haven’t already. See “Turn off virus protection and file sharing” on page 1-2 for more information. 2.
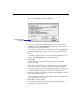
Installing FileMaker Pro 1-5 You see the FileMaker Pro Installer dialog box. Disk where FileMaker Pro will be installed 1 If you don’t see the name of the hard disk where you want to install FileMaker Pro, click the Switch Disk button, which appears only when you have more than one volume mounted. If you switch to a disk that isn’t a hard disk or is locked, the Install button is dimmed and the dialog box tells you why you can’t install onto that disk.
1-6 FileMaker Pro Installation & New Features Guide Custom installation To install a subset of FileMaker Pro files on your hard disk: 1. If you have not done so already, start the Installer. To do so, use the steps described in either “Installing from the FileMaker Pro CD-ROM disc” on page 1-3 or “Installing from the FileMaker Pro floppy disk set” on page 1-4. You see the FileMaker Pro Installer dialog box.
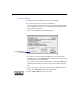
Installing FileMaker Pro 1-7 The dialog box lists the files you can install. Click here for information about the selected file Files you can install Total amount of disk space required for the selected files 3. Click the files you want to install. 4. Click Install. The Installer begins copying files. A dialog box tells you what the Installer is doing. You see a message if the selected drive doesn’t have enough space for the files you select.
1-8 FileMaker Pro Installation & New Features Guide Where files are stored on your hard disk The following table shows the files and folders you can install, and the preferred location for them on your hard disk. If you install onto the current system disk, the FileMaker Pro Installer places all the files you need in their preferred locations. File or folder Description Preferred location on hard disk FileMaker Pro The FileMaker Pro 3.0 application FileMaker Pro 3.
Installing FileMaker Pro 1-9 File or folder Description Preferred location on hard disk XTND enabler Extension that enhances the XTND graphics importing capabilities of Claris products Extensions folder in your System Folder (Power Macintosh only) Personalizing your copy of FileMaker Pro The first time you start FileMaker Pro, you’re asked to supply your name, company name (if applicable), and software registration number.
1-10 FileMaker Pro Installation & New Features Guide 4. Type your company name, if applicable, and press Tab. If you don’t have a company name, you can put other information (like your address) in the box or leave it blank. 5. Type the serial number from your FileMaker Pro registration card. The serial number is optional, but Claris recommends typing it here in case you lose your registration card. You need the serial number if you call Claris Technical Support or Customer Assistance.
Installing FileMaker Pro 1-11 Adjusting memory The Macintosh sets aside a certain amount of memory for FileMaker Pro.
1-12 FileMaker Pro Installation & New Features Guide 3. Choose Get Info from the File menu. You see the FileMaker Pro Info window. Change the amount of memory FileMaker Pro uses here 4. In the Memory Requirements area at the bottom of the window, double- click the Preferred size number and type a number to change the memory allocated for FileMaker Pro. If you can’t type into the box, make sure you’ve quit FileMaker Pro. 5. Click the close box.
Installing FileMaker Pro 1-13 Choosing a network protocol You must choose a network protocol if you want to use FileMaker Pro over a network, either as a guest or as a host. For more information about your network, consult your network administrator. Important The network protocol setting in FileMaker Pro must be the same on the host and guest computers. To choose a network protocol: 1. Choose Preferences from the Edit menu. You see the Preferences dialog box.
1-14 FileMaker Pro Installation & New Features Guide Opening files from previous versions FileMaker Pro 3.0 can open files from FileMaker Pro 1.x or 2.x for Macintosh and FileMaker Pro 2.x for Windows. To use files created with FileMaker Pro 1.x or 2.x, you must convert them to FileMaker Pro 3.x. To convert and open a file: 1. Start FileMaker Pro 3.0. 2. Choose Open from the File menu and select the file you want to convert in the Open dialog box. You see the conversion dialog box. 3.
Installing FileMaker Pro 1-15 Where to go from here After you install FileMaker Pro, you can immediately begin working with the application. Here are some suggestions on where to go in the documentation to get started: 1 If you’re new to databases, read chapter 1, “FileMaker Pro basics,” in the FileMaker Pro User’s Guide to learn basic database concepts. 1 If you’re new to FileMaker Pro, work through the online tutorial, which is automatically copied to your hard disk when you do an Easy Install.
Blank & Blind Page 1-16
Chapter 2: New features in FileMaker Pro This chapter introduces the new features available in FileMaker Pro 3.0. Relational database capability FileMaker Pro 3.0 supports relational features that you can use to display the contents of a field from another database file. You can display records from the related file in a layout of the current file. A relational database is one or more discrete database files that contain all the data you need to do your work.
2-2 FileMaker Pro Installation & New Features Guide FileMaker Pro 3.0 can be used with FileMaker Pro Server 3.0 for enhanced performance and to allow up to 100 guests to share databases. FileMaker Pro Server 3.0 supports simultaneous AppleTalk, IPX/SPX, and TCP/IP networking with both Macintosh and Windows guests. Guests can use the protocol of their choice to network with FileMaker Pro. (AppleTalk networking is not available for Windows guests.
New features in FileMaker Pro 2-3 Browse and Find mode improvements You can now revert changes after you modify a record or a find request. You can save space in a database file by storing graphics by reference. With this feature, you can store a graphic once but display it in many places throughout the database. FileMaker Pro now supports and works with empty found sets. You can replace a field’s contents with other text, serial numbers, or a calculation result.
2-4 FileMaker Pro Installation & New Features Guide 1 specify a custom validation message In addition, you can define new storage options for text, number, date, time, and calculation fields.
New features in FileMaker Pro 2-5 1 use a new context pop-up menu to edit a selection in both Layout and Browse modes Sample data in Layout mode now comes from your own records, so you can design your layouts more accurately. Label layout creation has been simplified. The new interface avoids the need to use sliding. For more information about layouts, see chapter 3, “Laying out and arranging information,” in the FileMaker Pro User’s Guide.
2-6 FileMaker Pro Installation & New Features Guide New ways to limit user access You can disable all or most of the menus using new access privileges, and you can disable the status area using ScriptMaker. For more information see chapter 7, “Networking and access privileges,” and chapter 5, “Using ScriptMaker and buttons,” in the FileMaker Pro User’s Guide.
Appendix A: MacIPX control panel You can use the MacIPX control panel to: 1 select the network interface for your MacIPX-based applications 1 change parameters that MacIPX uses (if necessary) Using an Ethernet or token-ring network interface for MacIPX The MacIPX control panel displays icons for the available network interfaces, such as Ethernet, AppleTalk, and token ring. MacIPX automatically configures itself for the first networking environment it detects when the Macintosh starts.
A-2 FileMaker Pro Installation & New Features Guide 3. Click OK, and then close the MacIPX dialog box. Note MacIPX 1.2.1 supports most Ethernet interface cards, as well as the token-ring interface card from Apple Computer. Selecting a frame type Each packet of information on the network must conform to a specific frame type to communicate with other devices on the network. After you select the network interface, you can let MacIPX select a frame type, or you can select one yourself.
MacIPX control panel A-3 3. Click OK to close the dialog box. When you start up your Macintosh, MacIPX determines the appropriate frame type by monitoring packets on the network. When this option is checked, the buttons for the frame types are unavailable. Note When IPX is using more than one frame type on a network, MacIPX might not choose the frame type you require.
A-4 FileMaker Pro Installation & New Features Guide Using an AppleTalk interface for MacIPX If your Macintosh is connected to an Apple LocalTalk network, you must specify an AppleTalk interface to use MacIPX networking. When you use AppleTalk, you must also select an IPX gateway. Important Novell supplies MACIPXGW.LAN, a LAN driver (IPX gateway) that can be run on Novell NetWare v3.11 or later servers, which lets you use AppleTalk to share information with other computers on the IPX network.
MacIPX control panel A-5 2. In the AppleTalk Access Configuration dialog box, choose an AppleTalk zone that has an IPX gateway. 3. Click Always Auto-Select an IPX Gateway from the Selected Zone. 4. Click OK to close the dialog box. When the Macintosh starts up and detects that it’s connected to an AppleTalk networking interface, such as LocalTalk, it selects an appropriate IPX gateway in the specified zone.
A-6 FileMaker Pro Installation & New Features Guide Setting advanced MacIPX parameters From the MacIPX control panel, you can set other parameters that affect MacIPX operations. Important Only a certified network engineer or administrator should change the advanced parameters. Changing the parameters without a good understanding of their functions can adversely affect the performance of MacIPX. For more information, see your network administrator or contact your Novell dealer.
MacIPX control panel A-7 Use the information in the following tables to set parameters for: 1 1 1 1 MacIPX SPX (Sequenced Packet Exchange) SAP (Service Advertising Protocol) RIP (Routing Information Protocol) MacIPX parameter Function Disable IPX Diagnostic Services Disables the IPX Diagnostic Services, used by some network management tools. Disabling IPX Diagnostic Services can reduce the amount of memory that MacIPX uses.
A-8 FileMaker Pro Installation & New Features Guide SPX parameter Function Minimum Retry Count Specifies the minimum number of times that an SPX packet must be retransmitted. If an application has a retry count setting that is too low, you can override it by setting this parameter. The default value is 0 (zero) times. For the following SAP parameters, you can enter any value between 0 and 9999, but an application can override the values you set.