
ODBC and JDBC Guide


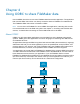
Table Of Contents
- Chapter 1 Introduction
- Chapter 2 Accessing external SQL data sources
- Chapter 3 Installing FileMaker ODBC client drivers
- Hardware and software requirements
- ODBC client access to FileMaker Cloud for AWS
- ODBC client driver architecture overview (Windows)
- ODBC client driver installation (Windows)
- Configuring client drivers (Windows)
- ODBC client driver installation (macOS)
- Configuring client drivers (macOS)
- Where to go from here
- Chapter 4 Using ODBC to share FileMaker data
- Chapter 5 Installing FileMaker JDBC client drivers
- Chapter 6 Using JDBC to share FileMaker data
- Chapter 7 Reference information
- Index
Chapter 3 | Installing FileMaker ODBC client drivers 15
To auto-detect language settings, select the Auto-detect language settings for
application option. To specify the language setting, clear the Auto-detect language
settings for application option and select the system setting you want to use.
For the Multi-byte text encoding option, select System or select UTF-8. For example,
some applications such as Microsoft Excel may expect text to be encoded using the System
encoding, but web applications may expect text to be encoded using UTF-8 encoding. If the
application expects a specific encoding but this option specifies a different encoding, then
the application may display some characters incorrectly. FileMaker software supports UTF-
8 multibyte characters consisting of up to three bytes.
1 Select the Describe text fields as long varchar option to correct issues with long field
values, such as using fields that do not have a maximum length specified in Microsoft Word
Mail Merge import, or field values in PHP applications that are longer than 255 characters. If
you do not use this option for field values longer than 255 characters, then your application
may retrieve an empty string (Windows) or only 255 characters (macOS).
1 If you want to create a log file for long-running queries, select the Save long-running
queries to a log file option, and enter the name for the log file.
Click Finish to save your data source information.
8. Review the information about your FileMaker DSN.
1 Click Test to verify that you have correctly configured the ODBC client driver to access the
FileMaker data source.
If you receive an error message, you can correct the connection information. You may also
need to check that the FileMaker Pro database file is hosted and available, that the
FileMaker file account specified uses a privilege set with the fmxdbc extended privilege for
access via ODBC/JDBC, and that the FileMaker Server, FileMaker Pro, or FileMaker Cloud
host application has been set up for sharing via ODBC/JDBC.
1 Click Done to save your data source information.
ODBC client driver installation (macOS)
The client driver is installed to the /Library/ODBC folder.
To install the ODBC client driver:
1. Do one of the following:
1 If you received your software electronically, double-click the disk image icon (.dmg file).
1 If you have an installation disk, insert the disk into the drive.
2. In the FileMaker Pro or FileMaker Server window, double-click the Extras folder.
3. Double-click the xDBC folder.
4. In the xDBC folder, double-click the ODBC Client Driver Installer folder.
5. In the ODBC Client Driver Installer folder, double-click FileMaker ODBC.pkg.
6. Install the ODBC client driver by following the onscreen instructions.