
WebDirect Guide
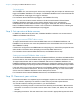


Table Of Contents
- Chapter 1 Introducing FileMaker WebDirect
- Chapter 2 Designing a FileMaker WebDirect solution
- Step 1: Plan your FileMaker WebDirect solution
- Step 2: Understand the capabilities of FileMaker WebDirect
- Step 3: Optimize performance
- Step 4: Design layouts for mobile browsers
- Step 5: Set the solution icon and options for layouts, views, and tools
- Step 6: Set up tasks for web users
- Step 7: Enable users to log out of the solution
- Step 8: Review the functions, scripts, and script triggers in your solution
- Step 9: Set up external data sources
- Step 10: Document your solution
- Chapter 3 Publishing a FileMaker WebDirect solution
- Chapter 4 Testing, monitoring, and securing a solution
- Appendix A Design considerations
- Index

Chapter 3
Publishing a FileMaker WebDirect solution
You can share layouts from your database on the web dynamically with FileMaker WebDirect and
FileMaker Server. If your server computer is connected to a LAN or WAN, you can share your
File
Maker WebDirect solution without requiring additional software.
Follow these steps to publish and manage a FileMaker WebDirect solution.
Sharing a FileMaker WebDirect solution
To publish a database on the web as a FileMaker WebDirect solution, use FileMaker Pro to
determine which user accounts can access the solution from a web browser and then upload the
database to FileMaker Server.
Choosing which users can access a solution
For web users to access a FileMaker WebDirect solution, each database file must be configured
to allow access to one or more privilege sets.
1. Open
the database in FileMaker Pro.
2. Ch
oose File menu > Sharing > Configure for FileMaker WebDirect.
FileMaker WebDirect Settings dialog box in FileMaker Pro
Choose a file to
share on the web
Specify which
users can access a
published solution
Suppress the filename in
FileMaker WebDirect
Launch Center
3. Choose the filename to publish on the web from the list of open files.