
User manual
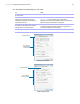
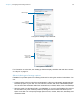
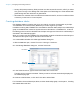
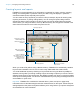

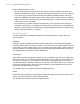
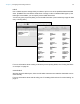


Table Of Contents
- Contents
- Chapter 1 Introducing FileMaker Pro
- Chapter 2 Using FileMaker Pro
- About fields and records
- Opening and closing files
- Opening multiple windows per file
- Saving files
- About modes
- Viewing records
- Adding and duplicating records
- Deleting records
- Entering data
- Working with data in Table View
- Finding records
- Sorting records
- Previewing and printing files
- Backing up files
- Setting preferences
- Chapter 3 Designing and creating solutions
- Planning a solution
- Creating a FileMaker Pro file
- Creating and changing fields
- Setting options for fields
- Creating database tables
- Creating layouts and reports
- Working with layout themes
- Working with layout object, part, and background styles
- Setting up a layout to print records in columns
- Working with objects on a layout
- Working with fields on a layout
- Working with layout parts
- Creating and editing charts
- Chapter 4 Working with related tables and files
- Chapter 5 Sharing data
- Sharing databases on a network
- Importing and exporting data
- Supported import/export file formats
- Setting up recurring imports
- ODBC and JDBC
- Methods of importing data into an existing file
- About adding records
- About updating existing records
- About updating matching records
- About the importing process
- Converting a data file to a new FileMaker Pro file
- About the exporting process
- Working with external data sources
- Publishing solutions on the web
- Chapter 6 Protecting files
- Protecting databases with accounts and privilege sets
- Creating accounts and privilege sets
- Viewing extended privileges
- Authorizing access to files
- Security measures
- Enhancing physical security
- Enhancing operating system security
- Establishing network security
- Backing up databases and other important files
- Installing, running, and upgrading antivirus software
- Chapter 7 Using FileMaker Pro Advanced
- Index
Chapter 3 | Designing and creating solutions 59
Labels layouts and Envelopes layouts use merge fields, which are placeholder fields for displaying
and printing only; you can’t enter data into merge fields. Merge fields expand and contract to fit
the data in the field as needed, and close up space if the field is empty. (See
“About merge fields”
on page 75.)
Setting up the layout
1. In Layout mode, click New Layout/Report.
The New Layout/Report assistant appears. For onscreen help as you use the assistant, press
F1 (Windows) or Command-? (OS
X) in each panel.
2. Choose a table, and type a name for the layout.
3. Choose Printer, then choose either Labels (for data that reads top to bottom horizontally) or
Vertical Labels (for data that reads right to left vertically).
For an Envelopes layout, choose Printer, choose Envelopes, and click Continue. Then skip
to “Choosing and formatting the merge fields,” below.
4. Click Continue.
5. In the Specify Label Layout panel, specify the measurements of your mailing labels:
1 To choose a predefined measurement based on common label types, for Use label
measurements for, choose the code that matches your labels. (This information is on the
package your labels came in.)
1 To specify a custom measurement, choose Use custom measurements, and enter values
for Labels across the page, Width, and Height. Measure the unused margins on the label
stock. Then select Fixed page margins and enter values for Top, Bottom, Left, and Right.
6. Click Next.
Choosing and formatting the merge fields
1. In the next panel, for the Available fields list, double-click the first field whose data you want
on the labels or envelope.
<<field name>> appears in the Label contents or the Envelope contents area. Angle
brackets indicate that this is a merge field, and field data will display in and print on the labels
or envelope.
To include fields from related tables, choose the table from Available fields.
2. Continue selecting fields.
3. Include all punctuation, blank spaces, and line breaks (to place a merge field on the next line)
that you want printed.
4. Click Finish.
Printing the labels or envelope
1. Load the labels or the envelope into your printer.
2. Choose File menu > Print, specify options, and click Print.