
User manual
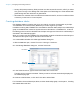
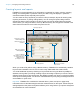

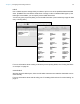


Table Of Contents
- Contents
- Chapter 1 Introducing FileMaker Pro
- Chapter 2 Using FileMaker Pro
- About fields and records
- Opening and closing files
- Opening multiple windows per file
- Saving files
- About modes
- Viewing records
- Adding and duplicating records
- Deleting records
- Entering data
- Working with data in Table View
- Finding records
- Sorting records
- Previewing and printing files
- Backing up files
- Setting preferences
- Chapter 3 Designing and creating solutions
- Planning a solution
- Creating a FileMaker Pro file
- Creating and changing fields
- Setting options for fields
- Creating database tables
- Creating layouts and reports
- Working with layout themes
- Working with layout object, part, and background styles
- Setting up a layout to print records in columns
- Working with objects on a layout
- Working with fields on a layout
- Working with layout parts
- Creating and editing charts
- Chapter 4 Working with related tables and files
- Chapter 5 Sharing data
- Sharing databases on a network
- Importing and exporting data
- Supported import/export file formats
- Setting up recurring imports
- ODBC and JDBC
- Methods of importing data into an existing file
- About adding records
- About updating existing records
- About updating matching records
- About the importing process
- Converting a data file to a new FileMaker Pro file
- About the exporting process
- Working with external data sources
- Publishing solutions on the web
- Chapter 6 Protecting files
- Protecting databases with accounts and privilege sets
- Creating accounts and privilege sets
- Viewing extended privileges
- Authorizing access to files
- Security measures
- Enhancing physical security
- Enhancing operating system security
- Establishing network security
- Backing up databases and other important files
- Installing, running, and upgrading antivirus software
- Chapter 7 Using FileMaker Pro Advanced
- Index

Chapter 3 | Designing and creating solutions 55
Keep the following points in mind:
1 If you are designing solutions for use with FileMaker Go or FileMaker WebDirect, see the
design guidelines in FileMaker
Go Development Guide or FileMaker WebDirect Guide.
1 If you intend to print the new layout in landscape orientation or on a special paper size, in
Browse or Layout mode, choose File menu
> Print Setup (Windows) or File menu >
Page
Setup (OS X), confirm the orientation and paper settings, then click OK. Modified Print
Setup and Page Setup settings affect all other layouts in the current file, so you may need to
change these settings later to print other layouts properly.
1 You can easily manage the layouts and layout folders in your file using the Manage Layouts
dialog box. For example, add, delete, and duplicate layouts and folders, open multiple layouts,
and change the order in which layouts and folders appear in the Layout pop-up menu.
To create a layout:
1. In Layout mode, click New Layout/Report in the status toolbar.
Or, in Browse mode, choose File menu > Manage > Layouts, and click New.
You see the New Layout/Report assistant, which helps you create a layout. As you make your
choices, additional options are presented to you. For example, if you choose Custom Device,
you can specify a width and height for the device. For some types of layouts, such as labels,
envelopes, and reports, you see additional panels.
2. If the file has multiple tables, for Show records from, choose a table.
3. For Layout Name, give the layout a name.
4. Choose the type of layout to create.
For a description of each layout type, see “About layout types,” below.
5. Depending on the layout type you choose, additional options may become available.
6. When you have finished making your choices, click Finish to create the layout.
7. For layouts designed for computers or touch devices, add fields to the layout.
See “Creating and changing fields” on page 43.
To Do this
See an onscreen Help topic that explains the
choices in the current panel
Windows: Press F1 (Windows) or Command-? OS X).
If the layout you’re creating has additional panels (such as
for labels, envelopes, or reports), you can also click
(Windows) or (OS X) to get information about those
panels.
Accept the settings in the panel and continue to the
next panel (available for labels, envelopes, and
reports layouts)
Click Continue or Next.
Accept the settings in the panel but go back to the
previous panel (available for labels, envelopes,
and reports layouts)
Click Back.
Close the assistant without saving any of your
choices
Click Cancel.