
User manual


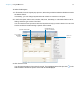
Table Of Contents
- Contents
- Chapter 1 Introducing FileMaker Pro
- Chapter 2 Using FileMaker Pro
- About fields and records
- Opening and closing files
- Opening multiple windows per file
- Saving files
- About modes
- Viewing records
- Adding and duplicating records
- Deleting records
- Entering data
- Working with data in Table View
- Finding records
- Sorting records
- Previewing and printing files
- Backing up files
- Setting preferences
- Chapter 3 Designing and creating solutions
- Planning a solution
- Creating a FileMaker Pro file
- Creating and changing fields
- Setting options for fields
- Creating database tables
- Creating layouts and reports
- Working with layout themes
- Working with layout object, part, and background styles
- Setting up a layout to print records in columns
- Working with objects on a layout
- Working with fields on a layout
- Working with layout parts
- Creating and editing charts
- Chapter 4 Working with related tables and files
- Chapter 5 Sharing data
- Sharing databases on a network
- Importing and exporting data
- Supported import/export file formats
- Setting up recurring imports
- ODBC and JDBC
- Methods of importing data into an existing file
- About adding records
- About updating existing records
- About updating matching records
- About the importing process
- Converting a data file to a new FileMaker Pro file
- About the exporting process
- Working with external data sources
- Publishing solutions on the web
- Chapter 6 Protecting files
- Protecting databases with accounts and privilege sets
- Creating accounts and privilege sets
- Viewing extended privileges
- Authorizing access to files
- Security measures
- Enhancing physical security
- Enhancing operating system security
- Establishing network security
- Backing up databases and other important files
- Installing, running, and upgrading antivirus software
- Chapter 7 Using FileMaker Pro Advanced
- Index

Chapter 2 | Using FileMaker Pro 29
To configure and enable quick find
If the selected layout doesn’t show the quick find badges for supported fields in Layout mode, use
the following steps.
1. In Layout mode, choose View menu > Show > Quick Find.
A small badge next to each field shows if the field has been enabled for quick find. If there is no
quick find badge next to a field, the field is not searchable, either because it is not supported for
quick find or because it is not set to be included in the search. A gray badge
indicates that
the layout is disabled for quick find. A green badge indicates that the field is searchable. A
yellow badge indicates that the field is searchable, but the search might take longer than
fields with the green badge.
2. Select one or more fields.
3. Click Inspector in the layout bar, then click Data.
4. In the Behavior area, select Include field for Quick Find.
5. To enable quick find, click Layout Setup in the layout bar. In the Layout Setup dialog box,
select Enable Quick Find, then click OK.
Making find requests in Find mode
When you perform a find in Find mode, you type criteria (the value or values to find) into fields in
a find request, which looks like a blank record. FileMaker
Pro searches through all the records in
a table, comparing the criteria you specify with the data in the table.
Records with data matching the criteria become the found set, which is the subset of records being
browsed. Records that don’t match are omitted. You can constrain (narrow) or extend (broaden)
the found set in Find mode.
You can work with just the records in the found set. For example, you can view, edit, calculate
summaries for, sort, print, delete, export, or replace data in these records. You can also open a
new window in order to perform different find requests on the same data.
You can save the found set of records and email it as a snapshot link.
You cannot perform a find in summary fields, container fields, or fields defined with the global
storage option.
Note In Find mode, a badge indicates a searchable field.