
Installation and New Features Guide


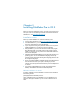


Table Of Contents
- Chapter 1 Before you begin
- About this guide
- Where to find FileMaker documentation
- Customer Support and Knowledge Base
- Product notifications
- About the license key
- Requirements for features in Windows
- Requirements for features in OS X
- Converting the trial version to the full version of FileMaker Pro
- Upgrading FileMaker Pro from a previous version
- Opening files from previous versions
- Updating your User Dictionary
- Installing under a volume license
- Chapter 2 Installing FileMaker Pro in Windows
- Chapter 3 Installing FileMaker Pro in OS X
- Chapter 4 New features
- New user interface for creating scripts and calculations
- New Launch Center window for opening files
- Improved layout design tools and controls
- New themes and improved style handling
- Improved performance and usability
- Script steps, script triggers, and functions
- Changed and removed features
- FileMaker Pro 14 Advanced
- Chapter 5 Where to go from here

13
Installing FileMaker Pro
You must use the installation program to install FileMaker Pro—you can’t
install FileMaker
Pro by dragging files to your hard disk.
To install FileMaker Pro on your hard disk:
1. Do one of the following:
1 If you received your software electronically, after downloading the
file for the 32- or 64-bit version of FileMaker
Pro, double-click the
installation icon (.exe file).
1 If you are installing FileMaker Pro using a DVD, insert the DVD
into your DVD drive, open the DVD window, then click the
installation icon to install the 32-bit version.
To install the 64-bit version, click the browse icon, open the 64-bit
folder, then double-click Setup.exe.
2. Install FileMaker Pro by following the onscreen instructions.
For details, see “Installation notes” on page 11.
3. When the installation is complete, the Product Registration dialog box
appears.
Click to install
the 32-bit
application
Click to exit
Click to browse
and view the
contents of the
DVD