
WebDirect Guide
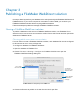

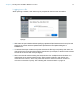
Table Of Contents
- Chapter 1 Introducing FileMaker WebDirect
- Chapter 2 Designing a FileMaker WebDirect solution
- Step 1: Plan your FileMaker WebDirect solution
- Step 2: Understand the capabilities of FileMaker WebDirect
- Step 3: Optimize performance
- Step 4: Design layouts for multiple screen sizes
- Step 5: Set default options for layouts, views, and tools
- Step 6: Set up tasks for web users
- Step 7: Enable users to log out of the solution
- Step 8: Review the functions, scripts, and script triggers in your solution
- Step 9: Document your solution
- Chapter 3 Publishing a FileMaker WebDirect solution
- Chapter 4 Working with a FileMaker WebDirect solution
- Requirements for accessing FileMaker WebDirect solutions
- Accessing a FileMaker WebDirect solution
- Working with data in FileMaker WebDirect
- Logging out of a database and closing a web session
- Using external ODBC data sources in FileMaker WebDirect
- Using external FileMaker data sources in FileMaker WebDirect
- Chapter 5 Testing, monitoring, and securing a solution
- Appendix A Design considerations
- Appendix B Changes in FileMaker 13 WebDirect Guide
- Index
Chapter 3 | Publishing a FileMaker WebDirect solution 24
To upload a database using FileMaker Pro:
1. Choose File menu > Sharing > Upload to FileMaker Server.
The Upload to FileMaker Server dialog box appears.
2. In the Hosts list, choose the host you want to upload files to.
Or, for Host Address, type the host’s IP address or domain name (as host.domain.com).
3. Enter your FileMaker Server Admin Console name and password, then click Next.
4. Click Browse, select the database file that you want to upload, and click Open.
5. Select Automatically open databases (on server) after upload to make your
FileMaker
WebDirect solution available immediately after the upload.
6. Click Upload.
FileMaker Pro updates the status for each file to indicate whether the upload was successful.
7. Click Done.
Changing FileMaker WebDirect settings in Admin Console
To change language and connection settings, run FileMaker Server Admin Console on a machine
that has network access to the FileMaker
Server deployment that is hosting your solution.
Note For a full description of Admin Console features and functionality, see FileMaker Server
Help.
To start Admin Console:
1. Open a web browser and enter:
https://<host>:16000/
where <host> is the IP address or domain name of the master machine in your
FileMaker
Server deployment.
Before the FileMaker Server Start Page appears, your web browser may ask you to respond to
a security message. This is normal behavior for the self-signed certificate that is included with
FileMaker
Server. Select the option to continue. For information about using certificates with
FileMaker
Server, see FileMaker Server Help.
2. Click Start Admin Console.
3. Enter the name and password for the Admin Console account, then click Log In.
Admin Console starts and displays the Status pane.