
User manual

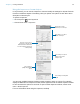

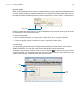

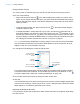
Table Of Contents
- Chapter 1 Introducing FileMaker Pro
- Chapter 2 Using databases
- About database fields and records
- Opening files
- Opening multiple windows per file
- Closing windows and files
- Saving files
- About modes
- Viewing records
- Adding and duplicating records
- Deleting records
- Entering data
- Working with data in Table View
- Finding records
- Performing quick finds in Browse mode
- Making find requests in Find mode
- Finding text and characters
- Finding numbers, dates, times, and timestamps
- Finding ranges of information
- Finding data in related fields
- Finding empty or non-empty fields
- Finding duplicate values
- Finding records that match multiple criteria
- Finding records except those matching criteria
- Viewing, repeating, or changing the last find
- Saving find requests
- Deleting and reverting requests
- Hiding records from a found set and viewing hidden records
- Finding and replacing data
- Sorting records
- Previewing and printing databases
- Automating tasks with scripts
- Backing up database files
- Setting preferences
- Chapter 3 Creating databases
- Planning a database
- Creating a FileMaker Pro file
- Creating and changing fields
- Setting options for fields
- Creating database tables
- Creating layouts and reports
- Working with layout themes
- Setting up a layout to print records in columns
- Working with objects on a layout
- Working with fields on a layout
- Working with layout parts
- Working with layout object, part, and background styles
- Creating and editing charts
- Chapter 4 Working with related tables and files
- Chapter 5 Sharing and exchanging data
- Sharing databases on a network
- Importing and exporting data
- Saving and sending data in other formats
- Sending email messages based on record data
- Supported import/export file formats
- Setting up recurring imports
- ODBC and JDBC
- Methods of importing data into an existing file
- About adding records
- About updating existing records
- About updating matching records
- About the importing process
- Converting a data file to a new FileMaker Pro file
- About the exporting process
- Working with external data sources
- Publishing databases on the web
- Chapter 6 Protecting databases
- Protecting databases with accounts and privilege sets
- Creating accounts and privilege sets
- Viewing extended privileges
- Authorizing access to files
- Security measures
- Enhancing physical security
- Enhancing operating system security
- Establishing network security
- Backing up databases and other important files
- Installing, running, and upgrading antivirus software
- Chapter 7 Converting databases from FileMaker Pro 11 and earlier
- Index

Chapter 3 | Creating databases 88
Selecting objects
To work with an object on a layout, select it in Layout mode. You see small squares, or handles,
surrounding the selected object.
Note If an object’s selection handles display as , the object is locked.
To select an object, click the selection tool in the status toolbar. The pointer becomes an arrow
pointer. Then do one of the following.
For more information about working with objects on a layout, see Help.
To In Layout mode, do this
Select one object With the arrow pointer, click the object. (If the object is transparent, click its border.)
Select several objects
at once
Drag the arrow pointer to make a selection box that includes the objects. The selection
box does not have to completely surround the objects. To avoid including partially selected
objects, press Ctrl (Windows) or 2 (OS
X) as you drag.
Or, press Shift as you click each object individually.
Select all objects on the
layout
Choose Edit menu > Select All.
Select all objects of the
same type (for
example, all text
objects or all
rectangles)
Click the tool for the type of object to select, then choose Edit menu > Select All. This
method does not select buttons.
Or, with the arrow pointer, click a field, press Shift (Windows) or Option (OS X), and
choose Edit menu > Select All (Windows) or Select Same (OS X).
Select all fields With the arrow pointer, click a field, press Shift (Windows) or Option (OS X), and choose
Edit menu > Select All (Windows) or Select Same (OS X).
Select a portal With the arrow pointer, click the border of the portal, or any other area within the portal that
doesn’t contain a field or object.
Select tab controls or
slide controls, tab
panels or slide panels,
and objects on tab
panels or slide panels
See Help for information on creating and working with tab controls and slide controls.
Select popover
buttons, popovers, and
objects on popovers
See Help for information on creating and working with popover buttons and popovers.
Deselect selected
objects
Click a blank area of the layout or any tool in the status toolbar. Or, press Shift and click
selected objects.
Handles surround a selected object