
User manual
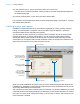

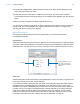


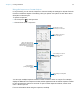
Table Of Contents
- Chapter 1 Introducing FileMaker Pro
- Chapter 2 Using databases
- About database fields and records
- Opening files
- Opening multiple windows per file
- Closing windows and files
- Saving files
- About modes
- Viewing records
- Adding and duplicating records
- Deleting records
- Entering data
- Working with data in Table View
- Finding records
- Performing quick finds in Browse mode
- Making find requests in Find mode
- Finding text and characters
- Finding numbers, dates, times, and timestamps
- Finding ranges of information
- Finding data in related fields
- Finding empty or non-empty fields
- Finding duplicate values
- Finding records that match multiple criteria
- Finding records except those matching criteria
- Viewing, repeating, or changing the last find
- Saving find requests
- Deleting and reverting requests
- Hiding records from a found set and viewing hidden records
- Finding and replacing data
- Sorting records
- Previewing and printing databases
- Automating tasks with scripts
- Backing up database files
- Setting preferences
- Chapter 3 Creating databases
- Planning a database
- Creating a FileMaker Pro file
- Creating and changing fields
- Setting options for fields
- Creating database tables
- Creating layouts and reports
- Working with layout themes
- Setting up a layout to print records in columns
- Working with objects on a layout
- Working with fields on a layout
- Working with parts on a layout
- Creating and editing charts
- Chapter 4 Working with related tables and files
- Chapter 5 Sharing and exchanging data
- Sharing databases on a network
- Importing and exporting data
- Saving and sending data in other formats
- Sending email messages based on record data
- Supported import/export file formats
- Setting up recurring imports
- ODBC and JDBC
- Methods of importing data into an existing file
- About adding records
- About updating existing records
- About updating matching records
- About the importing process
- Converting a data file to a new FileMaker Pro file
- About the exporting process
- Working with external data sources
- Publishing databases on the web
- Chapter 6 Protecting databases
- Protecting databases with accounts and privilege sets
- Creating accounts and privilege sets
- Viewing extended privileges
- Authorizing access to files
- Security measures
- Enhancing physical security
- Enhancing operating system security
- Establishing network security
- Backing up databases and other important files
- Installing, running, and upgrading antivirus software
- Chapter 7 Converting databases from FileMaker Pro 11 and earlier
- Index

Chapter 3 | Creating databases 78
5. On the layout, you see vertical lines indicating columns.
6. Place or arrange fields and other layout objects so they are contained within the sample column
on the left.
Use merge fields or fields or objects with sliding enabled to fit more data into the width of a
column. With either of these two features, fields can extend into the gray area of the second
column, and blank space in fields is eliminated when you view or print data.
Changing the width of columns
The initial width of each column is calculated based on the paper size, orientation, and any
margins you have set. To change the width of columns, do one of the following:
If you change the number of columns, FileMaker Pro adjusts the width of the columns to fit within
the width of the paper size you have defined, not including fixed margins. You may need to
readjust fields to fit within the sample column.
For more information about setting up a layout to print records, see Help.
To Do this
Interactively adjust the width of
the columns
Drag the right column boundary (the vertical dashed line at the right edge of the
sample column). If you widen the column, you see a medium-gray area that
indicates a “gutter” area that won’t print.
Precisely measure and adjust the
width of the columns
Click Inspector in the layout bar. Click Position. Position the pointer over
the right column boundary, hold down the mouse button (be careful not to drag
the column width), and read the column Width value in the Size area.
Manually resize column
widths by dragging
Sample column