
User manual
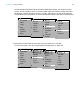
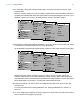


Table Of Contents
- Chapter 1 Introducing FileMaker Pro
- Chapter 2 Using databases
- About database fields and records
- Opening files
- Opening multiple windows per file
- Closing windows and files
- Saving files
- About modes
- Viewing records
- Adding and duplicating records
- Deleting records
- Entering data
- Working with data in Table View
- Finding records
- Performing quick finds in Browse mode
- Making find requests in Find mode
- Finding text and characters
- Finding numbers, dates, times, and timestamps
- Finding ranges of information
- Finding data in related fields
- Finding empty or non-empty fields
- Finding duplicate values
- Finding records that match multiple criteria
- Finding records except those matching criteria
- Viewing, repeating, or changing the last find
- Saving find requests
- Deleting and reverting requests
- Hiding records from a found set and viewing hidden records
- Finding and replacing data
- Sorting records
- Previewing and printing databases
- Automating tasks with scripts
- Backing up database files
- Setting preferences
- Chapter 3 Creating databases
- Planning a database
- Creating a FileMaker Pro file
- Creating and changing fields
- Setting options for fields
- Creating database tables
- Creating layouts and reports
- Working with layout themes
- Setting up a layout to print records in columns
- Working with objects on a layout
- Working with fields on a layout
- Working with parts on a layout
- Creating and editing charts
- Chapter 4 Working with related tables and files
- Chapter 5 Sharing and exchanging data
- Sharing databases on a network
- Importing and exporting data
- Saving and sending data in other formats
- Sending email messages based on record data
- Supported import/export file formats
- Setting up recurring imports
- ODBC and JDBC
- Methods of importing data into an existing file
- About adding records
- About updating existing records
- About updating matching records
- About the importing process
- Converting a data file to a new FileMaker Pro file
- About the exporting process
- Working with external data sources
- Publishing databases on the web
- Chapter 6 Protecting databases
- Protecting databases with accounts and privilege sets
- Creating accounts and privilege sets
- Viewing extended privileges
- Authorizing access to files
- Security measures
- Enhancing physical security
- Enhancing operating system security
- Establishing network security
- Backing up databases and other important files
- Installing, running, and upgrading antivirus software
- Chapter 7 Converting databases from FileMaker Pro 11 and earlier
- Index
Chapter 3 | Creating databases 51
4. After you’ve identified your categories of information, you are ready to organize your database.
In database terminology, these categories of information are referred to as tables. Tables are
used to group data containing a common element or purpose. For example, you might use one
table to store names and addresses, while you use another table to store transaction details,
such as date of sale, item number, unit price, and so on.
Typically, databases are organized in one of three ways:
1 A single table in a single file. Use a single table if you need to track data in one category only,
such as names and addresses.
1 Multiple tables in a single file. Use multiple tables if your data is more complex, such as
students, classes, and grades.
1 Multiple tables in multiple files. Use multiple files if you need to share the same data among
several different database solutions. For example, you can store your tax rates or shipping
information in a separate file if you plan to use that information in more than one solution.
Note Use relationships to share data between tables in the same file or with tables in external
files. Other database elements, such as scripts and access privileges, are stored at the file
level; therefore, some complex solutions will benefit from using multiple files.
5. Determine the database tables and the data they will include, and, in turn, which fields you will need.
Tip To make it easy to search and sort records, create separate fields for first and last name,
titles, (like Mr. or Dr.), and items in addresses (city, state or province, country, and postal code).
Separating your data into multiple fields at the time of data entry can make it easier to generate
future reports. For example, using separate fields to capture transaction details such as the
date, item number, quantity, and unit price of each transaction makes it easier to compile
summary and subsummary reports at the end of a week, month, or year.
6. Decide which fields will contain common data among the tables.
For example, a database for a bakery business might include these tables: a Customers table,
which stores customer information; a Products table, which stores product information; and an
Invoices table, which stores order information.
Each table has only one subject, and all fields in a table describe only that subject. For example,
the fields in one record of the Customers table together store all the information about one
customer. For the same reason, you might assign each customer a unique, identifying number.
You wouldn’t enter a customer identification number into the table unless you had a new
customer to add, so the existence of a customer number determines the existence of a record.
A Customers table might also have fields for the customer’s name, address and phone number.