FileMaker ® Pro 12 User’s Guide
© 2007–2012 FileMaker, Inc. All Rights Reserved. FileMaker, Inc. 5201 Patrick Henry Drive Santa Clara, California 95054 FileMaker and Bento are trademarks of FileMaker, Inc. registered in the U.S. and other countries. The file folder logo and the Bento logo are trademarks of FileMaker, Inc. All other trademarks are the property of their respective owners. FileMaker documentation is copyrighted.
Contents Chapter 1 Introducing FileMaker Pro About this guide Using FileMaker Pro documentation Where to find PDF documentation Online Help Templates, examples, and more information Suggested reading FileMaker Pro overview Creating simple or complex databases Using layouts to display, enter, and print data Finding, sorting, and replacing data Protecting databases Creating scripts to automate tasks Sharing and exchanging data Saving and sending data in other formats Chapter 2 Using databases About database
Finding records Performing quick finds in Browse mode Making find requests in Find mode Finding text and characters Finding numbers, dates, times, and timestamps Finding ranges of information Finding data in related fields Finding empty or non-empty fields Finding duplicate values Finding records that match multiple criteria Finding records except those matching criteria Viewing, repeating, or changing the last find Saving find requests Deleting and reverting requests Hiding records from a found set and
Creating layouts and reports About layout types Working with layout themes Setting up a layout to print records in columns Setting up columns in a layout Changing the width of columns Working with objects on a layout Using the Inspector to format objects Using the Inspector to position objects Using tools to precisely position objects Selecting objects Working with fields on a layout Placing and removing fields on a layout Setting up checkbox sets and other controls on a layout Deciding where to place re
Importing and exporting data Saving and sending data in other formats Sending email messages based on record data Supported import/export file formats Setting up recurring imports ODBC and JDBC Methods of importing data into an existing file About adding records About updating existing records About updating matching records About the importing process Converting a data file to a new FileMaker Pro file About the exporting process Working with external data sources Publishing databases on the web Chapter
Chapter 1 Introducing FileMaker Pro FileMaker® Pro is the leading workgroup database software for quickly creating and sharing solutions adapted to your business needs. Powerful features, broad platform support, and an easy-to-use interface make FileMaker Pro indispensable for anyone who needs to track and manage people, projects, and information.
Chapter 1 | Introducing FileMaker Pro 8 Online Help FileMaker Pro Help provides comprehensive step-by-step instructions on FileMaker Pro features. You can open Help from the Help menu in FileMaker Pro. There are three ways to access Help: 1 Browse the Help table of contents to locate topics by subject. 1 Search for particular topics by entering keywords. 1 Get information about the currently displayed dialog box by pressing F1 (Windows) or 2-? (Mac OS).
Chapter 1 | Introducing FileMaker Pro 9 FileMaker Pro overview Here is an overview of the capabilities of FileMaker Pro. Creating simple or complex databases With FileMaker Pro you can create simple databases consisting of just one database table, such as an address list, or you can create a complex database with relationships and multiple database tables. For example, you can create a complex database that relates two tables based on a single common value, such as a serial number or an ID number.
Chapter 1 | Introducing FileMaker Pro 10 Choose different layout types in the New Layout/Report assistant. Use these different layout types for various purposes, like displaying a data entry screen or printing a totaled sales report or formatting data as mailing labels. You can customize each layout further by using the design tools that are available in Layout mode.
Chapter 1 | Introducing FileMaker Pro 11 Protecting databases You can restrict what users see and do in a database file by defining accounts and privilege sets. Accounts authenticate users who are attempting to open a protected file. Each account specifies an account name and (usually) a password. Any user that cannot specify valid account information won’t be able to open a protected file. A privilege set specifies a level of access to a database file.
Chapter 1 | Introducing FileMaker Pro 12 You can quickly and easily publish FileMaker Pro layouts as web pages, which allows anyone with a web browser on your intranet (or the internet) to access your FileMaker Pro databases. With FileMaker Pro accounts and privilege sets and other security features, you can make your web databases secure. For more information about sharing and exchanging data, see chapter 5, “Sharing and exchanging data.
Chapter 2 Using databases This chapter explains the basics of how to: 1 1 1 1 1 1 1 1 1 open, close, and save files create records in a database add and edit data in fields find records using different criteria omit records from the found set find and replace data sort data print data, scripts, table and field information, and the relationships graph use scripts See Help for detailed, comprehensive information and step-by-step procedures about using FileMaker Pro.
Chapter 2 | Using databases 14 B C Records Michelle Cannon 123 4th St. SW Edmonton Fields CAN N4V 1LN (717) 555-0011 Your address book is like a database An invoicing system is an example of a more complex database, with multiple related tables, multiple layouts, and calculated fields. You can also view a subset of your data; for example, view only invoices for a particular month.
Chapter 2 | Using databases 15 To enter data in a database table, you make a new record and enter values into the fields that belong to that record. Values can be typed into a field, imported from another application, or entered in a number of other ways. FileMaker Pro also allows you to access and view data that is stored in non-FileMaker Pro files.
Chapter 2 | Using databases 16 2. When the FileMaker Quick Start Screen appears, do one of the following: Do this To Click Recent Files in the box at the center of the Quick Start Screen Display a list of FileMaker Pro files that you have recently opened.
Chapter 2 | Using databases 17 Keep these points in mind: 1 If you have Show recently opened files selected in the General preferences, files you have recently accessed appear in the File menu’s Open Recent list and in the Recent Files list in the FileMaker Quick Start Screen. See Help for information about adding local or remote files to the Favorite Files list in the FileMaker Quick Start Screen. 1 To open and share a file, see “Enabling file sharing and hosting files” on page 116.
Chapter 2 | Using databases 18 Opening multiple windows per file You can open more than one window per file. This allows you to view the same layout in separate windows, or simultaneously view different layouts in the same file. You can perform find or sort operations independently in the different windows. To open an additional window, choose Window menu > New Window. Another window appears. Initially, the window displays the same layout, sort order, and found set as the previously active window.
Chapter 2 | Using databases 19 Closing windows and files You can close FileMaker Pro windows and files as you would in most Windows and Mac OS applications. To close a window, do one of the following: 1 1 1 1 Windows: Double-click the document icon in the upper-left corner of the document window. Windows: Click the close box in the upper-right corner of the document window. Mac OS: Click the red close button in the upper-left corner of the document window. Choose File menu > Close.
Chapter 2 | Using databases 20 5. For Save a (Windows) or Type (Mac OS), choose one of the following options: Choose To Copy of current file Duplicate the entire file, including the tables, field definitions, layouts, scripts, page setup options, and data. Duplicating a file is useful before you make extensive changes to the file. Compacted copy (smaller) Compact the entire file into less disk space by reclaiming unused space in the file.
Chapter 2 | Using databases 21 About modes You work with data in FileMaker Pro in Browse, Find, Layout, or Preview mode. You can choose a mode from the View menu or from the mode pop-up menu at the bottom of the document window. Mode pop-up menu Use this mode To Browse mode Work with the data in a file. You can add, view, change, sort, omit (hide), and delete records. Browse mode is where you’ll do most of your work, such as data entry.
Chapter 2 | Using databases 22 The following illustration shows the same layout in three views.
Chapter 2 | Using databases 23 Selecting the active record In Browse mode, a table has one active (selected) record at a time for each window. For more information about working with multiple windows, see “Opening multiple windows per file” on page 18. In this view The active record is Form View The record that you’re displaying. List View The record that’s marked with a solid bar along the left side. To work with another record, click in the record to make it active.
Chapter 2 | Using databases 24 Moving through records To move from one record to another, use the book in the status toolbar. Book Current record number Number of records in the table Type search words for quick finds Slider To move Do this To the next record in the current table Click the right page of the book or choose Records menu > Go to Record > Next. To the previous record in the current table Click the left page of the book or choose Records menu > Go to Record > Previous.
Chapter 2 | Using databases 25 If the field is defined to automatically enter field values, you see those values entered in the new record. See “Defining automatic data entry” on page 66. To enter or change values in the new record, see “Entering and changing data in fields” on page 27. Adding and duplicating related records If you’re working with records in related tables, you can add records to a related table when you enter data in a record in the current table.
Chapter 2 | Using databases 26 Deleting records When you delete a record, you permanently discard the data in all the fields in that record. Important You can’t retrieve deleted data, and you can’t undo the action of deleting records. Before you delete records, consider making a backup copy of your file. If you’re working in a relational database and the option to delete related records is selected in the Edit Relationship dialog box, FileMaker Pro deletes related records when you delete a record.
Chapter 2 | Using databases 27 Entering and changing data in fields You can enter or import data up to the character limit for the field type. You can view and print only the data that fits within the field boundaries. Note For information about how FileMaker Pro uses system formats to display and sort dates, times, and numbers, see Help. To Click in the field in Browse mode, then Enter data in a text field Type the text (up to 1 billion characters).
Chapter 2 | Using databases 28 To Click in the field in Browse mode, then Insert an audio, video, image, PDF, or other type of file in a container field For information, see Help. Add data to value lists (fields formatted as radio or option buttons, checkboxes, lists, or menus) For information, see “Setting up checkbox sets and other controls on a layout” on page 87. Edit, format, or check the spelling of text in a field or edit dictionaries For information, see Help.
Chapter 2 | Using databases 29 To Do this Display a different background color for alternating records Right-click the left or right margin of a record, then choose a color from the Alternate Color shortcut menu. Restore the default display settings Right-click a column heading and choose Table View > Reset from the shortcut menu. Note Resetting Table View doesn’t delete the fields and records.
Chapter 2 | Using databases 30 Finding records To find particular records in your database, you can: 1 perform a quick find in Browse mode (see “Performing quick finds in Browse mode” on page 30) 1 make a find request in Find mode (see “Making find requests in Find mode” on page 31) Performing quick finds in Browse mode If a layout is enabled for quick find in Browse mode, you can use the search box in Browse mode to search for data across multiple fields on the layout.
Chapter 2 | Using databases 31 To configure and enable quick find In Layout mode, if the selected layout doesn’t show the quick find badges for supported fields, use the following steps. 1. In Layout mode, choose View menu > Show > Quick Find. A small badge next to each field shows if the field has been enabled for quick find.
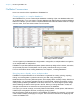
Chapter 2 | Using databases 32 You can use the Insert Operators list in the layout bar to help you enter criteria. You can click Omit to exclude records matching a specific set of criteria. A badge indicates you can search on the field Type find criteria in fields Choose a layout with fields you want to search on Click to see operators 3. Click Perform Find. Your find request returns a found set of records.
Chapter 2 | Using databases 33 Finding text and characters Search for text in text fields, or in calculation fields that return a text result. Unless you search for phrases and exact matches, the field can contain other values in addition to the one(s) you specify, and the values can be in any order. For example, typing hotel in a field named Accommodation finds records for Hotel, Discount Hotel, and Hotel, Luxury.
Chapter 2 | Using databases 34 To find Type this in the field Examples Exact matches of the text you specify (match entire field) == (two equal signs) for a field content match ==John finds John but not John Smith ==John Smith finds John Smith but not Smith, John or John Smithers Exact matches of whole words you specify (match whole word) = =Market finds Market, Market Services, and Ongoing Market Research but not Marketing or Supermarket =Chris =Smith finds Chris Smith or Smith Chris but not Chri
Chapter 2 | Using databases 35 To find Type this in the field Examples A date in a date field or in a calculation field that produces a date result The date as digits, separated by a valid date separator character (such as a slash or hyphen) 3/3/2014 finds 3/3/2014, March 3, 2014, and 3-3-2014 Today’s date in a date field or in a calculation field that produces a date result // // finds April 4, 2014 (when the current date is 4/4/2014) A time in a time field or in a calculation field that produce
Chapter 2 | Using databases 36 Finding ranges of information To find values that are Use this operator Examples Less than a specified value < <40 <9/7/2014 >95129 >9/7/2014 >M Greater than or equal to a specified value >= or ≥ (Mac OS) >=100 >=9/7/2014 ≥8:00 ≥M Within the range you specify. A range is different based on the data type: 1 Numbers: least to greatest .. or ...
Chapter 2 | Using databases 37 To find timestamps Type this in the field That occur on a Monday in 2015 =Mon 2015 From the 10th through the 16th of November 2015 and from 3:00 PM to less than 6:00 PM (if the date format is MM/DD/YYYY) 11/{10..16}/2015 {3..5} PM Finding data in related fields You can enter find criteria in related fields that are displayed in a portal or directly on a layout.
Chapter 2 | Using databases 38 Finding duplicate values You can find all records for which one or more fields contain duplicate values. For example, you might want to find all records that aren’t unique, then examine them to decide which records to use or delete. To find all duplicate records, in Find mode, type ! in the field. Finding records that match multiple criteria You can narrow or broaden your search by using more than one criterion.
Chapter 2 | Using databases 39 Extending (broadening) a found set You can broaden a found set to expand your search to include additional applicable records without starting over. For example, after searching for customers in New York, you can broaden the search to also find customers in Hong Kong: 1. Perform a find to find customers in New York. FileMaker Pro displays the found set in Browse mode. 2. Click Find and type the criteria to broaden the search (type Hong Kong in the City field). 3.
Chapter 2 | Using databases 40 4. Click Omit. 5. Click Perform Find. Keep these points in mind: 1 You can have omit criteria in more than one request. 1 FileMaker Pro works through the requests in the order you create them.
Chapter 2 | Using databases 41 Hiding records from a found set and viewing hidden records All records that are not in the found set are omitted, or hidden. You can omit additional records from the found set without doing a new find. Important Omitted records are temporarily excluded from the found set. They still exist in the database. To Do this Omit a specific record Display or select the record to omit, then click Omit in the layout bar.
Chapter 2 | Using databases 42 Select To An option in Search across In Browse mode, search across all records in the current layout or just in the current record. In Find mode, search across all find requests in the current layout or just in the current find request. Note In Layout mode, FileMaker Pro searches just in the current layout. An option in Search within In Browse and Find modes, search within all fields in the current layout or just in the current field. 4.
Chapter 2 | Using databases 43 To choose a sort field that is in the current layout’s table, whether or not it is on the current layout, choose Current Table (TableName) from the table list, then double-click a field in the list. For information about sort options, see Help. 3. Click Sort. To cancel before sorting is finished, press Esc (Windows) or 2-period (Mac OS). Note You can sort records on one field without opening the Sort dialog box by using the field’s shortcut menu.
Chapter 2 | Using databases 44 Previewing data on a layout When you switch to Preview mode, you see the layout as it appears on the printed page. You can’t enter or edit information in fields in Preview mode.
Chapter 2 | Using databases 45 7. In the Print dialog box, for Print, choose an option (Windows) or choose FileMaker Pro from the pop-up menu (Mac OS).
Chapter 2 | Using databases 46 There are three general steps for creating and printing labels: 1. Create a Labels layout. 2. Set up the merge fields. 3. Print the labels. Tip If you need help as you use the New Layout/Report assistant, click the Help button in each panel. Creating a Labels layout 1. Open the file that contains the data you want to print on labels. 2. Find the records containing the data you want to print on labels. 3. Choose File menu > Manage > Layouts. 4.
Chapter 2 | Using databases 47 Previewing and printing labels 1. In the next panel: 1 To see how the data will appear on the labels before printing them, select View in Preview mode, and click Finish. 1 To edit the labels, select View in Layout mode, and click Finish. 2. To print labels from Browse, Layout, or Preview modes, load the labels into your printer according to the instructions that came with your labels and your printer.
Chapter 2 | Using databases 48 4. Click OK (Windows) or Print (Mac OS). The field names, field types, and formulas or data entry options are printed for each selected table. Printing the relationships graph You can print a graphical representation of your database by printing the relationships graph. 1. Choose File menu > Manage > Database, then click the Relationships tab. 2. Click to display page breaks in the relationships graph. 3.
Chapter 2 | Using databases 49 Backing up database files Routine backups are strongly recommended for any document stored on a computer. It is easier to restore a backed up database than it is to re-create it. How often you should back up depends on the amount of data you are adding to your databases, and how difficult it would be to re-create your files if they become corrupt. For very important files, it’s a good idea to routinely store backups at an offsite location.
Chapter 3 Creating databases This chapter explains the basics of how to: 1 1 1 1 1 plan a database define and modify fields define tables create layouts work with fields, objects, and parts on a layout Note See Help for detailed, comprehensive information and step-by-step procedures about using FileMaker Pro. Planning a database A well-designed database promotes consistent data entry and retrieval, and reduces the existence of duplicate data among the database tables.
Chapter 3 | Creating databases 51 4. After you’ve identified your categories of information, you are ready to organize your database. In database terminology, these categories of information are referred to as tables. Tables are used to group data containing a common element or purpose. For example, you might use one table to store names and addresses, while you use another table to store transaction details, such as date of sale, item number, unit price, and so on.
Chapter 3 | Creating databases 52 A Products table might have fields for a product identification number, the unit price for each product, and the quantity in stock. A Line Items table might have fields for product and invoice identification numbers, the name, unit price, quantity, and total price of each product sold. An Invoices table might have fields for an invoice identification number, order date, and salesperson.
Chapter 3 | Creating databases 53 8. For each table, decide which fields will store data, and which ones will be used from other (related) tables. Based on a table’s subject, you can see where it makes sense to store the data and where to use data from a related table. Other than match fields, all fields should appear only once in your database. Cross out occurrences of fields that don’t pertain to the table’s subject.
Chapter 3 | Creating databases 54 12. Consider who will use the database and whether you want to restrict access to it. When you create the database, assign access privileges as needed. For more information about accounts and privilege sets, see chapter 6, “Protecting databases.” 13. Decide what layouts you need, and plan a separate layout for each task. For example, create separate layouts for printing labels or envelopes.
Chapter 3 | Creating databases 55 3. Select a solution from the list (Windows) or the group of thumbnails (Mac OS), then click Choose. 4. Type a name for the file (choose a different folder, if needed), then click Save. Windows: For Save as type, select FileMaker Files. FileMaker Pro creates the file on your disk and opens the file. You can modify fields and layouts in Starter Solutions. For more information, see the remaining sections in this chapter. Creating a blank, empty file 1.
Chapter 3 | Creating databases 56 7. Type the data for your record. For information on tasks such as deleting, duplicating, and sorting records, see “Working with records in Table View” on p. 28. 8. Continue adding fields and records to your database. FileMaker Pro saves changes to your data as you work. To see how your data looks in other views, click Form View or List View in the layout bar. 9. You can set field options such as validation or indexing when you define a field, or at a later time.
Chapter 3 | Creating databases 57 1 Use _ (underscore) in place of a space to avoid restrictions in ODBC (Open Database Connectivity) or JDBC (Java Database Connectivity), exporting, web publishing, and other operations. 1 If you’re exchanging data with another application, check the field naming restrictions in the file formats supported by the other application. 1 If you’re using ODBC or JDBC to share FileMaker Pro data, avoid using SQL keywords in field names.
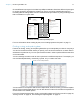
Chapter 3 | Creating databases 58 Sales Report Salesperson Item Qty Extended Price David Michaels David Michaels David Michaels David Michaels FB3 FB4 FB1 FB5 1 1 2 3 Total $93.85 Sophie Tang Sophie Tang Sophie Tang FB6 FB7 FB2 2 5 2 $39.00 $77.50 $45.00 Total Grand Total $3.95 $17.50 $19.90 $52.50 $161.50 $255.
Chapter 3 | Creating databases 59 Creating and changing fields To define a new field, you give it a name and select a field type. Then you select options that determine how the field interprets, enters, calculates, stores, and displays data. These characteristics make up the field definition. Product ID FB11 Product Name Focaccia Category Breads Flavor Plain Herb This field stores multiple values Unit Price $6.95 This field stores only numbers Discount $1.
Chapter 3 | Creating databases 60 5. For Type, select a field type. See “About choosing a field type” on page 57. You can enter a description of the field in the Comment box. For more information about creating calculation fields, see “Creating calculation fields” on page 61. For more information about creating summary fields, see “Creating summary fields” on page 63. For more information about creating container fields, see Help. 6. Click Create if you’re creating a new field.
Chapter 3 | Creating databases 61 Creating and changing fields in Table View Important Changing the field type can permanently and irretrievably erase data. 1. With the database open, in Browse mode, click Table View in the layout bar. 2. Create new fields or change existing fields. To Do this in Table View Create a field To create the first field, click Create Field in the first column heading. To create additional fields, click + in the column heading, or click in the right margin.
Chapter 3 | Creating databases 62 4. Build a formula for your calculation. Click where you want the item to appear in the formula box, then do the following. You can also type the formula into the box. To add a Do this Reference to a field In the field list, double-click a field name. To display field names from another table, choose a table from the table list. Mathematical or text operator In the keypad in the dialog box, click an operator.
Chapter 3 | Creating databases 63 To Do this Set the field type of the result Choose a data type for Calculation result is . Choose the correct type for the result you want. See “About choosing a field type” on page 57. Make a calculated field repeating Select Number of repetitions, then type the number of repetitions. Prevent calculation if all referenced fields are empty Select Do not evaluate if all referenced fields are empty.
Chapter 3 | Creating databases 64 3. In the Options for Summary Field dialog box, select a summary type, then select the name of the field you want to group by. Select this type of summary To summarize values in a field in the found set of records by Total of Calculating the total of values in the field Average of Calculating the average of values in the field Count of Counting the number of records that contain a value for the field.
Chapter 3 | Creating databases 65 For this summary type Select To Standard Deviation of by population Calculate population standard deviation, where the formula is n-weighted Fraction of Total of Subtotaled. In the list of fields that appears, select a field to group by. (When you return to Browse mode, sort by this field to calculate the value correctly.) Calculate a fraction of the total based only on a group of records 5. Select an option, if applicable, for summarizing a repeating field.
Chapter 3 | Creating databases 66 Some field options help ensure the accuracy and consistency of your data. For example, if you type Frnc instead of France into the Country field, you won’t find that record when you later search for all customers from France. To be sure that all country names are entered correctly, you can define a value list containing the names, then select the Member of value list validation option for the Country field.
Chapter 3 | Creating databases 67 Click Auto-Enter Select options for entering default data in the field 6. Click OK to close the Options for Field dialog box, or click another tab to set additional field options. Defining field validation You can select field validation options to ensure that data is entered into the field correctly. FileMaker Pro displays a message if you enter data incorrectly.
Chapter 3 | Creating databases 68 To require that the entered value Select Is a time containing numeric values for hours and minutes between 00:00 and 23:59 (seconds are optional) Strict data type, then choose Time of Day from the list Is not blank Not empty Does not duplicate a value found in this field in other records Unique value Matches another value in the same field in any other record Existing value Matches a value in a specified value list Member of value list, then choose an existing
Chapter 3 | Creating databases 69 About indexing and storage options FileMaker Pro provides options for indexing fields and for storing the results of calculations. You can: 1 Create an index, which is a list of the values stored in a field. An index greatly speeds searches, but takes up space on your disk. You can index text, number, date, time, and timestamp fields. You can also index calculation fields if the results are text, numbers, dates, times, or timestamps.
Chapter 3 | Creating databases 70 The options in the Storage tab change for a container field. . Select storage options for a container field Storage options for container fields For more information about setting field options, see Help. Creating database tables Use database tables to organize and group your data by a common characteristic or principle. Your database can contain as many tables as you need to organize your data.
Chapter 3 | Creating databases 71 3. In the Table Name box, type a name for the table, then click Create. The table can be renamed or deleted. Tables you add to a file are automatically displayed in the relationships graph. 4. Continue to define tables, or click the Fields tab to define fields. For information about relationships, tables, and the relationships graph, see chapter 4, “Working with related tables and files.
Chapter 3 | Creating databases 72 Tab Control tool Click to dislay another tab panel Tab control You create additional layouts by switching to Layout mode and using the New Layout/Report assistant, a wizard that guides you through creating a layout according to options you choose. Use the different layout types for various purposes, like displaying a data entry screen or printing a totaled sales report or mailing labels.
Chapter 3 | Creating databases 73 2. If the file has multiple tables, select the table from which you want records displayed in this layout and give the layout a name. 3. Follow the onscreen instructions to create the type of layout you chose in the first panel. For a description of each of the layout types you can create with the assistant, see “About layout types.” 4. When you have completed the series of panels, click Finish.
Chapter 3 | Creating databases 74 You can also view summary data in Table View, which lets you group your data by one or more columns (fields) and check subtotals for each group of grand totals for the table. The summary results recalculate and update in real time when you change data values in Table View. You can also create charts directly from Table View. For more information on creating dynamic reports and quick charts, see Help.
Chapter 3 | Creating databases 75 Labels Use a Labels layout to arrange fields you select to print on one of the predefined standard label sizes. (FileMaker Pro includes the dimensions of a large number of standard label types.) If the label type you want isn’t available, you can specify custom label dimensions. With the Vertical Labels layout, Asian and full-width characters are rotated so that labels can be used vertically.
Chapter 3 | Creating databases 76 Envelope Use an Envelope layout to print the fields you select, arranged to print on a standard “Number 10” business envelope. For more information about creating an Envelope layout and printing on envelopes, see “Printing labels and envelopes” on page 45. Working with layout themes Use FileMaker Pro themes to enhance the appearance of a layout or report and to give all your layouts a consistent look.
Chapter 3 | Creating databases 77 1 If you’re creating a layout to be used with Instant Web Publishing, choose the Classic theme. Only the Classic theme is supported in Instant Web Publishing. Some FileMaker Pro features may not display in databases published on the web. For more information, see the FileMaker Instant Web Publishing Guide and the FileMaker Knowledge Base (visit http://help.filemaker.com).
Chapter 3 | Creating databases 78 5. On the layout, you see vertical lines indicating columns. 6. Place or arrange fields and other layout objects so they are contained within the sample column on the left. Use merge fields or fields or objects with sliding enabled to fit more data into the width of a column. With either of these two features, fields can extend into the gray area of the second column, and blank space in fields is eliminated when you view or print data.
Chapter 3 | Creating databases 79 Working with objects on a layout An object is a discrete element—a field, text, a graphic object (such as an oval or imported picture), a button, a portal (for displaying rows of related records), a tab control, a chart, or a web viewer—that you can select, move, resize, delete, copy, format, or otherwise change. Place objects on a layout to enhance its design. For each type of object you work with, you use specific tools from the status toolbar.
Chapter 3 | Creating databases 80 Using the Inspector to format objects In Layout mode, you can use the Inspector to view and modify the settings for objects. Each tab focuses on a different aspect of formatting. Hold your pointer over options in each tab to see a description of what they do. To open the Inspector: 1 Click Inspector in the layout bar. 1 Choose View menu > Inspector.
Chapter 3 | Creating databases 81 Using the Inspector to position objects Use the Inspector to precisely position or size objects on a layout. Or you can set objects to automatically resize or move horizontally or vertically when the FileMaker Pro window is resized. Horizontal settings also apply to Preview mode and printing when the page size is wider than the size of the layout being viewed or printed.
Chapter 3 | Creating databases 82 Allowing objects to resize or move on the layout When layout objects are set to resize, they maintain a constant distance from the object to which they are anchored. This allows objects to move, expand, or contract when the FileMaker Pro window is resized. Anchor points are either the layout margin or the container margin in which an object resides. By default, objects are anchored on both the top and left sides of the layout or page.
Chapter 3 | Creating databases 83 To show or hide the grid, do one of these: 1 In the Inspector, click the Position tab. In the Grid area, select or deselect Show grid. 1 Choose View menu > Grid > Show Grid. To hide the grid, choose Show Grid again. Guides Guides help you align objects within the same layout and across multiple layouts. To Do this Create a vertical guide Drag out from the vertical ruler. (If the ruler isn’t displayed, select View menu > Rulers.
Chapter 3 | Creating databases 84 Screen stencils You can display guides that help you design layouts optimally for iPad, iPhone, and common desktop resolutions. You can also create screen stencils with custom dimensions. To display a screen stencil, click the arrow on Screen Stencil in the layout bar, then choose a size from the drop-down list. You can display more than one screen stencil at a time on the same layout. To create a screen stencil, choose Custom Size from the menu.
Chapter 3 | Creating databases 85 To select In Layout mode, do this Tab controls, tab panels, and objects in tab panels See Help for information on creating and working with tab controls. Deselect selected objects Click a blank area of the layout or any tool in the status toolbar. Or, press Shift and click selected objects. For more information about working with objects on a layout, see Help.
Chapter 3 | Creating databases 86 Placing a field on a layout 1. In Layout mode, choose the layout you want to work with from the Layout pop-up menu. 2. Do one of the following: 1 Drag a field from the Field tool in the status toolbar to the position you want it on the layout. As you drag the field onto the layout, you see a border and text baselines to help you align the field with other objects on the layout. Release the mouse button when the field is where you want it.
Chapter 3 | Creating databases 87 Removing a field from a layout In Layout mode, click the field to select it, then press Backspace or Delete, or choose Edit menu > Clear. Removing a field from a layout does not delete the field or its data from your database. Setting up checkbox sets and other controls on a layout You can format fields to display as drop-down lists, pop-up menus, checkboxes, radio buttons, and drop-down calendars.
Chapter 3 | Creating databases 88 5. Choose options for the value list, if desired. If you selected Drop-down list for the Control Style, you can select Include arrow to show and hide list if you want to format the field as a combo box. An arrow control appears in the edit box. Users click the arrow or press Esc to show or hide the drop-down list. To allow users to enter values other than those defined by the value list, select Allow editing of value list or Allow entry of other values.
Chapter 3 | Creating databases 89 Formatting field data on a layout Use FileMaker Pro field formats to control how data appears on a layout. The formats you specify don’t change the data as it’s stored in the database, and you can specify different formats each time you place a field on a layout (whether it’s on the same layout or a different layout). For example, if you enter –5123 into a number field, you can format it in one place to display as –$5,123.00 and in another place as <5123>.
Chapter 3 | Creating databases 90 3. Select the formats you want to use. Use the Text area to format the style, size, font, or color of the text or make text highlighted, bold, italic, or underlined. Use the Paragraph area to set paragraph alignment, indenting, and line spacing for fields. Use the Tabs section to position and align tab stops, and create a leader character to fill the width of the tab indention.
Chapter 3 | Creating databases 91 Specifying formats for fields containing numbers You can control how FileMaker Pro displays the values in number fields, calculation fields with numeric results, and summary fields. 1. In Layout mode, select one or more fields that display numeric values. 2. Click Inspector in the layout bar, then click Data. 3. In the Data Formatting area, click Number . 4.
Chapter 3 | Creating databases 92 4. Select the date format you want to use from the Format list, then select additional formats for the date field. Choose options for day, month, date, year, and separator characters Choose options for displaying Japanese dates 5. Press Enter or Tab, or click outside the Inspector to apply the changes. For more information about specifying formats for date fields, see Help.
Chapter 3 | Creating databases 93 Only two options affect the display of the seconds component: Fixed number of decimal digits and Decimal (to the right of Separators). The remaining options have no effect. Choose to display times as entered, in a predetermined format, or in a format you specify Choose options for displaying Japanese times 6. Press Enter or Tab, or click outside the Inspector to apply the changes. For more information about specifying formats for time fields, see Help.
Chapter 3 | Creating databases 94 Specifying formats for container fields You can control how FileMaker Pro displays images and file icons in container fields. Note The following instructions also apply to formatting graphic objects that you insert onto a layout. 1. In Layout mode, select one or more container fields or inserted graphics. 2. Click Inspector in the layout bar, then click Data. 3. In the Data Formatting area, click Graphic , then select the formats you want to use.
Chapter 3 | Creating databases 95 1. In Layout mode, select one or more fields. 2. Click Inspector in the layout bar, then click Data. 3. In the Behavior area, for Field entry, select the following options: To Do this Prevent entry into a field in Browse mode Clear Browse mode. Prevent entry into a field in Find mode Clear Find mode. Select the entire field's contents when the field is entered Choose Select entire contents on entry.
Chapter 3 | Creating databases 96 The New Layout/Report assistant automatically creates the appropriate layout parts depending on the choices you make. You can add, change, or delete layout parts after you finish the assistant as needed. (See “Creating layouts and reports” on page 71.
Chapter 3 | Creating databases 97 To include summary data on a layout (for example, subtotals, grand totals, averages, counts, and so on), you place summary fields in summary layout parts (see “Creating summary fields” on page 63). Summary parts include grand summary and subsummary parts. 1 A grand summary part usually contains one or more summary fields that display summary information (like totals) about all records being browsed.
Chapter 3 | Creating databases 98 Creating a chart The following steps describe how to create a quick chart, which FileMaker Pro sets up for you based on the field(s) you’ve selected in Browse mode. When you create a quick chart, FileMaker Pro sets up the chart based on the selected fields, field type, the contents of the active field, and the sort order you specified. Note You can also create charts in Layout mode. For more information about creating charts in Layout mode, see Help.
Chapter 3 | Creating databases 99 4. You can choose settings in the Chart inspector on the right to modify the chart, and preview the result of your changes in the Chart Setup dialog box. To Do this Add a title to the chart With the Chart options displayed, for Title, type or change the chart title, or click to specify a title. For example, “Accounts by Company.” Choose a chart type and specify the data series For Type, choose a chart type. For example, choose Pie.
Chapter 4 Working with related tables and files This chapter explains the basics of how to: 1 plan a relational database 1 create and edit relationships 1 create and edit lookups FileMaker Pro uses related tables as the basis for relational databases and lookups. Relational databases allow you to work with data from other tables dynamically, so that when you change data in one place, your changes are reflected in all places where the related data appears.
Chapter 4 | Working with related tables and files 101 About relationships A relationship is a powerful method for organizing your data. Using a relationship, you can join data in one or more tables based on common field values, different field values, or a comparison of values in two or more fields.
Chapter 4 | Working with related tables and files 102 For example, a database for a bakery might have these tables: a Products table, which stores information about bakery products and their current prices; a Customers table, which stores customer information such as customer names and contact information; an Invoices table, which keeps a record of each order; and a LineItems table, which stores sales data for each line of the invoice, including the item being sold and the price at which it is sold.
Chapter 4 | Working with related tables and files 103 Term Description Lookup source field (for lookups only) The field in the related table that contains the data you want copied during a lookup. Match field A field in the current table and a field in a related table that each contains values used to access matching records. (A match field is sometimes called a key field.) For each relationship, you select one or more match fields in each table.
Chapter 4 | Working with related tables and files 104 Because each relationship represents an additional set of criteria, you must be aware of your context within the relationships graph. Context is the point in the graph from which a relationship is evaluated. Because the graph is never a cycle, each point along the graph offers a different perspective into your data.
Chapter 4 | Working with related tables and files 105 Use a single-criteria relationship when you want to relate two tables based on a single common value, such as a serial number or an ID number. For example, a database has two tables: Customers, which stores names and addresses, and Contacts, which stores phone numbers, types of phone numbers (such as work, home, fax, and so on), and email addresses.
Chapter 4 | Working with related tables and files 106 Multi-criteria relationships In a multi-criteria relationship, you increase the number of match fields, which increases the criteria that FileMaker Pro evaluates before successfully joining related records. In a multi-criteria relationship, FileMaker Pro compares the values from each match field on each side of the relationship in the order in which the fields appear.
Chapter 4 | Working with related tables and files 107 Table Field name Comment Catering Line Items Customer ID Number field; one of the match fields to the Customers table Event Date Date field; the other match field to the Customers table Equipment ID Number field Because the relationship is defined to allow the creation of related records in the Catering Line Items table, you will be able to enter catering information in an empty portal row, and FileMaker Pro will automatically create a relate
Chapter 4 | Working with related tables and files 108 Relationships that return a range of records A relationship that returns a range of records is similar to a multi-criteria relationship, except that you use comparative operators to find records that are greater than one of your criteria and less than your other criteria. This type of relationship is commonly used to return records that fall between a range of dates or serial numbers.
Chapter 4 | Working with related tables and files 109 When you define a self-joining relationship in the relationships graph, FileMaker Pro generates a second occurrence of the table upon which you are basing the self-join. FileMaker Pro does this to prevent the relationships graph from forming a cycle, which would make it impossible to evaluate the relationship.
Chapter 4 | Working with related tables and files 110 5. Repeat step 4 for each match field you intend to use in this relationship. For more information about match fields, see “About match fields for relationships” on page 104. 6. Click OK to save your changes and close the relationships graph. Click once to collapse all but the match fields. Click again to collapse all but the table name.
Chapter 4 | Working with related tables and files 111 Or, you can select the relationship in the graph and click dialog box. to open the Edit Relationship Select the relational operator Select options for the tables in the relationship 4. Edit tables and match fields for the relationship. To Do this Change a match field Select the new match field and click Change. Add a match field Select the new match field and click Add.
Chapter 4 | Working with related tables and files 112 Summarizing data in portals You can summarize data that’s in a related field displayed in a portal. The portal can contain records from a related table or from the same table (a self-join). To summarize data in portals: 1. Create a calculation field in the table in which you want the total to be displayed. 2. For the calculation field, define a formula that includes an aggregate function for the type of summary calculation you want to perform.
Chapter 4 | Working with related tables and files 113 After a value is copied into the lookup target field, you can edit, replace, or delete it like any other value (because the lookup value belongs to the current table). You can also update data in the current table to match data that changes in the related table. Records in related table Current table Relationship Customer ID Name C200 Smith Customer ID City Lookup target field C235 Name Customer ID C100 Phone 42.83.91.
Chapter 4 | Working with related tables and files 114 10. Select options for the lookup. To Do this Specify an action when values in the match fields do not match exactly For If no exact match, then, select an option to copy no value, copy the next lower or next higher value that’s in the lookup source field, or enter a fixed value to be used instead Prevent null (empty) data in the lookup source field from being copied to the lookup target field Select Don’t copy contents if empty.
Chapter 5 Sharing and exchanging data This chapter explains the basics of how you can share FileMaker Pro databases: 1 FileMaker Network Sharing: You can share FileMaker Pro databases on your network, which allows multiple FileMaker Pro and FileMaker Go users to access and use the same database file simultaneously. 1 Importing and exporting data: You can exchange information between FileMaker Pro and other applications by importing and exporting data.
Chapter 5 | Sharing and exchanging data 116 The host opens the file Clients open connections to the shared file Once a shared file is open, the host and clients have access to the same information, and all changes to the file appear in each user’s window. Modifications to the data made by any user are saved in the shared file. The shared file is saved on the disk where the file resides. Sort orders, find requests, import and export field orders, and print setups are specific to each user.
Chapter 5 | Sharing and exchanging data 117 3. In the FileMaker Network Settings dialog box, for Network Sharing, click On. In the TCP/IP Address box, you see the TCP/IP address of your system. Click to enable network sharing Select level of network access for the selected file(s) 4. Select the file(s) to be hosted from the list of Currently open files. 5. Set the level of network access for the file(s). To Select Provide access to all FileMaker Pro and FileMaker Go users on your network All users.
Chapter 5 | Sharing and exchanging data 118 2. In the Open Remote File dialog box, select View for a list of hosts. Choose To display Favorite Hosts Hosts you previously added as favorites Local Hosts FileMaker Pro hosts on your TCP/IP subnet Hosts Listed by LDAP FileMaker Pro hosts available through the specified LDAP server 3. To see the available files from a host, select the host. In the Available Files list, select the file you want to open.
Chapter 5 | Sharing and exchanging data 119 Database change Limitation Data sources Two people can’t modify or define the same data source at the same time. One person can edit a data source reference while another person is using the external file. Accounts and privileges Two people can’t modify or define accounts and privileges at the same time. One person can create or modify an account and privileges while another person is using it.
Chapter 5 | Sharing and exchanging data 120 To close a hosted file: 1. On the computer hosting the file, choose File menu > Close. 2. If any clients have the shared file open, you see a dialog box listing those clients. Click Ask to send a message to these clients requesting that they close the file. 3. Clients see a dialog box requesting that they close the file.
Chapter 5 | Sharing and exchanging data 121 Supported import/export file formats Every application stores its data files in its own file type or file format. Most applications can also exchange information in certain other formats. FileMaker Pro can import and/or export files in these formats, followed by their filename extensions: Microsoft Excel (.xls, .xlsx), tab-separated text (.tab, .txt), comma-separated values (.csv, .txt), FileMaker Pro 12 (.fmp12), Merge (.mer), HTML table (.htm), and XML (.xml).
Chapter 5 | Sharing and exchanging data 122 9. If you are importing data from an Excel file, you can import data by worksheet or by named range. To Do this Import data by worksheet Select Display worksheets, select the worksheet you want to import, then click Continue. Import data by named range, one worksheet or named range per layout Select Display named ranges, select the named range you want to import, then click Continue. 10. The new layout appears in Browse mode in Table View.
Chapter 5 | Sharing and exchanging data 123 About adding records When you add records, you import all records from the source file to the target file or table. A new record is created in the target file for each importable record in the source file. About updating existing records With this option, you replace data in your file with data from the source file.
Chapter 5 | Sharing and exchanging data 124 About the importing process The basic steps for importing records are: 1. Make a backup copy of the target file you’re importing into. 2. If the source file is a FileMaker Pro file, perform a find so that the found set in the current window contains only the records you want to import. 3. Open the target file, and if it has multiple tables, select a layout that shows records from the table you want to import data into.
Chapter 5 | Sharing and exchanging data 125 1 Converted field names if they are available in the file or source you convert. Otherwise, field names are generic: f1, f2, f3, and so on. 1 Converted field types if they are available in the file or source you convert. Otherwise, all fields are text fields. To import data into a new file: 1. In the source application, save the data you want to import in a file type that FileMaker Pro supports. See “Supported import/export file formats” on page 121. 2.
Chapter 5 | Sharing and exchanging data 126 7. Select whether or not to apply the current layout’s formatting to the exported data. To export related fields, select the related table from the list Select fields from this list FileMaker Pro exports these fields Select whether or not to apply formatting For more information about exporting data, see Help.
Chapter 5 | Sharing and exchanging data 127 Publishing databases on the web With FileMaker Pro, you can use Instant Web Publishing to publish your databases in a web browser, allowing users to find, browse, and modify data in the database. Using Instant Web Publishing with FileMaker Pro accounts and privilege sets, you can make your web databases secure. Note FileMaker Pro Instant Web Publishing supports the sharing of files with up to 5 concurrent users.
Chapter 6 Protecting databases This chapter describes the basics of how to restrict what users can see and do in a FileMaker Pro file.
Chapter 6 | Protecting databases 129 The privileges that you set up apply to a single file only and all database tables within that file. If your database solution consists of multiple files that you want to protect, you may want to combine all of these files into one multi-table file. Then you can define privileges in only a single file to manage access to the entire database solution.
Chapter 6 | Protecting databases 130 Extended privileges Extended privileges determine the data sharing options that are permitted by a privilege set, such as whether a privilege set permits users to open a shared file or view a database in a web browser. The following table lists the default extended privileges that are available.
Chapter 6 | Protecting databases 131 The Admin account is fully editable. You can rename it, assign it a password, or make the account inactive. You can even delete the Admin account; however, you must assign the Full Access privilege set to at least one other active account. Important Don’t forget the account name and password that is assigned to the Full Access privilege set. If necessary, write it down and store it in a secure place.
Chapter 6 | Protecting databases 132 Privilege Full Access privilege set Data Entry Only privilege set Read-Only Access privilege set Password change number of days off off off Minimum password length off off off Available menu commands All All All You must have Allow Printing privileges to save records as a PDF file. You must have Allow Exporting privileges to export records as a Microsoft Excel worksheet.
Chapter 6 | Protecting databases 133 To plan the security for a shared file: 1. Determine the privilege sets that you need for the file. Make a list of the areas of the file that you want to protect, such as particular tables, fields, records, layouts, value lists, and scripts. Plan the number of privilege sets you need to enforce the varying levels of file access that you require. 2. Determine whether you need individual accounts for each user, or group accounts that multiple users can share. 3.
Chapter 6 | Protecting databases 134 Suggestions for creating secure passwords 1 Secure passwords are typically eight or more characters in length, and include at least one numeric character. 1 If the file is shared via web publishing, account names and passwords can only use characters included in the ISO Latin-1 character set (except colons).
Chapter 6 | Protecting databases 135 2. Choose File menu > Manage > Security. You see the accounts defined for this file. 3. In the Manage Security dialog box, click the Privilege Sets tab. You see the privilege sets defined for this file. Creating accounts You can create accounts for every individual who accesses a file, or create fewer accounts that are shared among many individuals, such as a “Marketing” account and a “Sales” account. You must assign a privilege set to each new account.
Chapter 6 | Protecting databases 136 3. In the Edit Account dialog box, for Account is authenticated via, choose FileMaker. For information about accounts managed by an external server, see “Creating accounts that authenticate via an external server” on page 137. 4. Enter an account name and password for the account. Tip If you plan to create accounts for individual users, you may want to base each account name on the User Name defined in the Preferences dialog box.
Chapter 6 | Protecting databases 137 Creating accounts that authenticate via an external server If you’re hosting FileMaker Pro database files with FileMaker Server and your organization uses centrally managed authentication for users and groups such as Apple OpenDirectory or a Windows Domain, you can set up accounts that authenticate users based on your authentication server.
Chapter 6 | Protecting databases 138 2. Click New. The Edit Privilege Set dialog box appears. By default, each privilege set option is set to its most restrictive setting. 3. Enter a name and optional description for the privilege set. 4. Define the privileges for the privilege set. 5. Click OK. After you create the privilege sets that you want, you need to create or edit accounts so that they use the appropriate privilege sets. For more information, see “Creating accounts” on page 135.
Chapter 6 | Protecting databases 139 You can view extended privileges in the Manage Security dialog box, as well as enable each extended privilege for selected privilege sets. All extended privileges except fmreauthenticate10 are disabled by default, even in the Full Access privilege set. It may be necessary to delete an extended privilege that is no longer required. To view the extended privileges: 1. Open the database file. 2. Choose File menu > Manage > Security. 3.
Chapter 6 | Protecting databases 140 2. Choose File menu > Manage > Security, then click the File Access tab. 3. To protect this file against unwanted access from other files, select Require full access privileges to create references to this file. 4. If any files that reference the protected file are currently open, you see an alert for each file, asking if you want to authorize the file. Click Yes. 5. If you want to authorize additional files that are not currently open, click Authorize.
Chapter 6 | Protecting databases 141 1 Secure the client workstations that access a database. Lock the computers down and restrict access by using a screensaver that requires a password. 1 Ensure the physical security of backup copies of files stored on portable media, such as tapes and CDs. Enhancing operating system security Use the security features of your operating system to restrict access to important data.
Chapter 6 | Protecting databases 142 Backing up databases and other important files Develop plans for restoring data, including alternate sites and systems to run business-critical information services. A current backup can help you recover from a situation where someone loses the administrator account information for a file, or from a situation where user error (and sometimes bad database design) causes data to be deleted or modified inappropriately.
Chapter 6 | Protecting databases 143 1 Disruption or damage to the organization infrastructure such as building fires, environmental or biological hazards, floods, and so on. 1 Disruption or damage to the public infrastructure, including electrical power, telecommunications (voice and data), transportation grids (roadways, buses, trains) caused by environmental conditions, or severe weather such as tornadoes or floods.
Chapter 7 Converting databases from FileMaker Pro 11 and earlier You must convert files created in FileMaker Pro 11 and earlier to the FileMaker Pro 12 format in order to use them with FileMaker Pro 12. When you convert a file, FileMaker Pro creates a Conversion.log file, so you can view the conversion status and any problems that may have occurred during the conversion process. Keep these points in mind: 1 You can only convert files created in FileMaker Pro version 7.x, 8.x, 9.x, 10.x, or 11.
Chapter 7 | Converting databases from FileMaker Pro 11 and earlier 145 1 Convert multiple files all at the same time to convert all the files in a relational database. There are several ways to select the files that you want to convert; you can drag and drop the files (or a folder containing the files) onto the FileMaker Pro 12 application icon, or you can select multiple files in the FileMaker Pro Open dialog box.
Index Symbols – 56 ^ 56 _ 57 , 56 ; 56 : 56 :: 56 ! 38 ? 35 ... 36 " 56, 62 " " 30, 33 ( 56, 62 ) 56, 62 [ 56 ] 56 } 56 @ 33 * 33, 37, 56 / 56 // 35 & 56 # 33 + 56 < 36, 56 <= 36 = 34, 37, 56 == 34 > 36, 56 >= 36 ~ 34 $ 56 ≤ 36, 56 … 56 ≥ 36, 56 A Access privileges.
Boolean values described 34, 57, 68 finding 34 formatting 91 Break fields 97 Browse mode creating charts in 98 described 21 finding data in 30 Browser, web opening URL 127 working with published database in 127 Browsing records 21 Bubble charts 97 Buttons, including in tab order 26 C Calculation fields creating 61 described 57 formulas 61 stored and unstored results 69 Calculations See also Calculation fields formatting 91 related fields field references to 62 summarizing data 112 Calendars, displayin
Databases creating 54 described 13 naming 55 planning 50 preference for creating new 56 printing 44 protecting 128 publishing on web 127 Databases, relational.
Field/Control tool 86 Fields adding in Table View 61 adding to a layout 85 creating and changing 59 creating in Manage Database dialog box 59 creating in Table View 55, 61 defining 59 deleting definition 60 deleting from a layout 87 described 14 displaying 9, 71 empty or non-empty, finding 37 entry options 65, 87 formatting 89 formatting data 89 Furigana in 60 global 69 hiding or showing in Table View 61 indexing 69 maximum characters in 27 merge 88 naming 59 options 60 placing on a layout 85 removing
Finding records See also Find requests, Quick finds adding new request 38 all records 32 Boolean numbers 34 described 30 duplicate records 38 empty or non-empty fields 37 exact values 34 excluding records 39 invalid values 35 logical AND searches 38 logical OR searches 38 multiple criteria 38 omitting records 39 order of requests 40 partial or variable text 33 quick finds in Browse mode 30 ranges of information 36 related fields and records 37 saving and sending as snapshot link 10, 31 showing all reco
J JDBC field name considerations 57 privileges for 130, 137 Join expressions. See Relationships Join fields. See Match fields K Key fields. See Match fields L Labels field 86 part 95 vertical 75 Labels (mailing), printing 45 Labels layout, creating 45 Layout bar 18, 21 Layout folders, managing 72 Layout mode creating charts in 98 Layout mode, described 21 Layout objects.
M O Macros.
Pointer tool. See Selection tool Pointers to files. See Relationships Pop-up menus, displaying fields as 87 Portals See also Relational databases adding records 25 deleting records 26 described 103, 105 filtering records in 112 omitting related records 40 placing related records 88 selecting 84 selecting records 23 summarizing data in 112 Positive/negative column charts 97 Preferences application 49 described 49 file 49 Preview mode, described 21, 44 Previewing printing.
Related tables described 103 planning 50 Relational databases described 14, 100 match fields described 103 planning 104 planning 50, 109 portals 103 related tables described 103 planning 50 terminology 102 Relational operators 103, 107, 111 Relationships See also Relational databases changing 110 comparative 107 creating 109 described 103 multi-criteria 106 planning 53 returning range of records 108 self-joining 108 single-criteria 104 types 104 Relationships graph 103 creating relationships 110 descri
Strings, text. See Text, literal Subforms. See Portals Subsummaries See also Reports; Summary fields creating reports 74 parts, described 97 printing 44 Subtotals. See Subsummaries; Summary fields Summarizing data in related fields 112 Summary fields Average for 64 Count for 64 creating 63 defining in Table View 63 described 57, 63 Fraction of Total for 64 Maximum for 64 Minimum for 64 on layouts 97 options for 64 Standard Deviation for 64 Total for 64 Summary parts.
U X Unauthorized users.