
Tutorial
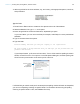
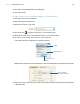
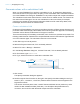
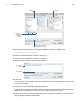
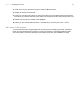
Table Of Contents
- Lesson 1 FileMaker Pro basics
- Lesson 2 Browsing information
- Lesson 3 Finding and sorting records
- Use quick find to search a database
- Find records based on criteria in a single field
- Find records based on criteria in specific separate fields
- Find records that match multiple criteria in the same field
- Find records that match a range of criteria in the same field
- Narrow your search
- Save a find request to use later
- Find records using a saved find
- Sort your found set
- Add a new record in List View
- For more information
- Lesson 4 Creating a database and entering records
- Lesson 5 Customizing what you see
- Lesson 6 Creating lists, mailing labels, and form letters
- Lesson 7 Simplifying data entry
- Lesson 8 Automating tasks with buttons and scripts
- Lesson 9 Creating and running reports
- Lesson 10 Charting data
- Lesson 11 Making databases relational
- Lesson 12 Sharing and exchanging data
- Lesson 13 Protecting data in FileMaker Pro
- Lesson 14 Backing up your databases

Lesson 6 | Creating lists, mailing labels, and form letters 42
6. Click the Footer part label, then press Backspace or Delete.
7. Verify that the unit of measurement for the rulers is inches. Click the top left corner of the rulers
until the corner shows in for inches (rather than cm for centimeters or pt for points).
8. Place the pointer over the Body part boundary and, using the vertical ruler as a guide, drag the
boundary down to about 11 inches.
When you release the mouse button, you should see the page boundary. If you don’t see the
page boundary, drag the Body boundary down farther.
9. Now drag the Body part boundary up to just above the page boundary.
The page boundary line will disappear. Dragging the body part boundary above the page
boundary limits your form letter to a single page.
10. If necessary, use the scroll bar at the bottom of the screen to scroll to the right until you see a
heavy dotted line along the right side. This is the right-side page boundary. Your letter will be
within these boundaries.
11. Scroll back all the way to the left, if necessary.
12. Scroll up to the top of the layout, if necessary.
Create the text block
You will create a text block with a 2 inch margin on all sides.
1. Select the Text tool in the status toolbar.
2. Using the horizontal and vertical rulers as a guide, drag a rectangle starting about 2 inches from
the top left side of the layout, and ending about 2 inches from the bottom right side, as indicated
by the page boundary lines.
When you release the mouse, the horizontal ruler displays the width of the text block. The
insertion point flashes in the top left of the text box. You will type the form letter inside the text
block.
Add the address
1. Choose Insert menu > Merge Field.
2. Select First Name in the list and click OK.
3. Type a space.
4. Choose Insert menu > Merge Field.
5. Select Last Name in the list and click OK.
6. Press Enter (Windows) or Return (Mac OS).
Page boundary