
Tutorial
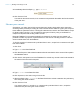
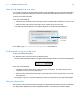
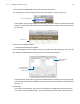

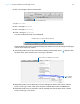
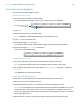
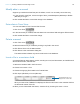


Table Of Contents
- Lesson 1 FileMaker Pro basics
- Lesson 2 Browsing information
- Lesson 3 Finding and sorting records
- Use quick find to search a database
- Find records based on criteria in a single field
- Find records based on criteria in specific separate fields
- Find records that match multiple criteria in the same field
- Find records that match a range of criteria in the same field
- Narrow your search
- Save a find request to use later
- Find records using a saved find
- Sort your found set
- Add a new record in List View
- For more information
- Lesson 4 Creating a database and entering records
- Lesson 5 Customizing what you see
- Lesson 6 Creating lists, mailing labels, and form letters
- Lesson 7 Simplifying data entry
- Lesson 8 Automating tasks with buttons and scripts
- Lesson 9 Creating and running reports
- Lesson 10 Charting data
- Lesson 11 Making databases relational
- Lesson 12 Sharing and exchanging data
- Lesson 13 Protecting data in FileMaker Pro
- Lesson 14 Backing up your databases

Lesson 4 | Creating a database and entering records 28
Modify data in a record
Suppose you realize that Jane Doe paid 75 dollars, not 25. You can easily correct the entry.
1. In the record for Jane Doe, click to the right of the 2, press Backspace (Windows) or Delete
(Mac
OS), then type 7.
2. Click outside the field to commit this change in the database.
Enter data in Form View
You can enter data in Form View and List View too.
1. Click Form View .
2. In the last record you created, select the data in the Last Name field and type a different name.
3. Click outside the field to commit the change.
Delete a record
1. Click Table View .
2. Select the last record you created by clicking in any field in the record.
3. Click Delete Record in the status toolbar.
4. Click Delete in the confirmation dialog box.
The status toolbar indicates only two records remain in the database.
Insert a file in a container field
A container field can store photos, movies, sounds you record, and documents, such as Microsoft
Word and Excel files, and PDF files.
1. Select the container field in the first record.
2. Choose Insert menu > File.
3. Choose the logo.png file located in the Tutorial folder.
4. Click Open (Windows) or Insert (Mac OS).
When you insert a file, FileMaker Pro displays the file's icon and name in the container field but
not the actual content of the file.
5. When you are finished with this lesson, close the file by choosing File menu > Close.
The PNG filename and icon are
displayed in the container field