
Development Guide
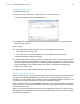

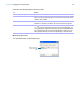
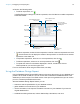
Table Of Contents
- Chapter 1 Introducing FileMaker Pro Advanced
- Chapter 2 Creating database solutions
- Chapter 3 Customizing database solutions
- Chapter 4 Debugging and analyzing files
- Appendix A Feature comparison of the runtime application with FileMaker Pro
- Index

Chapter 3 | Customizing database solutions 23
To change the properties of a menu item:
1. Select a menu item from the Menu Items list and do one or more of the following:
2. Click OK.
Creating custom menu sets
Custom menu sets are collections of menus that appear in the FileMaker Pro application menu
bar. You can create custom menu sets to include only the menus you require. After you create
menu sets, you can:
1 specify menu sets for individual layouts
1 create scripts that change menu sets
1 change the default menu set in a solution file’s menu bar
1 switch menu sets temporarily using the FileMaker Pro Advanced Tools menu
To create or edit menu sets:
1. Choose File menu > Manage > Custom Menus > Custom Menu Sets tab.
2. Click Create.
To Do this
Change a command for
a menu item
For Based on an existing command, click Specify, choose a different command, then
click Select (Windows) or OK (Mac OS).
Change a menu item
from one type to another
For Menu Item Type, choose a different type. (For example, you can change a separator
to a command.)
Change the name of a
menu item
Select Item Name and enter a new name.
To base the menu title on the result of a calculation, click Specify, then build a formula in
the Specify Calculation dialog box.
Windows: To specify an access key, type an ampersand (&) before the character you
want to use as the access key. For example, type &Open to display the Open menu item
with the letter “O” as the access key.
Define a keyboard
shortcut for a menu item
Select Keyboard Shortcut. In the Specify Shortcut dialog box, type a key combination,
then click OK. Keyboard shortcuts appear next to menu items in the Menu Items list. For
more information about keyboard shortcuts, see Help.
Perform a script or script
step when a user
selects a menu item
Select Action. In the Specify Script Step dialog box, select a step and specify options as
necessary, then click OK.
Note To affect the behavior of a currently running script (for example, to halt, exit,
resume, or pause the script) use the Perform Script script step.
For more information about scripts and script steps, see Help.
Change a script or script
step
For Action, click Specify, modify the script definition, then click OK.
Install menu items
based on conditions you
specify
For Install when, specify a calculation that results in a Boolean value.
If the calculation evaluates true or non-zero, the menu item is installed.
For example, for the menu item to appear when the file is opened in Windows, enter:
If ( Abs(Get( SystemPlatform )) = 2; 1; 0 )
When the calculation evaluates false or zero, the menu item is not installed.
For example, for the menu item to appear when the file is opened in Mac OS, enter:
If ( Abs(Get( SystemPlatform )) = 1; 1; 0 )
To ensure a menu item is always installed, for Install when, enter 1.