
Development Guide
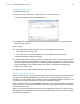

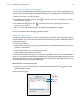
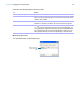
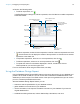
Table Of Contents
- Chapter 1 Introducing FileMaker Pro Advanced
- Chapter 2 Creating database solutions
- Chapter 3 Customizing database solutions
- Chapter 4 Debugging and analyzing files
- Appendix A Feature comparison of the runtime application with FileMaker Pro
- Index

Chapter 3 | Customizing database solutions 21
Creating custom menus
To create a custom menu:
1. Choose File menu > Manage > Custom Menus > Custom Menus tab.
You see the Manage Custom Menus dialog box.
2. If FileMaker Pro Advanced includes menus that do not exist in this file, click Update to add
missing menus to the file.
3. Click Create.
4. In the Create Custom Menu dialog box, do one of the following, then click OK:
1 Click Start with an empty menu.
1 Click Start with a standard FileMaker menu, then select a menu from the list.
The Edit Custom Menu dialog box appears.
5. In the Edit Custom Menu dialog box, specify a custom menu name, a comment that describes
the menu (optional), the menu title that you want to display in the menu bar, conditions under
which the menu should be installed or not installed, and the FileMaker
Pro modes in which the
menu should appear. See
“Creating custom menu items” for information on specifying a
platform for a custom menu.
6. Create custom menu items, as described in the following section.
Creating custom menu items
After you create a menu, you can create menu items. You can also create or edit menu items that
are copies of the Standard FileMaker menus. Menu items can be commands, submenus, or
separators. You can create a menu item that is based on a standard FileMaker command or you
can create a menu item that initially does not have an assigned command.
When you base a menu item on a FileMaker command, the menu item inherits all the properties
of that command. You can override properties (menu item name, keyboard shortcut, or action) to
customize the menu item.
When you create a menu item that does not have an assigned command, an <unknown> menu
item appears in the Menu Items list in the Edit Custom Menu dialog box. You can then customize
this menu item’s properties.