
Tutorial
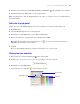
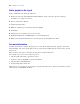
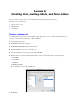
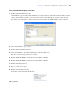
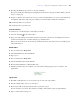
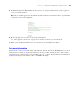

Table Of Contents
- Contents
- Lesson 1 FileMaker Pro basics
- Lesson 2 Browsing information
- Lesson 3 Finding and sorting records
- Use quick find to search a database
- Find records based on criteria in a single field
- Find records based on criteria in specific separate fields
- Find records that match multiple criteria in the same field
- Find records that match a range of criteria in the same field
- Narrow your search
- Save a find request to use later
- Find records using a Saved Find
- Sort your found set
- Add a new record in List View
- For more information
- Lesson 4 Creating a database and entering records
- Lesson 5 Customizing what you see
- Lesson 6 Creating lists, mailing labels, and form letters
- Lesson 7 Simplifying data entry
- Lesson 8 Automating tasks with buttons and scripts
- Lesson 9 Creating and running reports
- Lesson 10 Charting data
- Lesson 11 Making databases relational
- Lesson 12 Sharing and exchanging data
- Lesson 13 Protecting data in FileMaker Pro
- Lesson 14 Backing up your databases

Lesson 6
|
Creating lists, mailing labels, and form letters 45
Choose the fields that will appear on the labels
1. Double-click First Name in the list.
<<First Name>> appears in the Label Contents area. Angle brackets around the field name indicate this is
a merge field and data (in this case the first name in the record) will appear on labels rather than the
placeholder text “First Name.” Notice that the insertion point in the Label Contents text box flashes.
2. After <<First Name>>, type a space.
3. Double-click Last Name in the list.
4. After <<Last Name>>, press Enter (Windows) or Return (Mac OS).
This moves the insertion point to the next line.
5. Double-click Home Address 1 in the list, then press Enter or Return.
6. Double-click Home Address 2 in the list, then press Enter or Return.
7. Double-click City in the list.
8. Type a comma, then a space.
9. Double-click Country in the list.
Your label contents should look like this:
10. Click Next.