
Development Guide
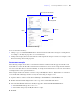
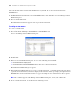
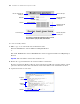
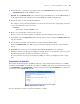

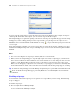
Table Of Contents
- Chapter 1 Introducing FileMaker Pro Advanced
- Chapter 2 Creating database solutions
- Chapter 3 Customizing database solutions
- Chapter 4 Debugging and analyzing files
- Chapter 5 Developing third-party FileMaker plug-ins
- Appendix A Feature comparison of the runtime application with FileMaker Pro
- Index

Chapter 3
|
Customizing database solutions 25
To create or edit menu sets:
1. Choose File menu > Manage > Custom Menus > Custom Menu Sets tab.
2. Click Create.
3. In the Edit Custom menu set dialog box, click Add to specify which menus to include in the menu set.
4. Click OK to return to the Manage Custom Menus dialog box.
Tip To change the default menu set for this file, select Default menu set for this file and click OK. You see
the new menu set in FileMaker
Pro.
For more information about creating, installing, and testing custom menu sets, see Help.
Creating custom layout themes
FileMaker Pro and FileMaker Pro Advanced use a variety of layout themes to describe the colors, patterns,
fonts, and borders of text, fields, and parts in a new layout.
A theme is an Extensible Markup Language (XML) document that can be read and edited in a text editor
(such as Notepad for Windows or BBEdit for Mac
OS X) or XML editor (such as XMLSpy or XMetaL).
You can customize an existing theme or create your own, and then use the New Layout/Report assistant to
apply the custom theme when you create layouts for your databases. You can modify attributes defined by
the theme in Layout mode after the layout is created. However, you can’t apply a theme to an existing layout.
Note A FileMaker theme is not a stylesheet and does not contain positioning information for objects on a
layout.
Important The XML for a layout theme must be well-formed and comply with the required syntax. Omitting
a required element or attribute, or mismatching start and end tags will result in an unusable document and
FileMaker
Pro Advanced will be unable to parse the XML or display the theme in the New Layout/Report
assistant.
To : Do this:
Add a menu to this menu set Click Add, do one of the following in the Select Menu dialog box,
then click Select:
1 Choose a menu from the list.
1 Click + to create a new menu. For more information, see “Creating
custom menus” on page 22.
Tips
1 You can Shift-click or Ctrl-click (Windows) or Command-click
(Mac OS) additional menus to add multiple menus to the menu set.
1 Click – to remove a custom menu in the Select Menu dialog box.
Change the properties of a menu in this menu set Select the menu, then click Edit. For more information, see “Creating
custom menu items” on page 23.
Remove a menu from this menu set Select the menu, then click Remove.