
Tutorial
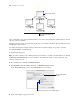
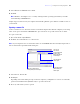

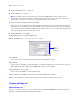
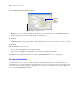
Table Of Contents
- Contents
- Lesson 1 FileMaker Pro basics
- Lesson 2 Browsing information
- Lesson 3 Finding and sorting records
- Find records based on criteria in a single field
- Find records based on criteria in separate fields
- Find records that match multiple criteria in the same field
- Find records that match a range of criteria in the same field
- Narrow your search
- Save a find request for later use
- Find records using a Saved Find
- Sort your found set
- Add a new record in List View
- For more information
- Lesson 4 Creating a database and entering records
- Lesson 5 Customizing what you see
- Lesson 6 Creating lists, mailing labels, and form letters
- Lesson 7 Simplifying data entry
- Lesson 8 Automating tasks with buttons and scripts
- Lesson 9 Creating and running reports
- Lesson 10 Making databases relational
- Lesson 11 Sharing and exchanging data
- Lesson 12 Protecting data in FileMaker Pro
- Lesson 13 Keeping your data safe

78 FileMaker Pro Tutorial
5. For Account Name, type Le Nguyen.
6. For Password, type lnguyen.
Note For security reasons, password text never appears in FileMaker Pro. Always make a note of
passwords you enter when setting up accounts, then provide passwords to the appropriate users. Store
passwords in a safe place in case they’re forgotten and so they can’t be stolen.
7. Select User must change password on next login.
In most cases, an account that is shared by multiple users should not force a password change upon first
login. Instead, you should specify a password and provide it to the users that need it. Also, the privilege
set for a shared account should not permit password changes because one user could change the password
and lock out all other users who share the account.
8. For Account Status, select Active.
9. For Privilege Set, choose [Read-Only Access].
10. For Description, type Customer Service Agent.
11. Click OK.
You see the new account listed with the default Guest and Admin accounts.
12. Click OK.
An alert appears informing you that the Admin account in the sample file is not password protected. You
must acknowledge this setting before FileMaker
Pro allows you to continue.
13. Click Allow to close the alert.
You see the Confirm Full Access Login dialog box.
14. Type Admin for Full Access Account, leave Password blank, then click OK.
Note For security purposes, always password-protect the Admin account in files you create.
Create a privilege set
About privilege sets
Privilege sets specify a level of access to a database file. In addition, FileMaker Pro allows for extended
privilege sets, which determine sharing options for files.
Specify
settings for
this account