
Tutorial
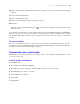
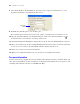
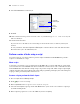


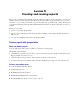


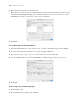
Table Of Contents
- Contents
- Lesson 1 FileMaker Pro basics
- Lesson 2 Browsing information
- Lesson 3 Finding and sorting records
- Find records based on criteria in a single field
- Find records based on criteria in separate fields
- Find records that match multiple criteria in the same field
- Find records that match a range of criteria in the same field
- Narrow your search
- Save a find request for later use
- Find records using a Saved Find
- Sort your found set
- Add a new record in List View
- For more information
- Lesson 4 Creating a database and entering records
- Lesson 5 Customizing what you see
- Lesson 6 Creating lists, mailing labels, and form letters
- Lesson 7 Simplifying data entry
- Lesson 8 Automating tasks with buttons and scripts
- Lesson 9 Creating and running reports
- Lesson 10 Making databases relational
- Lesson 11 Sharing and exchanging data
- Lesson 12 Protecting data in FileMaker Pro
- Lesson 13 Keeping your data safe

60 FileMaker Pro Tutorial
7. Move the Last Name field to the Sort order list.
This sorts the records in each group of membership types alphabetically by members’ last names. Notice
that the break field Membership Type appears automatically at the top of the Sort order list to enable
FileMaker Pro to group records by this category before sorting data.
8. Click Next.
Select a theme and create the header and footer
1. Select the Standard theme to set the text size, color, and style of the finished report, then click Next.
2. Go to the Top center list in the Header area and select Large Custom Text.
3. Type Membership Type Report for the header of the report and click OK.
4. Go to the Bottom center list and select Page Number to number the pages in the report’s footer.
5. Click Next.
Create a script so you can run this report again
1. Click Create a script.
2. Leave Script name as it appears, and click Next.