
Tutorial

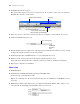

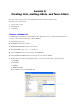

Table Of Contents
- Contents
- Lesson 1 FileMaker Pro basics
- Lesson 2 Browsing information
- Lesson 3 Finding and sorting records
- Find records based on criteria in a single field
- Find records based on criteria in separate fields
- Find records that match multiple criteria in the same field
- Find records that match a range of criteria in the same field
- Narrow your search
- Save a find request for later use
- Find records using a Saved Find
- Sort your found set
- Add a new record in List View
- For more information
- Lesson 4 Creating a database and entering records
- Lesson 5 Customizing what you see
- Lesson 6 Creating lists, mailing labels, and form letters
- Lesson 7 Simplifying data entry
- Lesson 8 Automating tasks with buttons and scripts
- Lesson 9 Creating and running reports
- Lesson 10 Making databases relational
- Lesson 11 Sharing and exchanging data
- Lesson 12 Protecting data in FileMaker Pro
- Lesson 13 Keeping your data safe
38 FileMaker Pro Tutorial
5. Click Open.
6. Drag the logo or text block to move it, if necessary.
7. Click Save Layout, then click Exit Layout to see the finished layout.
8. When you are finished with this lesson, close the file by choosing File menu > Close.
For more information
You have learned how to enhance the appearance of your data by using tab panels, graphics, custom text,
field formatting, and creative positioning of objects on layouts.
There are many other ways to customize the appearance of fields and layouts.
For example, after you’ve created a layout, you can:
1 add effects like embossing or patterns to objects
1 use lines or boxes to highlight or separate information
1 add scroll bars to individual fields
1 change background or field color
When you create a new layout, you can apply color and style using a theme. For more information on such
enhancements, see FileMaker
Pro Help.