
Tutorial

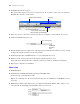
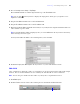
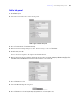

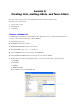

Table Of Contents
- Contents
- Lesson 1 FileMaker Pro basics
- Lesson 2 Browsing information
- Lesson 3 Finding and sorting records
- Find records based on criteria in a single field
- Find records based on criteria in separate fields
- Find records that match multiple criteria in the same field
- Find records that match a range of criteria in the same field
- Narrow your search
- Save a find request for later use
- Find records using a Saved Find
- Sort your found set
- Add a new record in List View
- For more information
- Lesson 4 Creating a database and entering records
- Lesson 5 Customizing what you see
- Lesson 6 Creating lists, mailing labels, and form letters
- Lesson 7 Simplifying data entry
- Lesson 8 Automating tasks with buttons and scripts
- Lesson 9 Creating and running reports
- Lesson 10 Making databases relational
- Lesson 11 Sharing and exchanging data
- Lesson 12 Protecting data in FileMaker Pro
- Lesson 13 Keeping your data safe

Lesson 5
|
Customizing what you see 35
Add a tab panel
1. Click Edit Layout.
2. Select the Contact info tab to select the tab panel.
3. Choose Format menu > Tab Control Setup.
4. In the Tab Control Setup dialog box, enter Membership info for Tab Name.
5. Click Create, then OK.
You see the new tab panel to the right of the Contact Info tab.
6. In the Contact info tab panel, starting outside the tab panel, drag around the Company, Membership Type, Fee
Paid, Date Paid, and Member Since fields and their labels to select them all.
7. Choose Edit menu > Cut.
8. Select the Membership info tab panel.
9. Choose Edit menu > Paste Layout Object(s) (Windows) or Paste (Mac OS).
Handles appear around the entire panel