
Tutorial
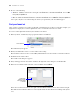
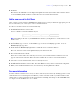

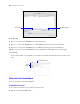
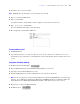

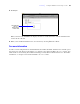

Table Of Contents
- Contents
- Lesson 1 FileMaker Pro basics
- Lesson 2 Browsing information
- Lesson 3 Finding and sorting records
- Find records based on criteria in a single field
- Find records based on criteria in separate fields
- Find records that match multiple criteria in the same field
- Find records that match a range of criteria in the same field
- Narrow your search
- Save a find request for later use
- Find records using a Saved Find
- Sort your found set
- Add a new record in List View
- For more information
- Lesson 4 Creating a database and entering records
- Lesson 5 Customizing what you see
- Lesson 6 Creating lists, mailing labels, and form letters
- Lesson 7 Simplifying data entry
- Lesson 8 Automating tasks with buttons and scripts
- Lesson 9 Creating and running reports
- Lesson 10 Making databases relational
- Lesson 11 Sharing and exchanging data
- Lesson 12 Protecting data in FileMaker Pro
- Lesson 13 Keeping your data safe

22 FileMaker Pro Tutorial
2. Do one of the following:
1 Windows: Click the down arrow to the right of the Find button, and under Saved Finds, choose 2009
fees paid, except March.
1 Mac OS: Click and hold the Find button, and under Saved Finds choose 2009 Fees Paid, except March.
Once again, only the 11 records meeting the criteria you specified in your Saved Find appear.
Sort your found set
After you have a found set of records to work with, you might want to sort those records. For example, you
might want to display the records in alphabetical order, or sort them from newest to oldest.
To sort records in alphabetical order by the members’ last names:
1. In the layout bar, click the Layout pop-up menu and choose Club List.
The Club List layout appears.
2. This layout will make it easier to see the results of the sorting.
The black bar to the left of the record for Mary Smith indicates it is the current record in the found set.
3. Click Sort in the status toolbar.
The Sort Records dialog box appears.
4. If any fields appear in the Sort Order column on the right side of the dialog box, click Clear All.
5. In the list of available fields on the left, select Last Name and click Move.
Notice the sort direction symbol to the right of the Last Name field increases in size from left to right.
This indicates that when the database is sorted by this field, the data will be in ascending order (from a
to z).
Choose Club List
Sort direction
buttons become
active when a field
is selected