
ODBC and JDBC Guide
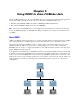


Table Of Contents
- Chapter 1 Introduction
- Chapter 2 Installing FileMaker ODBC and JDBC client drivers
- Chapter 3 Using ODBC to share FileMaker data
- Chapter 4 Using JDBC to share FileMaker data
- Chapter 5 Supported standards
- Chapter 6 Mapping FileMaker fields to ODBC data types
- Chapter 7 Mapping FileMaker fields to JDBC data types
- Chapter 8 ODBC and JDBC error messages
- Index
Chapter 3
|
Using ODBC to share FileMaker data 17
5. Construct and execute an SQL query in the client application.
Each FileMaker database file that is open and set up for access is a separate data source (you create a
DSN for each FileMaker database file you want to access as a data source).
Each database can have one or more tables. FileMaker fields are represented as columns. The complete
field name, including any non-alphanumeric characters, displays as the column name.
Note In Windows, Microsoft Access can import only 32 or fewer fields at one time via ODBC from a
FileMaker database file. If your database file has more than 32 fields, import them in increments of 32.
Accessing a FileMaker database file from a Windows application
Specifying ODBC client driver properties for a FileMaker DSN (Windows)
Create a DSN for each FileMaker database file you want to access as a data source. The DSN identifies the
FileMaker ODBC client driver, the location of the FileMaker host application, and the FileMaker database
file you’re accessing as a data source.
To set up or change ODBC client driver properties:
1. Open the ODBC Data Source Administrator control panel.
In the Windows Control Panel, choose Administrative Tools > Data Sources (ODBC).
In Windows XP, Administrative Tools appear in the Performance and Maintenance category. In
Windows Vista, Administrative Tools appear in the System and Maintenance category.
2. Click the System DSN tab.
If you set up your data source as a User DSN or File DSN, click the corresponding tab.
3. Click Add.
Note If you’re changing the properties of an existing data source, select the data source, click Configure,
and skip to
step 6.
4. Choose DataDirect 32-BIT SequeLink 5.5 from the list of drivers.
If the driver is not listed in the ODBC Data Source Administrator, look for the (Default) entry of the
registry key HKEY_LOCAL_MACHINE\SOFTWARE\ODBC\ODBCINST.INI\ODBC Drivers using Regedit
(choose Start menu
> Run > Regedit). The Data for this entry should be (value not set). If instead you see
a blank string, right-click (Default), choose Delete, and click Yes to confirm. This resets the entry to
(value
not set). Uninstall and reinstall your ODBC client driver to see it in the ODBC Data Source
Administrator.
5. Click Finish.
The DataDirect SequeLink for ODBC Setup dialog appears, with the General tab selected.