
Help

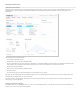

Configuring email notifications
Enable Send Email Notifications to receive FileMaker Cloud notifications through email messages in addition to on the Admin Console.
You can add other users who will also receive email notifications. When you add users, they receive an Amazon Simple Email Service (SES)
Address Verification Request email. After clicking the verification link in the email, the user’s email address is added to the verified list. Each
email address is verified only once, and clicking Send Verification for a verified user simply adds their email address to the list.
After you add the first user's email address, the From Email Address field appears, showing that user's email address. Notifications are sent
from that address. Additional verified users are subsequently added to the list so that you can choose an alternate "from" email address.
To add a user's email address:
1. Click Add Email Address.
2. Enter the user's email address and click Send Verification.
3. If the user has not been previously verified, wait for confirmation of the verification.
4. Click Save.
5. Click Edit Email Settings and enable emails for that user.
6. Click Save Changes.
Note: You also use Edit Email Settings to delete a user's email address. You cannot delete the current "from" email address.
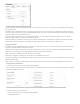
Importing SSL certificates
FileMaker provides a default Secure Socket Layer (SSL) certificate issued by the Comodo certificate authority (CA). You can renew the default
certificate or import your own custom certificate.
To import a custom certificate:
1. Click the import it link.
2. In the Import Certificate dialog box, browse to the certificate file location.
3. Browse to the certificate key file location.
4. Enter the private key password, if one was created when the certificate was generated.
5. Click OK.
When you import a custom certificate, the FileMaker Cloud server restarts and the IP address of your instance might change. Check the Domain
Name Service (DNS) registration with your DNS provider. Verify that the registered IP address and host name match your FileMaker Cloud
instance.
Concatenating multiple certificates for import
When you import or renew a custom certificate, you might need to concatenate multiple certificates to import as one file. To do so, you create a
.pem file, a concatenated certificate container file for SSL certificates.
There are two types of .pem files that you can create and import into FileMaker Cloud:
a .pem with an entire SSL certificate trust chain (root, intermediate, and primary certificates)
a .pem with server and intermediate certificates
Creating a .pem file
To create a .pem file
1. Download primary and intermediate certificates. For an entire trust chain, also download the root certificate.
2. In a text editor, paste the entire body of each certificate into one text file.
Important: The certificates must be pasted in this order:
1. Primary certificate—your_domain_name.crt
2. Intermediate certificate—intermediate_name.crt
3. (For an entire trust chain) Root certificate—root_name.crt