
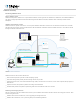
Help


Note: You also use Edit Email Settings to delete a user's email address. You cannot delete the current "from" email address.
Importing SSL certificates
FileMaker Cloud provides a 90‑day trial Secure Socket Layer (SSL) certificate issued by the Comodo certificate authority (CA). You must purchase
and register your own custom domain, and replace the trial certificate within 90 days. Use of the filemaker‑cloud domain after the 90‑day trial
is currently not supported.
To import a custom certificate:
1. Click the import it link.
2. In the Import Certificate dialog box, browse to the certificate file location.
3. Browse to the certificate key file location.
4. Enter the private key password, if one was created when the certificate was generated.
5. Click OK.
6. If you are using a wildcard SSL certificate, enter the preferred host name for your instance. and click OK.
7. Wait to receive an email from FileMaker Cloud.
The email shows the preferred host name and the fully qualified domain name (FQDN) generated by FileMaker Cloud.
When you import a custom certificate, the FileMaker Cloud server restarts and the IP address of your instance might change. In your Domain
Name Service (DNS) registration, you can create a Canonical Name (CNAME) record that maps the preferred host name to the FQDN. With the
CNAME mapping, if the instance IP address changes, you don't have to update it in the DNS registration.
Concatenating multiple certificates for import
When you import or renew a custom certificate, you might need to concatenate multiple certificates to import as one file. To do so, you create a
.pem file, a concatenated certificate container file for SSL certificates.
There are two types of .pem files that you can create and import into FileMaker Cloud:
a .pem with an entire SSL certificate trust chain (root, intermediate, and primary certificates)
a .pem with server and intermediate certificates
Creating a .pem file
To create a .pem file
1. Download primary and intermediate certificates. For an entire trust chain, also download the root certificate.
2. In a text editor, paste the entire body of each certificate into one text file.
Important: The certificates must be pasted in this order:
1. Primary certificate—your_domain_name.crt
2. Intermediate certificate—intermediate_name.crt
3. (For an entire trust chain) Root certificate—root_name.crt
You must include the beginning and end tags on each certificate. The end result will look like the following:
BEGINCERTIFICATE
Primary SSL certificate: your_domain_name.crt
ENDCERTIFICATE
BEGINCERTIFICATE
Intermediate certificate: intermediate_name.crt
ENDCERTIFICATE
BEGINCERTIFICATE
(For an entire trust chain) Root certificate: root_name.crt
ENDCERTIFICATE
3. Save the combined file as your_domain_name.pem.
You can now import the file.
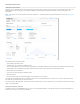
Setting up ODBC data sources
In FileMaker Cloud, click Configuration > ODBC Sources to set up ODBC data sources for access by FileMaker Cloud clients. When you add an
ODBC data source and choose the driver type, the default port number for that driver is selected. However, you can select any port number from
1 to 65535, except for the reserved ports used by FileMaker Cloud.
Note: To test the ODBC data source connection, you must know the user name and password for the database.