
Help

To set up Login with Amazon:
1. Go to Login with Amazon at http://login.amazon.com, then click App Console.
2. If you haven’t registered for Login with Amazon, click the Sign up is free link under Not registered? If you have registered previously,
click Sign in to the App Console.
3. Click Register new application.
4. In the Register Your Application dialog box, enter:
a name for the application
a description of the application
a privacy URL, which can be a placeholder URL
an optional logo
5. Click Save.
An application information page appears.
6. Click the Web Settings tab to expand it.
Notice the Client ID and Client Secret fields, which you will copy and paste into FileMaker Cloud.
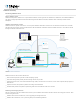
To set up FileMaker Cloud for Login with Amazon:
1. On the Web Settings tab of your Seller Central application, click Edit.
2. Sign in to FileMaker Cloud.
3. In Configuration > Password and Users, follow the onscreen instructions to:
copy and paste the Return URL fields into your Seller Central application, then save your changes
copy and paste the Client ID and Client Secret fields from the Seller Central application into FileMaker Cloud
4. In FileMaker Cloud, click Save Identity Provider.
Adding an authenticated user to FileMaker Cloud
After setting up Login with Amazon as the identity provider, you can invite users to sign in to FileMaker Cloud using their Amazon
credentials.
Note: You must know a user’s Amazon email address to invite them.
To add an Amazon authenticated user:
1. In Configuration > Password and Users, click Add Amazon Authenticated User.
2. Enter the user's Amazon email address.
The user will receive an email from FileMaker Cloud with an Amazon sign‑in link.
3. The user clicks the link and signs in to Amazon.
An Authentication Success page appears, with a link to the FileMaker Cloud Sign‑In page.
4. The user clicks the link to sign in.
Important: The user should bookmark this link for future use; it contains the URL for the instance.
If any authentication errors appear after the user clicks the Amazon link, check the settings that you copied and pasted between FileMaker
Cloud and Seller Central. Also check that you clicked Save in the Seller Central Web Settings page when you pasted the Return URL fields.
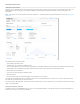
Configuring email notifications
Enable Send Email Notifications to receive FileMaker Cloud notifications through email messages in addition to on the Admin Console.
You can add other users who will also receive email notifications. When you add users, they receive an Amazon Simple Email Service (SES)
Address Verification Request email. After clicking the verification link in the email, the user’s email address is added to the verified list. Each
email address is verified only once, and clicking Send Verification for a verified user simply adds their email address to the list.
After you add the first user's email address, the From Email Address field appears, showing that user's email address. Notifications are sent
from that address. Additional verified users are subsequently added to the list so that you can choose an alternate "from" email address.
To add a user's email address:
1. Click Add Email Address.
2. Enter the user's email address and click Send Verification.
3. If the user has not been previously verified, wait for confirmation of the verification.
4. Click Save.
5. Click Edit Email Settings and enable emails for that user.
6. Click Save Changes.