
User manual


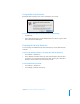


Table Of Contents
- Bento® 4
- Welcome to Bento
- Overview of Bento
- Using Libraries
- Using the Address Book Library
- Migrating the iCal, iPhoto, and Address Book Libraries
- Using Collections
- Using Form View
- About Forms
- Creating Records in Form View
- Editing Records in Form View
- Duplicating Records in Form View
- Deleting Records in Form View
- Creating Forms
- Deleting Forms
- Showing and Hiding Forms
- Duplicating Forms
- Copying Forms
- Renaming Forms
- Locking and Unlocking Forms
- Adding Fields to a Form
- Tabbing Between Fields
- Moving Fields and Objects on Forms
- Resizing Fields and Objects
- Removing Fields from a Form
- Customizing Form Layouts
- Using Table View
- About Table View
- Selecting Records in Table View
- Creating Records in Table View
- Editing Records in Table View
- Duplicating Records in Table View
- Deleting Records in Table View
- Sorting Records
- Working with Fields and Columns in Table View
- Creating Fields in Table View
- Adding Fields in Table View
- Working with Media Fields in Table View
- Changing Options for a Field in Table View
- Completing Text Automatically as You Type
- Duplicating Fields
- Changing the Field Type
- Showing and Hiding Columns
- Deleting Fields in Table View
- Reordering Columns
- Resizing Columns
- Filling Fields Automatically
- Summarizing Column Data
- Using Grid View
- Using Fields
- Importing, Exporting, and Printing
- Backing Up and Restoring Information
- Syncing
- Keyboard Shortcuts
- Reverting to a Previous Version of Bento
- Index

122 Chapter 10 Importing, Exporting, and Printing
To save a label setup for the selected library:
1 Click the Setup tab.
2 Click Save/Load Label and choose Save As from the pop-up menu.
3 Type a name for the label setup, then click OK.
Your new label setup appears in the Save/Load Label pop-up menu.
4 Set up the labels as desired.
To print from a saved label setup:
1 Choose File > Print > Labels.
2 Click the Setup tab.
3 Click Save/Load Label and choose a label setup from the pop-up menu.
4 Click Print.
To define a custom layout setup for the selected library:
1 Choose File > Print > Labels.
2 Click the Layout tab, click Page, then choose Define Custom from the pop-up
menu.
3 Type a name for the custom layout setup, then click OK.
4 Set the page margins, the number of labels on a page, and the gutter space
between labels.
Your custom layout setup appears in the Page pop-up menu.