
User manual
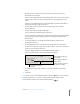


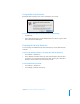


Table Of Contents
- Bento® 4
- Welcome to Bento
- Overview of Bento
- Using Libraries
- Using the Address Book Library
- Migrating the iCal, iPhoto, and Address Book Libraries
- Using Collections
- Using Form View
- About Forms
- Creating Records in Form View
- Editing Records in Form View
- Duplicating Records in Form View
- Deleting Records in Form View
- Creating Forms
- Deleting Forms
- Showing and Hiding Forms
- Duplicating Forms
- Copying Forms
- Renaming Forms
- Locking and Unlocking Forms
- Adding Fields to a Form
- Tabbing Between Fields
- Moving Fields and Objects on Forms
- Resizing Fields and Objects
- Removing Fields from a Form
- Customizing Form Layouts
- Using Table View
- About Table View
- Selecting Records in Table View
- Creating Records in Table View
- Editing Records in Table View
- Duplicating Records in Table View
- Deleting Records in Table View
- Sorting Records
- Working with Fields and Columns in Table View
- Creating Fields in Table View
- Adding Fields in Table View
- Working with Media Fields in Table View
- Changing Options for a Field in Table View
- Completing Text Automatically as You Type
- Duplicating Fields
- Changing the Field Type
- Showing and Hiding Columns
- Deleting Fields in Table View
- Reordering Columns
- Resizing Columns
- Filling Fields Automatically
- Summarizing Column Data
- Using Grid View
- Using Fields
- Importing, Exporting, and Printing
- Backing Up and Restoring Information
- Syncing
- Keyboard Shortcuts
- Reverting to a Previous Version of Bento
- Index

Chapter 10 Importing, Exporting, and Printing 121
6 To add an image, click the pop-up menu below Insert Field, then choose a
media field or an image file.
If you choose a media field, what is printed depends on the contents of the media
field for each record. If you choose an image file, the same image prints on all
labels.
Left Align is the default alignment. Select Right Align to print the media field or
image file on the right edge of each label.
7 To print labels for the currently selected records in table view, click Print
Selected Records.
8 Click the Layout tab to specify the label type.
Choose a label type from the Page pop-up menus.
For your convenience, the margin and gutter measurements for the label type and
size are displayed. Use the Size pop-up menu to change the displayed unit of
measurement.
9 Click “Start printing on” to specify which label number you want to start
printing from. Click OK.
10 Click the Appearance tab to specify options that affect the look of the labels.
Click Set to change a font’s style, size, and other options. Click the color well next
to Text Color to change the text color.
Choose an alignment option from the Alignment pop-up menu.
Select Print Label Border to print a thin border on each label.
11 To preview the current page of labels in a Quick Look window, click Preview
Labels.
12 Click Print.
Note Data in a selected checkbox field prints on labels as . Data in an unselected
checkbox field prints as . Data in a rating field prints the number of stars
representing the numeric value in the field (for example, ).
Click to display the Mac OS
Fonts window.
Click to print a thin border
on the label.
Click to display the Mac
OS
Colors window.
Click to choose how you want
text aligned on the label.