
User manual


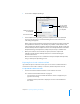


Table Of Contents
- Bento® 4
- Welcome to Bento
- Overview of Bento
- Using Libraries
- Using the Address Book Library
- Migrating the iCal, iPhoto, and Address Book Libraries
- Using Collections
- Using Form View
- About Forms
- Creating Records in Form View
- Editing Records in Form View
- Duplicating Records in Form View
- Deleting Records in Form View
- Creating Forms
- Deleting Forms
- Showing and Hiding Forms
- Duplicating Forms
- Copying Forms
- Renaming Forms
- Locking and Unlocking Forms
- Adding Fields to a Form
- Tabbing Between Fields
- Moving Fields and Objects on Forms
- Resizing Fields and Objects
- Removing Fields from a Form
- Customizing Form Layouts
- Using Table View
- About Table View
- Selecting Records in Table View
- Creating Records in Table View
- Editing Records in Table View
- Duplicating Records in Table View
- Deleting Records in Table View
- Sorting Records
- Working with Fields and Columns in Table View
- Creating Fields in Table View
- Adding Fields in Table View
- Working with Media Fields in Table View
- Changing Options for a Field in Table View
- Completing Text Automatically as You Type
- Duplicating Fields
- Changing the Field Type
- Showing and Hiding Columns
- Deleting Fields in Table View
- Reordering Columns
- Resizing Columns
- Filling Fields Automatically
- Summarizing Column Data
- Using Grid View
- Using Fields
- Importing, Exporting, and Printing
- Backing Up and Restoring Information
- Syncing
- Keyboard Shortcuts
- Reverting to a Previous Version of Bento
- Index

118 Chapter 10 Importing, Exporting, and Printing
• When printing form view data, select “Show field borders” if you want to
include field borders. (The setting of this option when you open the Print
dialog box depends on the setting of View
> Show Field Borders.)
• To create custom page margins for form view, see ”Creating and Using
Custom Page Sizes for Form View” on page 118.
Tip If you want to prevent certain fields from being printed (for example, Date Created
or Date Modified), drag them off the form before you print. Remember to drag the
fields back on to the form after printing is finished. You can also duplicate the form
and then remove the fields that you don’t want printed (giving you one form for
viewing and another for printing).
Creating and Using Custom Page Sizes for Form View
You can create and then use custom page sizes when you print from form view.
To create a custom paper size:
1 In the printing dialog box, for Paper Size, choose Manage Custom Sizes.
2 In the Custom Paper Sizes dialog box, click +, then double-click Untitled in
the list and type a name for your custom paper size.
3 For Paper Size, type the width and height of the paper.
4 To use the printer margins of an installed printer, choose the printer from
Non-Printable Area. To define your own margins, choose User Defined, then
type values for the top, right, bottom, and left margins in the boxes.
5 Click OK to save your custom paper size.
• To remove a custom paper size from the list, select the name in the list,
then click – .
• To copy a custom paper size, select the name in the list, then click
Duplicate. You can then make changes to the duplicated paper size.
To use a custom paper size:
1 Choose File > Print > Table/Form.
2 For Paper Size, choose the custom size you want.