Bento™ User’s Guide
© 2007, 2008 FileMaker, Inc. All rights reserved. FileMaker, Inc. 5201 Patrick Henry Drive Santa Clara, California 95054 FileMaker, the file folder logo, Bento and the Bento logo are either trademarks or registered trademarks of FileMaker, Inc., in the U.S. and other countries. All other trademarks are the property of their respective owners.
1 Contents Preface 7 7 16 17 17 Welcome to Bento Bringing It All Together Summary About This Document Resources for Learning More Chapter 1 19 20 21 Overview of Bento Home Dialog Bento Window Chapter 2 31 31 32 34 34 34 Using Libraries About Libraries Creating a Library Using the Bento Templates Creating a Library by Importing Deleting Records from a Library Deleting a Library Chapter 3 35 36 37 40 Using the Address Book and iCal Libraries Displaying the Address Book and iCal Libraries Address
Chapter 5 47 47 48 48 49 49 50 50 50 50 50 51 51 52 52 52 Using Form View About Forms Creating Records in Form View Editing Records in Form View Duplicating Records in Form View Deleting Records in Form View Creating Forms Deleting Forms Adding Fields to a Form Moving Between Fields Moving Fields and Objects on Forms Resizing Fields and Objects Deleting Fields from a Form Duplicating Forms Renaming Forms Customizing Form Layouts Chapter 6 57 57 58 58 58 59 59 60 60 Using Table View About Table View
90 90 91 Creating a Backup File Reverting from a Backup File Using Time Machine with Bento Appendix A 93 Keyboard Shortcuts Index 97 Contents 5
Contents
Preface Welcome to Bento Bento™ software helps you organize your information, providing the power of a database without complexity. Bento is an easy-to-use database that manages contacts, tasks, and other information that is important to you. Because Bento is a database, you can create data relationships and view your data in more ways than you can in a spreadsheet. Bento was designed for Mac OS.
Using Address Book Data When you open Bento, you see the Home dialog that helps you get started. After you start using Bento, you see that the Bento Address Book library displays contact records from the Address Book application. A contact in the Address Book application. View all the records in table view by clicking “Table.” View data in several form views. Bento provides the “Overview” and “Details” forms for you. The same contact in the Bento Address Book library.
Using iCal Data The Bento iCal Events library displays the events that are in the iCal application. An Event in the iCal application. View the record data in “Table” view or in “Form” view. The same event in the Bento iCal Events library.
Managing Data in Libraries Bento comes with more than twenty library templates to help you create libraries easily. You can create an Expenses library to track information about expenses, and an Event Planning library to track information about your travel club events.
Bento provides a Project library, so you’re ready to start managing projects for your travel club. Libraries Fields You can add fields to any library, even the Bento Address Book and iCal libraries.
Importing Data from Other Applications How do you add your spreadsheet of expenses to Bento? Create a library by importing data from another application, or import data into a library you’ve already created. Save your spreadsheet as a comma-separated values (CSV) file, and then import the CSV file into Bento. Bento creates the fields needed to hold your data and creates records for each row of data in the CSV file. Importing spreadsheet data into a Bento library.
Creating Collections You have a team of people who are working with you on your next travel club event. All of your team members are in the Bento Address Book library, but you’d like to create a smaller group that includes only your team members, not everyone in the Address Book library. You want to create a collection. Creating a collection is as easy as creating a group in Address Book or a playlist in iTunes. Open the Bento Address Book library in table view.
Give the collection the name “Team Members” and Bento creates the Team Members collection.
Creating Relationships Bento makes it easy to connect your libraries of information using related records lists. For example, say you want to track expenses by team member. To create a related records list, drag “Team Members” to the “Expenses” form.
You can also create a related records list that shows expenses for each team member. Drag “Expenses” to the “Team Members” form. Summary With Bento, you’re able to display data from Address Book and iCal, create new libraries to keep all your data together, import data from other applications, and create unique data relationships between libraries and collections.
About This Document The following table tells you where to find information in this documentation.
Web Resources Learn more about Bento on the web. To access web-based information about Bento: 1 Choose Help > Bento Help. 2 Click the Bento Website link. Technical Support To learn more about the support options that are available to Bento users, view the service and support information. To view the service and support information: Choose Help > Service and Support.
1 Overview of Bento 1 This chapter provides an overview of Bento features. This chapter is a description of what you see when you start using Bento. It introduces the Home dialog and describes the sections of the Bento window, including the Source list, the Fields list, and the records area where you can display your information in table view or in form views.
Home Dialog When you first open Bento, you use the Home dialog to learn about Bento, to display Address Book and iCal records in Bento, and to create your first library. To see how easy it is to use, take a video tour of Bento. Display Address Book and iCal information in Bento, and you can use the data in other libraries, too. Bento uses libraries to store information. One way to start using Bento is by creating a library. When you’re done with the Home dialog, click this button to start using Bento.
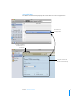
Bento Window The Bento window contains three main sections: 1 The left side of the window is the Source list. 1 The center area of the window displays the records in Bento. You can display record data in table view or in form view. 1 The right side of the window is the Fields list. Source list Records area Fields list By default, all three sections of the Bento window are displayed.
Source List The Source list displays the libraries and collections that are in Bento. 1 A library categorizes data by content. Bento provides several libraries by default. The Address Book, iCal Tasks, and iCal Events libraries display data from the Address Book and iCal applications. The Projects library, which stores data about projects, is an example library with sample data. You can create libraries to store other categories of data. To add a library to the Source list, click the New Library button.
Address Book and iCal Libraries Bento displays the data you’ve already entered into the Mac OS X applications Address Book and iCal using three libraries: Address Book, iCal Events, and iCal Tasks. Address Book Library The Address Book library displays contact information from the Mac OS X Address Book application, so there is no need to re-enter your contact information. Enter new contacts in Address Book or in Bento, and the information appears in both applications. See “Address Book Library” on page 37.
Creating Libraries Bento comes with more than twenty library templates that make it easy for you to create new libraries of information. A template defines the fields of information used in each record of a library, which you can change based on your needs. Select the library template that most closely matches the category of data you want to store. See “Creating a Library Using the Bento Templates” on page 32.
Records Area In the center area of the Bento window, you can display information stored in Bento in either table view or in one of several form views. 1 Table view shows information in an entire library or collection in a spreadsheet-like table, where each row in the table is a record in the library. 1 Form view shows fields from one record at a time, in arrangements that you can customize, using beautiful themes. Table view shows each record as a row in a table.
Form View To view your information one record at a time, use form view. In form view, you can create multiple forms for each collection or library, giving each form a different name. For example, you could create a form in the Address Book library to show birthdays, and track whether you’ve sent a card or gift. You can customize forms in many ways, including: 1 Selecting the fields that you want to show. 1 Arranging the fields on the form. 1 Changing the size of fields.
Navigation Bar The navigation bar, visible in both form view and table view, contains several controls that help you display information in Bento. 1 Click the “Table” button to see records in a spreadsheet-like view. 1 Click one of the form view buttons to see records one at a time in a page-like view. In the example below, there are two form view buttons: “Overview” and “Details.” You can have as many form views as you want.
Search Field and Advanced Find 1 Use the Search field to do a simple search for text in text fields. 1 Use Advanced Find to find a set of matching records by defining search values and criteria for specific fields. To use the Search field: 1 Select the library or collection. 2 Enter a text string into the Search field. Bento searches across the text fields of the selected library or collection, and shows the records that match the search string as you type.
To use Advanced Find: 1 Select the library or collection. 2 In the search field, click and select Advanced Find, or press Command-F. 3 Specify what you want to find. Add or remove criteria as needed. 4 Click Find. Bento performs the search, and displays the matching records. 1 To save the matching records as a Smart Collection, click Save. See “About Smart Collections” on page 45. 1 To close Advanced Find, click the X next to “Advanced Find” or press Command-F.
Fields List The Fields list on the right side of the Bento window displays the fields that are defined for the selected library or collection. 1 In a form view, use the Fields list to add fields to the form. 1 In table view, use the Fields list to select which columns are shown. Form view Drag to add field to the current form. Table view Locked fields cannot be deleted or renamed. Field is already on the current form. Fields with selected checkboxes are already shown as columns in table view.
2 Using Libraries 2 In Bento, you use libraries to organize your information. You can use the libraries that Bento provides, and create your own libraries using templates.
Bento provides two ways for you to view the records of a library: 1 Form view shows fields from a single record. Each page shows one record at a time, for example, a single contact record in the Address Book library. You can have more than one form view for the library. See Chapter 5, “Using Form View,” on page 47. 1 Table view shows the records in a table, for example, a list of the contacts in the Address Book library. Each row in the table represents a single record in the library.
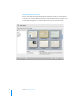
To create a library using the Bento templates: 1 Choose File > New Library. 2 In the New Library dialog, select a template category in the left column, then select the template. Select “Blank” if none of the templates meet your needs. You can create all of the fields yourself with the Blank library. 3 Enter a name for your library, and click Choose. Bento creates the library, and opens the library in form view.
1 If you want to change the layout of the fields on the form view, then see “Customizing Form Layouts” on page 52. 1 If you want to change the appearance of the form view, then you can select a new theme. See “Customizing Form Layouts” on page 52. If you are working in a library created from the Blank template, then the default view is an untitled form with default fields and with the default library theme applied.
3 Using the Address Book and iCal Libraries 3 Bento provides libraries that display data from the Mac OS X Address Book and iCal applications. With these libraries, you can manage contacts, events, and tasks together, and display them as related records in other libraries in Bento.
Displaying the Address Book and iCal Libraries Bento starts with an Address Book library, an iCal Events library, and an iCal Tasks library. Even if the Address Book and iCal applications are not running, you see the data from these applications in Bento. Displaying the Address Book and iCal libraries is optional. When you first start using Bento, these libraries are displayed by default.
Address Book Library By default, Bento displays contact information and groups from the Mac OS X Address Book application. When you make changes to records in the Bento Address Book library, you are actually updating the records in the Address Book application. You can use the Bento Address Book library to edit data from any application or device that synchronizes with the Address Book application.
If you delete a collection under the Address Book library, the associated Address Book group is deleted also. Similarly, if you delete a group in the Address Book application, the associated collection under the Address Book library is deleted also. The Address Book library displays contact information from the Address Book application. Address Book groups display as collections in Bento.
Bento Fields That Update the Address Book Application The following fields in the Address Book library update information in the Address Book application.
1 You can use import and export with the Address Book library. Records imported into the Address Book library update the Address Book application. See Chapter 8, “Importing, Exporting, and Printing,” on page 75 for information on importing and exporting. iCal Events and iCal Tasks Libraries iCal is a convenient application for keeping track of your events and tasks.
You can use the records in the iCal Events and iCal Tasks libraries just like the records in any other libraries and collections in Bento. The only difference is that changes in the iCal Events and iCal Tasks libraries update the information in the iCal application. Note: Bento does not display information from the subscribed calendars in the iCal application. Bento Event Fields That Update the iCal Application The following event fields update the iCal application.
Troubleshooting iCal Updates This section describes some common issues with displaying data from the iCal application. 1 Why don’t I see the collections from iCal Events or iCal Task libraries in the iCal application? The iCal application does not have a way to display a subset of the events or tasks from a specific calendar. 1 Why don’t I see events or tasks from my subscribed calendars? Subscribed calendars are stored on an external server; Bento displays information for local calendars only.
4 Using Collections 4 This chapter describes how to use collections to further organize your records in Bento. In Bento, your records are kept in libraries, as described in Chapter 2, “Using Libraries.” If you want to organize records in different ways or if you want to work with a subset of the records in a library, you can create a collection. About Collections A collection is a set of records from a library. You can create a collection to: 1 Create a set of records for a special purpose.
However, a record from a library can be added to any of the collections in a library. For example, if you have a “DVD” library with a “Favorites” collection and a “Classic Movies” collection, you can have the same record in both collections.
If you click Remove from Collection, the records are removed only from the collection, not from the associated library. If you click Delete, the records are permanently removed from both the library and the collection. Deleting a Collection To delete a collection: Select the collection and press the Delete key. The records are deleted from the collection but not from the library.
Creating Smart Collections You can create a Smart Collection that adds records to or removes records from a collection according to criteria that you define. To create a Smart Collection: 1 Choose File > New Smart Collection. 2 Type a name for the Smart Collection, then press Return. Use the pop-up menus and entry fields to specify the criteria for the Smart Collection. Click to add additional criteria.
5 5 Using Form View In Bento, you use form view to display one record at a time from a library or collection. This chapter describes how to create and edit records in form view, create and modify forms, and customize form layouts. About Forms In form view, you can create and use forms to display one record at a time from a library or collection in a page-like format. For example, you can display a contact in the Address Book library or a task in the iCal Tasks library.
Creating Records in Form View You can create records in form view or table view. To create a record for a library or collection: 1 Select the library or collection you want to add a record to. 2 Click a form name in the navigation bar or choose View > Form > Form Name. 3 Choose Records > New Record. 4 Type data in the fields. 5 Press Tab to move to the next field in the same record. Press Shift-Tab to move to the previous field in the same record.
Sending Emails When browsing records, you can quickly send emails to your family, friends, or colleagues. To send an email: 1 Select a form in the navigation bar or choose View > Form > Form Name. 2 Click next to the email address field. 3 The default email application opens and displays a pre-addressed, blank email message. 4 Compose the message and send it.
Creating Forms To create a form: 1 Select the library or collection you want to add a form to. 2 Click in the navigation bar or choose Insert > New Form. In the Form name dialog, type a name, then click OK. 3 Move fields to the form and create records. Deleting Forms To delete a form: 1 Select the library or collection you want to delete a form from. 2 Click in the navigation bar. Adding Fields to a Form To add a field to a form: 1 Select a library or collection.
3 Select the field or object, then drag it to a new location. If you drag a field into an empty space, Bento positions the field below the nearest field. Bento allows you to drag fields above, below, next to, or between other objects on the form. While moving an object, notice the dark line that indicates the object’s position when you stop dragging it. To move multiple fields or objects: 1 Click in the navigation bar or choose View > Customize Form.
Duplicating Forms To duplicate a form: 1 Select a form in the navigation bar or choose View > Form > Form Name. 2 Choose Insert > Duplicate Form. Renaming Forms To rename a form: 1 Double-click the form name at the top of the window. 2 In the Form name dialog, type a new name, then click OK. Customizing Form Layouts You can quickly change the appearance of a form. Changing the Theme You can change a form’s theme (the coordinated colors, layout, and text attributes) at any time.
3 Position the cursor in the middle of the space between two columns, then drag left or right. 4 When you’ve finished making changes, click in the navigation bar or choose View > Customize Form to work with your data again. To resize fields that touch a column’s right edge, hold down the Option key as you change the column width. Changing the Position of Labels You can change how the labels for fields are positioned on a form.
Aligning the Right Edges of Fields You can align the rightmost edges of selected fields within a column. To align the right edges of fields: 1 Click in the navigation bar or choose View > Customize Form. 2 Select a form in the navigation bar or choose View > Form > Form Name. 3 Select the fields whose right edges you want to align within a column. Command-click to select fields that aren’t next to each other. Shift-click to select contiguous fields. The border of selected fields is highlighted in blue.
Adding Spacers Use a spacer to create a blank space between items on a form. For example, add a spacer to separate groups of fields. When editing the form, you can change the spacer's width, height, and shading. To add a spacer: 1 Click in the navigation bar or choose View > Customize Form. 2 Select a form in the navigation bar or choose View > Form > Form Name. 3 Choose Insert > Spacer. 4 Drag the spacer to the desired location on the form.
Chapter 5 Using Form View
6 6 Using Table View In Bento, you use table view to display data in a spreadsheet-like format where rows represent records and columns represent fields. This chapter describes how to create and modify records in table view, sort records, and rearrange data in columns. About Table View In table view, you can see your records in rows with the fields in columns (in a format similar to a spreadsheet).
Creating Records in Table View You can create records in table view or form view. To create a record for a library or collection: 1 Select the library or collection you want to add a record to. 2 In table view, choose Records > New Record. At the bottom of the window, the record count increases. 3 Type data in the columns. 4 Press Tab to move to the next field in the same record. Press Shift-Tab to move to the previous field in the same record.
Deleting Records in Table View To permanently delete selected records from a library: 1 Select the library. 2 Select the records, then choose Records > Delete Selected Records or press the Delete key. In the dialog box, click Delete. To permanently delete selected records from a collection: 1 Select the collection. 2 Select the records, then choose Records > Remove Selected Records or press the Delete key.
Working with Fields in Table View To reorder a column: Drag the column header left or right to a new location. Drag header to reorder column. To resize a column: Drag the edge of a column header to the width you want. Drag header edge to resize column. To show or hide columns: In the Fields list, select a field’s checkbox to display the field in table view. Clear the checkbox to hide the field in table view.
Depending on the field type, the following functions are available. Name Purpose Sum Calculates the total of the values in the selected field Count Reports the number of items that have a value in the selected field Average Reports the average of the values in the selected field Maximum Reports the highest value of the values in the selected field Minimum Reports the lowest value of the values in the selected field You can use the Count function on any type of field.
Chapter 6 Using Table View
7 7 Using Fields Bento provides a wide variety of field types to store the kinds of information you use in your daily life. In Bento, you can choose from many different field types to track things such as names, addresses, dates, times, prices, images, movies, songs, and lists of files. This chapter describes the purpose of the field types, how to create and modify fields, how to use the Fields list in table view or form view, and work with file list fields and media fields.
Field Types These are the types of fields you can create in Bento: Field Type Purpose Text Store anything you type* Number Store numeric data** Choice Create a pop-up menu in order to select an item from a list Checkbox Store status information Media Store image, movie, and sound files File list Store aliases to other files or folders that are on your computer Related records list Store records from another library or collection that are related to the current record Time Store a time of d
For example, if you create a phone number field named “Home Phone Number” in a library that does not yet contain a phone number field, Bento creates a list field named “Phone Number List.” If you then add other phone number fields to the same library, when you enter data in the phone number fields, Bento displays the data in the field named “Phone Number List.” Form 1 Form 2 Phone number fields Phone number list field On Form 1, you enter data in phone number fields.
8 If you are looking at records in form view, you can drag a field to a form. If you are looking at records in table view, you can select a field’s checkbox to display the field as a column. Note: In table view, you cannot see media fields or any of the list field types: address, email address, phone number, IM account, URL, related records list, and file list. After you have created a field, you can enter data into it, one record at a time.
6 Click Create. The new field is added to the Fields list. Tip: If you are unfamiliar with creating calculations, click Show Examples to see and experiment with examples of calculations. Creating File List Fields Use a file list field to store a list of aliases to files or folders on your computer. Each alias contains a path to a specific file or folder in a specific location on your hard drive. If you move or rename a file or folder that an alias refers to, the alias is broken.
Creating Related Records List Fields Use a related records list field to display records that are related to the current record you are viewing. These related records are from another library or collection. For example, if you created a Projects library to manage party planning and wanted to display certain vendors on a form, you could create a related records list field to display the contacts listed in a collection named Vendors under the Address Book library.
7 Drag the field to the form you want. You see an empty related records list field with column headers. Column headers Related records list field 8 Click to display records from the data source you specified in step 5. 9 Select the records you want to add, then drag them to the related records list or click Add to List. 10 Press Esc to close the library or collection window. 1 To remove a record from the related records list, click . This removes the record from the related records list only.
You can create related records lists that display records from the Bento iCal Events and iCal Tasks libraries. If you change an iCal Event or iCal Task record in a related records list, you are actually updating the data in the iCal application. If you delete an event or task record from the iCal application, it is removed from any related records list where it appeared in Bento.
Opening Files Stored in File List Fields When browsing records, you can quickly open files or applications that are stored in file list fields. To open files stored in a file list field: 1 Select a form in the navigation bar or choose View > Form > Form Name. 2 Select one or more items in the file list field. 3 Click or double-click the files you want to open. 4 The application associated with each file starts.
Adding Media Files You can add sound, image, and movie files to your forms. Image files include images from the web or other applications. To add a media file: 1 Click in the media field. 2 Drag a media file from the Finder or iPhoto to the media field or click file. to choose a You can’t drag a file from iTunes to the media field. When you add a media file, Bento copies it into the bento.bentodb file.
Resizing Images You can resize an image within the media field or make it exactly fit the field. To resize an image: 1 Click in the media field. 2 Drag the zoom slider to zoom in or out on the image. 3 Click to make the image the same size as the field. Exporting Images You can export (save) any image file with a different name or in a different location. It is saved in its original file format. To export an image: 1 Click in the media field. 2 Click .
Chapter 7 Using Fields
8 Importing, Exporting, and Printing 8 Bento lets you import and export information as commaseparated values files. You can also print information to share it with others. A good way to start using Bento is by importing information. Bento supports the comma-separated value (CSV) text file format. For example, you can import CSV files created from spreadsheets, exported from other databases, or downloaded from banking or stock websites.
Exporting CSV Files from Other Applications For the best results when importing information into Bento, follow these guidelines: 1 Export your data from the other application as a CSV file. If you have multiple worksheets in a single spreadsheet file or multiple tables in a database, export each one into a separate CSV file. 1 If your CSV file contains multiple tables because you are unable to export individual tables, then split the file into separate CSV files, creating one file for each table.
1 Put double quotation marks around field values that contain double quotation marks. Change the embedded double quotation marks into a pair of consecutive double quotation marks. For example: “She said ““I will be there”” in her email.
Importing Information into Bento When you import information into Bento, you can either create a library or import the information into a library or collection you already have. Creating a Library by Importing If the information you are importing does not belong in a library you already have, then create a library when you import the CSV file. Enter the name for the new library. Click pop-up to change the field type from the default of “Text” or to set to “Do not import.
4 Indicate whether the CSV file contains a row with values that you want to use as field names. 1 If the CSV file contains a row with column names, click the arrow buttons to go to that row and select “Use this record’s values as column names.” Bento uses the values in this row as the new field names. 1 If the CSV file does not contain a row with column names, clear “Use this record’s values as column names.” Bento sets the field names to default values.
Importing into a Library If you want the information that you are importing to go into a library you already have, then import the CSV file into that library. Bento creates new records in the library. You can also import a CSV file into a collection. When you choose a collection as the target for the import, Bento creates new records in the library that contains that collection, and adds the new records to the collection.
To import information into a library or collection: 1 Choose File > Import. 2 Click “Choose” and choose the CSV file you want to import. 3 For “Choose a Target,” choose the library or collection that you want your information to be added to. The example above shows the “Address Book” library as a target library. 4 Indicate whether the CSV file contains a row with values that you want to use as column names.
Additional Ways to Import Information In addition to the File > Import menu item, Bento provides the following ways to import information: 1 Choose File > New Library to open the New Library dialog. Then click “Import data.” 1 Drag the CSV document icon to the Source list in Bento. 1 Drag the CSV document icon to a specific library or collection in the Source list in Bento. 1 Drag the CSV document icon to the Bento application icon.
For this field type date This data can be imported Numeric data in the form DD, MM/DD, or MM/DD/YYYY, where: 1 DD is the day (between 1 and 31, as valid for the month) 1 MM is the month (between 1 and 12) 1 YYYY is the year (between 1 and 9999). A date field can also contain a “time” value, as described for the time field. duration Text representing a duration in weeks, days, hours, minutes, and seconds.
Exporting Information from Bento Bento can export information into a CSV file from a library, from a collection, from a Smart Collection, or from the results of a search or Advanced Find. Exporting from a Library, Collection, or Smart Collection When you export records from a library or collection, the information in all of the fields in the library or collection is exported.
Export Considerations for Specific Field Types You cannot export: 1 Contents of address list fields, phone number list fields, email list fields, URL list fields, or IM account list fields. (You can export data from individual address, phone number, email, URL and IM account fields.) 1 Information displayed in a related records list field. 1 File aliases in file list fields. 1 Binary contents of media fields.
Printing from Search or Advanced Find If you want to print a subset of records, you can use search or Advanced Find to narrow the set of records in a library or collection, and then print the records. To print a subset of records: 1 Use the search field or Advanced Find to create a subset of records. See “Search Field and Advanced Find” on page 28. 1 For search, the set of records that matches the criteria is displayed as you type the search string.
9 Backing Up and Restoring Information 9 This chapter describes how to create a backup copy of your Bento data. Use the backup copy to recover your original information if you make an inadvertent change, or to revert your data in case of a problem such as a hard drive failure. A Bento backup file contains the data in Bento at the time you run the back up command. The back up command is easy to use; you simply specify a name and location for the backup file.
About Bento Backup Files When you create a Bento backup file, you create a copy of the data that is in Bento. The backup file contains the data in your libraries and collections at the time you run the back up command. Important: The Bento backup file does not contain the data from the Address Book and iCal applications. You should back up your Address Book and iCal data whenever you back up your Bento data.
Using the Back Up Reminder By default, Bento reminds you to create a backup file once a week. To create a Bento backup file from the back up reminder dialog: 1 Click Back Up. 2 In the dialog that appears, use the default name and location or type a name and location for the backup file. Changing the Back Up Reminder You can change the default back up reminder frequency or turn off the back up reminder. To turn on the back up reminder or to change the reminder frequency: 1 Choose Bento > Preferences.
Creating a Backup File When you create a Bento backup file, you create a copy of the data that is in Bento. It’s a good idea to back up your Bento data before you make extensive changes, such as importing data, deleting libraries, or significantly changing forms. To create a backup file: 1 Choose File > Back Up Bento Data. 2 Use the default name and location or type a name and location for the backup file. 3 Click Save.
Using Time Machine with Bento Time Machine is the Mac OS X application that backs up your computer on a regular basis. To use Time Machine to back up your Bento data, set the backup options so that Time Machine backs up the user's Library folder. Then you can use Time Machine to restore the Bento data from a specific backup date and time. When you restore data from a Time Machine backup, you replace all of the data that is in Bento with the contents of the backup file.
Chapter 9 Backing Up and Restoring Information
A Keyboard Shortcuts A This section provides a reference of the keyboard shortcuts. You can use your keyboard and mouse to quickly accomplish many tasks in Bento. To find the shortcuts for common menu commands, look in the menus (or see the menu shortcuts listed here). To complete an action, press the shortcut keys in the order shown. Note: To tab and shift-tab to all fields in form and table view, you must set full keyboard access to “All controls.
Action Shortcut Working with Table View Edit a selected record Enter Extend selection upward Shift-up arrow Extend selection downward Shift-down arrow Move to previous record Up arrow Move to the next record Down arrow Show or hide summary row Command-R Select multiple records Select one record, then Shift-click another record to select all records in between Extend record selection With records selected, Command-click record to add a record to selection, if it is not selected, or to remove
Action Shortcut General Create library (opens New Library dialog) Command-L Create collection Shift-Command-N Create Smart Collection Option-Command-N Show or hide Advanced Find Command-F Use search field Option-Command-F Show Source list, records area, and Fields list Command-1 Show Source list and records area Command-2 Show records area and Fields list Command-3 Show records area only Command-4 Move to next area of main window (to the right) Control-Option-right arrow Move to previo
Appendix A Keyboard Shortcuts
A Address Book application 8, 23 Address Book groups 37 displaying data from 35 Address Book library 8 described 23, 31, 37 fields updated in Address Book application 39 hiding 36 Advanced Find 29 aliases to files or folders 67 aligning fields on forms 54 archiving. See backing up Average function 61 B backing up described 87 turning off reminder 89 back ups, reverting from 90 bento.
E emails 49 events displaying 40 iCal application 35 exporting 84 F field labels 47 moving 53 field names 65 changing 70 setting up during import 79 fields adding to a form 50 aligning on forms 54 calculating data in 64, 66 creating 65, 70 deleting data from 70 deleting from form 51 described 63 displayed from Address Book 39 displayed from iCal 41 in current library 30 in different form views 47 in form view 63 in table view 57, 63 list fields 64 locked 70 media fields 71 resizing 51 selecting 51 Fields l
list fields 64 locked fields 70 M mailing labels 86 mapping fields 81 Maximum function 61 media fields 71 media files, deleting 73 Microsoft Excel 76 Minimum function 61 movies 72 MP3 files 71 music 72 N navigation bar 27 Numbers 76 O objects selecting on form 51 text boxes 54 operators 66 P PDF files 67 photos 71 printing 85 mailing labels 86 selected records 86 Q QuickTime 71 R records adding 48, 58, 80 adding media files to 72 adding to collections 44 calculating data in 64 deleting 34, 49, 59 dupl
Index