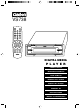
VS738 DIGITAL MEDIA P L AY E R OWNER’S MANUAL INSTALLATION GUIDE BEDIENUNGSHANDBUCH INSTALLATIONSANLEITUNG MODE D’EMPLOI GUIDE D’INSTALLATION MANUALE DELL’UTENTE GUIDA PER L’INSTALLAZIONE MANUAL DEL USUARIO GUÍA DE INSTALACIÓN GEBRUIKS- EN INSTALLATIEHANDLEIDING BRUKSANVISNING INSTALLATIONSGUIDE MANUAL DO PROPRIETÁRIO GUIA DE INSTALAÇÃO
• Features Compatible with PAL DVD (Video CD) and NTSC DVD (Video CD) This player can play discs recorded in either PAL or NTSC format. Use the Proper Power Supply This product is designed to operate with a 12 volt DC, negative ground battery system (the regular system in a normal car). - A single LSI chip now integrates all major DVD playback circuit functions including the MPEG2 decoder, video D/A converter, and audio decoders.
Contents Safety Information . . . . . . . . . . . . . . . . . . . . . . . . . . . . . . . . . . . . . . . . . . . . . . . . . . 3 Disc Notes . . . . . . . . . . . . . . . . . . . . . . . . . . . . . . . . . . . . . . . . . . . . . . . . . . . . . . . . 4 Installation . . . . . . . . . . . . . . . . . . . . . . . . . . . . . . . . . . . . . . . . . . . . . . . . . . . . . . . . 6 DIN Front-mount (Method A) . . . . . . . . . . . . . . . . . . . . . . . . . . . . . . . . . . . . . . . . . .
• Caution - THIS MOBILE DVD PLAYER IS A CLASS I LASER PRODUCT. HOWEVER THIS MOBILE DVD PLAYER USES A VISIBLE/ INVISIBLE LASER BEAM WHICH CAN CAUSE HAZARDOUS RADIATION EXPOSURE IF DIRECTED. - BE SURE TO OPERATE THE MOBILE DVD PLAYER CORRECTLY AS INSTRUCTED. - USE OF CONTROLS OR ADJUSTMENTS OTHER THAN THOSE SPECIFIED HEREIN MAY RESULT IN HAZARDOUS RADIATION EXPOSURE. - DO NOT OPEN COVERS AND DO NOT REPAIR YOURSELF. REFER SERVICING TO QUALIFIED PERSONNEL.
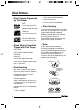
Disc Notes • 2. Dirty, dusty and damp areas. Disc Formats Supported by This Player 3. Near car heaters. 4. On the seats or dashboard. DVD 12 cm disc/8 cm disc (Single-sided disc only) Video CD 12 cm disc/8 cm disc CD/CD-R/RW, MP3 12 cm disc/8 cm disc • Discs Which Cannot Be Played with This Player - DVD-ROM - DVD-R/DVD-RW/DVD-RAM - CD-ROM - Photo CD • Disc Cleaning Use a dry soft cloth to wipe the surface.
• Preparing New Discs with Rough Spots A new disc may have rough edges on its inside and outside edges. If a disc with rough edges is used, the proper setting will not be performed and the player will not play the disc. Therefore, remove the rough edges in advance by using a ball-point pen or pencil as shown below. To remove the rough edges, press the side of the pen or pencil against the inside and outside edges of the disc.
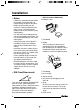
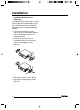
Installation • Notes: - DIN Front-mount (Method A) - Choose the mounting location where the unit will not interfere with the normal driving function of the driver. - Before finally installing the unit, connect the wiring temporarily and make sure it is all connected up properly and the unit and the system work properly. - Use only the parts included with the unit to ensure proper installation. The use of unauthorized parts can cause malfunctions.
Removing the unit 1. Frame 2. Insert fingers into the groove in the front of frame and pull out to remove the frame. (When re-attaching the frame, point the side with the groove downwards and attach it.) 3. Lever Insert the levers supplied with the unit into the grooves at both sides of the unit as shown in figure until they click. Pulling the levers makes it possible to remove the unit from the dashboard. Fastening the unit to the factory radio mounting bracket. 1.
Installation - Installation Bracket-mount (Method C) If installation of the DVD player in a DIN slot is impossible or undesirable, it can be installed in alternative installation locations using the supplied mounting brackets. 1. Use flat head machine screws (M5×5) to fix the installation brackets to the unit (on both sides) in the desired direction. 2. Align the unit on the place of installation and secure it with Hex washer head tapping screws (M5×18). 1. Flat head machine screws (M5×5) 2.
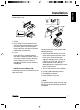
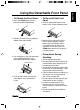
• To Detach the Front Panel 1. Press the OPEN button, then the front panel will be folded down. • To Re-install the Front Panel 1. Push the front panel into the main body. A ‘click’ sound should be heard. OPEN 2. Remove the front panel by pulling its middle-hand side outward. 3. For safekeeping, store the front panel in the supplied protective case immediately after being removed. PROTECTIVE CASE FRONT PANEL 4. Push the front metal plate into the main body. A ‘click’ sound will be heard. 2.
10 VIDEO AUDIO-R AUDIO-L YELLOW RED WHITE AV-OUT IGNITION SWITCH (B+) GROUND (B-) RED BLACK SPDF DIGITAL OUT MEMORY BACK-UP YELLOW AV-IN EXTERNAL REMOTE RECEIVER VIDEO AUDIO-R AUDIO-L YELLOW RED WHITE Electric Connection DVD MAIN UNIT (VIEW FROM REAR) OUT IN IR TO POWER SUPPLY
POWER Button for switching the equipment ON or OFF. 1. 2. 0-9 Numerical buttons. 3. ILL/GOTO Button for adjusting the brightness of the VFD Display, or performing time search during play. 4. 7 Press to stop playback. Fast forward ¡ and fast reverse 1 buttons. 5. 1/¡ Button for advancing to the start of the next section ] or for returning 6. ]/[ to the previous section [. In the menu mode, these buttons control the cursor. 7. SUBTITLE Selects subtitles on DVD discs with multilingual subtitle functions. 8.
Preparing the Remote Control Unit for Use • Inserting the Batteries 1. Open the battery compartment cover. 2. Insert the new batteries. Make sure that the positive and negative poles of the battery are positioned as show inside the battery compartment. 3. Close the battery compartment. 4. Batteries required: two AAA batteries. • Using the Remote Control Point the remote control towards the player front face IR mark (remote control signal receiver). Operation angle: About ±30° in front of the IR mark.
• - DVD/CD Disc Stop Play - Briefly press the 7 STOP button to stop playback, and press the PLAY button to continue normal play. - Press the 7 STOP button twice. The player will stop and return to the first section or chapter. • Fast Forward/Fast Reverse 1. Continuously repeats the current chapter/section, when REPEAT 1 mode has been selected. 2. Select the REPEAT mode to continuously repeat all chapters/ sections on the disc. 3.
Basic Operation - Use the 0-9 keys to input the TITLE/ CHAPTER, or hh:mm:ss to which you want to jump. Use 1 or ¡ to select TITLE/CHAPTER/TIME input. Use ENTER to execute jumping. - CD/VCD: Press ILL once to display: GOTO --:-- Use the 0-9 keys to input the mm:ss from where you want to start playback. Note that the input time must be less than the total time of the currently playing track. - The GOTO function is unavailable for MP3 playback.
5. Press DISPLAY for the fifth time. The message on the screen will be cleared. - VCD (with PBC Off)/CD Each time the DISPLAY button is pressed, the screen display changes in the following order: SINGLE ELAPSE TOTAL ELAPSED SINGLE REMAIN • Each time the DISPLAY button is pressed, the screen display changes as follows: CHAPTER ELAPSED CHAPTER REMAIN Multiple Language Audio Function for DVD - Press the AUDIO button during play.
MP3 Disc Replay • Supported CD-R/RW Standards: - Disk at once - Track at once • Supported File Formats: - ISO9660, level 1 and level 2 - Joliet - Romeo • File System: - Max. 8 levels of folders 31 files in each folder Max. 255 folders Max. 255 files • Supported Bit Rates: - @fs = 32, 44.
• Initial Setup SETUP – MAIN PAGE Press SETUP in the stop mode. (Press the 7 STOP button twice to ensure the player is in the stop mode.) 1. The initial SETUP MENU is displayed. 2. Select the preferred item by using the ]/[ buttons. 3. Press the ENTER button. I. GENERAL SETUP This setup page includes all the items for TV display & Audio output setup. For details, please refer to General Setup Menu. II. SPEAKER SETUP This is to activate the audio output from DOLBY AC3 5.1 DOWNMIX to the 2-channel mode.
General Setup SETUP – GENERAL – TV TYPE SETUP – GENERAL – ANGLE MARK • TV Type Setup - This player can play discs recorded in either PAL or NTSC format. - Select the NTSC format, when an to NTSC TV is connected. - Select PAL format, when a PAL TV is connected. - With MULTI format, the TV output format will automatically change according to the DVD disc format.
SETUP – GENERAL – CAPTIONS • Audio Setup SETUP – AUDIO – SPDIF • Captions Setup Activate the CAPTIONS feature by selecting ON. Release this feature by selecting OFF. • Speaker Setup • SPDIF Setup Turns the SPDIF optical output ON/ OFF. SETUP – AUDIO – OP MODE SETUP – SPEAKER – DOWNMIX • • DOWNMIX Setup This is to switch the audio output from DOLBY AC3 5.1 DOWNMIX to 2-channel mode. OP Mode There is only one operating mode for the Dolby Digital decoder: LINE MODE.
Preferences Setup SETUP – AUDIO – DUAL MONO SETUP – AUDIO – LPCM OUTPUT • Dual Mono The Dual mono reproduction only process for Dolby Digital program with 1+1 Audio code mode. STEREO: Reproduces 1+1 program CH1 for left channel, CH2 for right channel. CH1 MONO: Reproduces CH1 channel in both Left/Right output. CH2 MONO: Reproduces CH2 channel in both Left/Right output. MIX MONO: Reproduces CH1+CH2 in both Left/Right output. • LPCM Output Sets the LPCM output sample rate.
SETUP – PREFERENCES – SUBTITLE SETUP – PREFERENCES – LOCALE • • Subtitle Language Setup Select the preferred SUBTITLE language by using the cursor buttons. SETUP – PREFERENCES – DISC MENU Locale Select the preferred city by using the cursor buttons. The player will depend on this setting to choose a related film grade. SETUP – PREFERENCES – PARENTAL • Disc Menu Language Setup Select the preferred DISC MENU language by using the cursor buttons.
Preferences Setup SETUP – PREFERENCES – PASSWORD SETUP – PREFERENCES – DEFAULTS • • Password Select CHANGE and press the ENTER button. Type the old password (the initial factory code is 3308) and key in the 4-digit password you want to use, and retype again to confirm the new password. SETUP – PREFERENCES – SMART NAV Factory Settings (Reset) Select RESET to return the unit to the factory settings. The factory settings are as following: AUDIO SETUP Smart NAV Sets the playing style of MP3 discs.
Supply voltage: Current consumption: Signal system: Playable discs: Audio output level: Audio signal output characteristics: 12 V DC (11 V - 16 V), nominal voltage 12 V, negative ground Less than 2.0 A Composite video 1.0 Vp-p 75 (RCA pin jack) (1) DVD-VIDEO disc 5" (12 cm) single-sided, single-layer 5" (12 cm) single-sided, double-layer 3" (8 cm) single-sided, single-layer 3" (8 cm) single-sided, double-layer (2) Compact disc (CD-DA, VIDEO-CD, CD-R) 5" (12 cm) disc 3" (8 cm) disc 10 KΩ (2 ch 1.