MS2005BO.
MS2005BO.QXD 6/27/2002 2:25 PM Page 2 ongratulations on your purchase of this Ungo System. Please read this manual thoroughly to familiarize yourself with your system’s components and operation. Discuss any questions you might have with your installing dealer. C Record the serial number of your Ungo System and keep all dealer records and receipts. Be sure to discuss the installation with the dealer so that you understand the specifics of the installation in your vehicle.
MS2005BO.QXD 6/27/2002 2:25 PM Page 3 Table of Contents 1. About Your System . . . . . . . . . . . . . . . . . . . . . . . . . . . . . . . . . . . . . . . . . . . . . . . . . . . . . . . Page 1 2. Remote Transmitters Remote Transmitter Layout . . . . . . . . . . . . . . . . . . . . . . . . . . . . . . . . . . . . . . . . . . . .Page 2 Optional Driver Door Priority Mode . . . . . . . . . . . . . . . . . . . . . . . . . . . . . . . . . . . . . .Page 2 Battery Replacement . . . . . . . . . . . . . . . . .
MS2005BO.
MS2005BO.QXD 6/27/2002 2:25 PM Page 1 About Your Ungo System The Ungo MS2005 is a state-of-the-art combination vehicle security and remote controlled car starter system. The MS2005 offers security features designed to deter and detect potential intrusions to your vehicle. It will alert and inform the driver and people in the vicinity of your vehicle when a zone is violated.
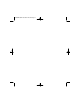
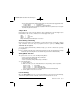
MS2005BO.QXD 6/27/2002 2:25 PM Page 2 Remote Transmitters Remote Transmitter Layout LED Button 1 Button 2 Button 3 Button 4 The Ungo MS2005 comes with 2 multi-function Remote Transmitters used to control nearly all of the system’s features. Each time a transmitter button is pressed, the LED will flash to indicate that a transmission is taking place. Button 1 Arms the system. This button also locks the doors when the system is in Valet Mode. Button 2 Disarms the system.
MS2005BO.QXD 6/27/2002 2:25 PM Page 3 Battery Replacement Your Ungo Remote Transmitter uses a 12 volt alkaline battery, which will need to be replaced from time to time. Under normal conditions, the battery should last for up to a year before it needs replacement. When your Remote Transmitter’s battery is in need of replacement, you will notice a decrease in your system’s operating range or a decrease in the brightness of the Transmitter’s LED indicator.
MS2005BO.QXD 6/27/2002 2:25 PM Page 4 Security Features Remote Arming When Armed, the system monitors and protects 3 independent areas, or zones, including the doors, hood/trunk, and shock sensor. To Arm the system: 1. Turn off the ignition. 2. Press Button 1. • • • • The siren/horn will chirp once.* The doors will lock. The parking lights will flash once. The LED will turn on red, indicating the doors, hood and trunk inputs are activated.
MS2005BO.QXD 6/27/2002 2:25 PM Page 5 * The siren chirps and light flashes during disarming will alert you if the system had been triggered while armed. 2 chirps / 2 flashes 3 chirps / 3 flashes = = normal disarming Tamper Alert - system was triggered ** If the Passenger Unlock Feature is installed, pressing Button 2 will unlock only the driver’s door. Pressing the unlock Button 2 again unlocks all doors.
MS2005BO.QXD 6/27/2002 2:25 PM Page 6 To start the Passive Arming Process: 1. Turn off the ignition.* • The status LED will begin to flash quickly. 2. Open the door and exit the vehicle. • Once all doors are closed and the dome light is turned off, the LED will turn off. 3. After 20 seconds, • The siren will chirp (if Passive Arming with chirp is selected). • The parking lights will flash. • The doors will lock.** • The status LED will flash red, indicating the system is armed. 4. The system is now armed.
MS2005BO.QXD 6/27/2002 2:25 PM Page 7 3. Turn ignition key on. 4. Within 4 seconds, press and hold the Override switch. • The system will disarm. 5. You can now start and drive the car. Note: During installation, your installer can program the system to give 10 second entry delay when the system Arms passively. When the door is opened while the system is Armed, the siren will give a series warning of chirps before sounding, giving you time to perform the emergency override procedure.
MS2005BO.QXD 6/27/2002 2:25 PM Page 8 Remote Start Features Remote Starting To Remote Start the System: 1. Be sure the System is not in Valet Mode. 2. Press Button 4. • • • • • • The parking lights will turn on. The siren will chirp 3 times (if the system is Armed, the shock sensor will turn off). The ignition will turn on. The engine will start and run for the duration of its programmed Run Timer.* The heater or air conditioner will turn on (if turned on prior to exiting the vehicle).
MS2005BO.QXD 6/27/2002 2:25 PM Page 9 To re-enter the vehicle and resume driver control: 1. Disarm the alarm by pressing Button 2 on the Remote Transmitter.* • The doors will unlock.* 2. Turn on the ignition. 3. Press the brake pedal to disengaged the MS2005. • The LED will turn off. *If optional keyless entry feature is installed. Auto Cold Starting The Auto Cold Starting Feature automatically starts the vehicle every two hours and runs for the preset Run Time. To enter Cold Start Mode: 1.
MS2005BO.QXD 6/27/2002 2:25 PM Page 10 Other Features Valet Mode Allows you to temporarily disable the security system when the car is being service or turned over to a parking attendant. To turn Valet Mode on or off: 1. Turn on the ignition. 2. Press and hold the override switch. 3. While holding the override switch, turn off the ignition. • The siren will chirp once to indicate you have turned Valet Mode on. • The siren will chirp twice to indicate you have turned Valet Mode off. 4.
MS2005BO.QXD 6/27/2002 2:25 PM Page 11 Dome Light Control The dome light will turn on for 20 seconds when the system is disarmed (or unlocked in Valet Mode) using the Remote Transmitter. Auxiliary Function This function will operate regardless of whether the system is armed or disarmed and will stay active for as long as the Button 3 is held. To operate the auxiliary function, press Button 3.
MS2005BO.
MS2005BO.QXD 6/27/2002 2:25 PM Page 13 Reference Chart You can use this chart to quickly identify and interpret your system’s chirp indications and LED flashes.
MS2005BO.QXD 6/27/2002 2:25 PM Page 14 System Indications You can use these tables to quickly identify and interpret the MS2005’s parking light and LED indications.
MS2005BO.QXD 6/27/2002 2:25 PM Page 15 Warranty Information 1. Ungo Security Corporation of Gardena, California ("Ungo Security") warrants this Ungo system to be free from defects in materials and workmanship and to comply with Ungo Security’s applicable printed specifications. 2. Ungo Security systems carry a limited lifetime warranty on the Main unit (system brain) and transmitters.
MS2005BO.QXD 6/27/2002 2:25 PM Page 16 Ungo Security Corporation A Clarion Company 661 West Redondo Beach Blvd. Gardena, CA 90247 800-Go-Clarion www.clarion-usa.com © Ungo Security Corporation, Gardena, CA 97-MS2005-10 Rev.