Owner’s manual Mode d’emploi Manual de instrucciones RMX465D AM/FM MD PLAYER WITH CD CHANGER CONTROL • LECTEUR MD AM/FM AVEC COMMANDE DE CHANGEUR CD • RADIO DE AM/FM Y REPRODUCTOR DE MINIDISCOS CON CONTROL DE CAMBIADOR DE DISCOS COMPACTOS 6 Clarion Co., Ltd. 1999/12 (A·C) All Rights Reserved. Copyright © 1999: Clarion Co., Ltd.
Thank you for purchasing this Clarion product. Memorándum ∗ Please read this owner’s manual in its entirety before operating this equipment. ∗ After reading this manual, be sure to keep it in a handy place (e.g., glove compartment). ∗ Check the contents of the enclosed warranty card and keep it carefully with this manual. ∗ This manual includes the operating procedures of the CD changer. The CD changer has its own manual, but no explanations for operating it are described. Contents 1. FEATURES ..........
11.
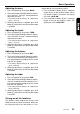
. NOMENCLATURE 3. CONTROLS / LES COMMANDES / CONTROLES 10. INDICACIONES DE ERROR Note: • Be sure to read this chapter referring to the front diagrams of chapter “3. CONTROLS” on page 5 (unfold). Source unit / Appareil pilote / Unidad fuente Cuando ocurra un error, se visualizará el tipo del mismo. Tome las medidas descritas a continuación para solucionar el problema.
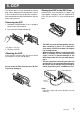
. DCP The control panel can be detached to prevent theft. When detaching the control panel, store it in the included DCP case to prevent scratches. We recommend taking the control panel with you when leaving the car. Storing the DCP in the DCP Case Hold the DCP, in the orientation as shown in the figure below, and put it into the supplied DCP case. (Ensure the DCP is in the correct orientation.) Removing the DCP 1. Hold down POWER button 3 for 1 second or longer to turn off the power. 2.
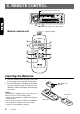
. REMOTE CONTROL Receiver for remote control unit 6 Operating range: 30° in all directions Remote control unit Signal transmitter ¥ ) * ( & ™ ¡ £ ¢ § ∞ Inserting the Batteries 1. Turn the remote control unit over, then slide the rear cover in the direction of the arrow. 2. Insert the AA (UM-3/1.5V) batteries that came with the remote control unit facing in the directions shown in the figure, then close the rear cover. AA (UM-3/1.
Functions of Remote Control Unit Buttons Button Mode Radio MD CD changer ¥ FUNC Turns power on and off. When pressed and held for 1 second: Turns power off. Switches among radio, MD and CD changer. & BAND DISC UP PROG TOP Switches reception band. * VOLUME Increases and decreases volume (in all modes). ( SEARCH Moves preset channels up and down. Moves tracks up and down. When pressed and held for 1 second: Fast-forward/ fast-backward. ) PLAY/PAUSE Turns mute on and off.
7. OPERATIONS Basic Operations Note: Be sure to read this chapter referring to the front diagrams of chapter “3. CONTROLS” on page 5 (unfold). CAUTION Turning the Rotary volume knob $ clockwise increases the volume; turning it counterclockwise decreases the volume. ∗ The volume level is from 0 (minimum) to 33 (maximum). Switching the display Press DISP button 5 to select the desired display.
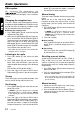
Basic Operations Adjusting the bass 1. Press A-M button 2 and select “BASS”. 2. Turning the Rotary knob $ clockwise emphasizes the bass; turning it counterclockwise attenuates the bass. ∗ The factory default setting is “0”. (Adjustment range: −6 to +6) 3. When the adjustment is complete, press A-M button 2 several times until the function mode is reached. ommended to use the loudness effect. 1. Press and hold LD button 2 for 1 second or longer to turn on the loudness effect.
Radio Operations FM reception For enhanced FM performance the ® tuner includes signal actuated stereo control and Multipath noise reduction circuits. Changing the reception area This unit is initially set to USA frequency intervals of 10kHz for AM and 200kHz for FM. When using it outside the USA, the frequency reception range can be switched to the intervals below. ● Setting the reception area 1. Press BND button @ and select the desired radio band (FM or AM). 2.
Radio Operations MD Operations Auto store Loading an MD Auto store is a function for storing up to 6 stations that are automatically tuned in sequentially. If 6 stations cannot be received, a previously stored station remains unoverwritten at the memory position. 1. Press BND button @ and select the desired band (FM or AM). 2. Press and hold AS button 9 for 2 seconds or longer. The stations with good reception are stored automatically to the preset buttons. 1.
MD Operations Selecting a track Random play ● Track-up 1. Press the right side of SRCH button # to move ahead to the beginning of the next track. 2. Each time you press the right side of SRCH button #, the track advances ahead to the beginning of the next track. ● Track-down 1. Press the left side of SRCH button # to move back to the beginning of the current track. 2. Press the left side of SRCH button # twice to move to the beginning of the previous track.
8. OPERATIONS OF ACCESSORIES CD Changer Operations CD changer functions When an optional CD changer is connected through the C-BUS cable, this unit controls all the CD changer functions. This unit can control a total of 2 changers. Press FNC button 3 and select the CD changer mode to star t play. If 2 CD changers are connected, press FNC button 3 to select the CD changer for play. ∗ If “NO MAGA” appears in the display, insert the magazine into the CD changer.
CD Changer Operations 1. Press and hold SCN button 9 for 1 second or longer. “DISC” and “SCN” light in the display and the disc scan play starts. 2. To cancel the disc scan play, press SCN button 9 again. “DISC” and “SCN” go off from the display and the current track continues to play. Repeat play The repeat play continuously plays the current track. This function continues automatically until it is canceled. 1. Press RPT button 8. “RPT” lights in the display and the current track is repeated. 2.
9. TROUBLESHOOTING General Problem Cause Measure Power does not turn on. (No sound is produced.) Fuse is blown. Replace with a fuse of the same amperage. If the fuse blows again, consult your store of purchase. Incorrect wiring. Consult your store of purchase. No sound output when operating the unit with amplifiers or power antenna attached. Power antenna lead is shorted to ground or excessive current is required for remote-on the amplifiers or power antenna. 1. Turn the unit off. 2.
10. ERROR DISPLAYS If an error occurs, one of the following displays is displayed. Take the measures described below to eliminate the problem. CD changer MD Error Display Cause Measure ERROR 2 An MD is caught inside the MD deck and is not ejected. This is a failure of MD deck’s mechanism and consult your store of purchase. ERROR 3 An MD cannot be played due to scratches, etc. Replace with a non-scratched, non-warped-disc. ERROR 6 An MD is loaded upside-down inside the MD deck and does not play.
11. SPECIFICATIONS FM Tuner Audio Frequency Range: 87.9 MHz to 107.9 MHz Usable Sensitivity: 11 dBf 50dB Quieting Sensitivity: 17 dBf Alternate Channel Selectivity: 75 dB Stereo Separation (1 kHz): 35 dB Frequency Response (±3 dB): 30 Hz to 15 kHz Maximum Power Output: 180 W (45 W × 4 ch) (EIAJ) Continuous Average Power Output: 16 W × 4, into 4 Ω, 20 Hz to 20 kHz, 1%THD Bass Control Action (30 Hz): ±13 dB Treble Control Action (10 kHz): ±10 dB Line Output Level (MD 1 kHz): 1.
Memo 20 RMX465D