Owner’s manual & Installation manual 사용 설명 및 설치 설명서 AM/FM DVD VIDEO / VIDEO CD / CD / MP3 PLAYER / CD CHANGER CONTROLLER WITH 7" LC DISPLAY 調頻 (FM) 帶7英寸液晶顯示器調 幅 (AM)/ 帶7英寸液晶顯示器調幅 (AM)/調 CD/CD/MP3播放機 DVD VIDEO/VIDEO CD/CD/MP3 播放機 / CD 換片機控制器 7인치 LC 디스플레이 화면의 AM/FM DVD 비디오/비디오 CD/CD/MP3 플 레이어 / CD 체인저 컨트롤러 R Clarion Co., Ltd. All Rights Reserved. Copyright © 2002: Clarion Co., Ltd. Printed in Japan/ 在曰本印刷/일본에서 인쇄하였음.
English Owner’s manual Thank you for purchasing the Clarion VRX935VD. ∗ This owner’s manual is for the VRX935VD. ∗ Please read this owner’s manual in its entirety before operating this equipment. ∗ After reading this manual, be sure to keep it in a handy place (e.g., glove compartment). ∗ Check the contents of the enclosed warranty card and keep it carefully with this manual. ∗ This manual includes the operating procedures of the CD changer, MD changer, DVD changer, TV tuner, 5.1ch Surround Decoder.
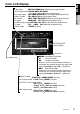
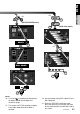
The Color LCD Display and the Information Panel on the main unit show the following displays, providing information about the mode and functions operated. WARNING Preset channel indication Disc number indication ∗The disc numbers corresponding to the discs in the DVD, CD or MD changer light. 1.
Main unit / 主機 / 본체 [OPEN] [Q] [FUNC] Names of Buttons Note: • Be sure to read this chapter referring to the front diagrams of chapter “3. CONTROLS” on page 5 (unfold). When the display closed [DIRECT] [BAND] [DIRECT] button [RELEASE] • Use this button to increase/decrease the volume. [SENSOR] [DISP] button • Use this button to select a preset channel in the radio/TV mode. • Use this button to select a disc in the changer mode.
English Color LCD Display Owner’s manual •Radio mode : FM1 98.10MHz Pch 1(band/frequency/preset No.) •DVD changer mode: D2 T02 C002 01:08:20 (disc No./title No./chapter No./ playback time) •DVD video mode : T01 C003 00:08:20(title No./chapter No./playback time) •Video CD mode : T01 00:01:18(track No./playback time) •MP-3 mode : F001 T001 00:04:07(folderNo./track No./playback time) •CD mode : TRACK 02 04 : 07(track No./playback time) •CD/MD changer mode: D02 T02 00 : 45(disc No./track No.
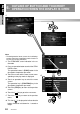
English 6. OUTLINE OF BUTTON AND TOUCHKEY OPERATION WHEN THE DISPLAY IS OPEN Owner’s manual ∗1 ∗2 ∗3 Note: • The background of some screens in the following sections have been simplified to make it easier to see the keys in each procedure. ∗1: The STANDARD screen indication in the radio mode ∗2: Press an operation button to switch the STANDARD screen. The operation button is [FUNC] button in the description of operation per mode.
English Owner’s manual (ADJUST MODE menu) ∗8 (DVD SETUP menu) 1 ∗6 ∗7 STOP CLOCK ∗6 PARENTAL LEVEL VRX935VD 11
English Owner’s manual (AUDIO MODE menu) (KEY PAD) BASS BOOST DETAIL ∗9 9 EQ LEVEL 12 VRX935VD 8 1 0 ENT
English Owner’s manual ∗8 ∗10 1 (MOTION/SPRITEmenu) (DVD video menu) SPRITE ∗11 WALL COLOR ENT Notes: ∗8: This icon [ ] is displayed to indicate that the button should be held down for 1 second or longer. ∗9: This shows a KEY PAD selection example in the radio mode when 98.10 MHz is selected. ∗10: Use this button during DVD, video CD and MP-3 playback. ∗11: When the KEY PAD is difficult to view, press the touch key on the right (left) side of the screen to move it to the other side of the screen.
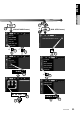
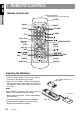
English 7. REMOTE CONTROL Owner’s manual Remote control unit Signal transmitter Operating range: 30˚ in all directions [CeNET] [BAND] [MUTE] [FUNC] [VOLUME] [P.TIME] [0-9] [ [DISC SEL] [ ],[ ] [ ] ] [SEARCH MODE] [RTN] [MENU] [SET UP] [TITLE] [ [RPT] [ENT] [ ],[ ] [SCAN] [ ],[ ] ],[ [RDM] [AUDIO] ] [PBC] [SLOW] [ANGLE] [SUB TITLE] Inserting the Batteries 1.Turn the remote control unit over, then slide the rear cover in the direction of the arrow. AA (SUM-3, IECR-6/1.
● Shared modes [FUNC] button [VOLUME] button • Increases and decreases volume. [MUTE] button [P.TIME] button • Press to turn on and off the playtime display in the DVD video and video CD mode. • Press and hold this button for 1 second or longer to switch the playback status display contents. • Turns mute on and off. [ß] button [CeNET] switch • Press to stop video playback in DVD video and video CD mode. • For operating this unit, switch this switch to the CeNET position.
English Functions of Remote Control Unit Buttons [w], [z], [Å], [Î] button [SLOW] button • Press to select menus and other items during DVD video/MP-3 playback. • Press to perform slow playback in DVD video or video CD mode. Owner’s manual [ENT] button • Press to confirm numerics entered in the KEY PAD operation screen. [ ][ ] buttons • Press to select the next higher or lower chapter number in DVD video mode.
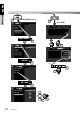
2. Press the right side of the DCP carefully to fit it in place. Owner’s manual The control panel can be detached to prevent theft. When detaching the control panel, store it in the DCP (DETACHABLE CONTROL PANEL) case to prevent scratches. We recommend taking the DCP with you when leaving the car. Removing the DCP 1. Turn the power off. 2. Slide the [RELEASE] lever leftward to release the DCP/Operation Panel. DCP 3. Press the [FUNC] button to turn on the power. CAUTION DCP 3.
English 9. CAUTIONS ON HANDLING LCD panel/Generalities Owner’s manual For a longer service life, be sure to read the following cautions. • Be sure to store the LCD panel inside the main unit when parking the car outdoors for long period of time. The LCD panel will operate properly in a temperature range of 0 to 60˚C. • Don’t allow any liquids on the set from drinks, umbrellas etc. Doing so may damage the internal circuitry. • Do not disassemble or modify the set in any way. Doing so may result in damage.
DVD Video Features This unit provides the following functions in addition to the high image quality and sound quality of DVD video. Notes: • The functions described in the section, “Features”, for example, the recorded language, subtitles, angles, etc. differ with the DVD video disc. Refer to the instructions provided with the DVD video. • Some disc functions may operate differently than described in this manual.
English Discs TV color system This DVD player plays NTSC discs and PAL discs only and cannot be used for playback of SECAM discs. Playable discs This DVD video player can play the following discs. Owner’s manual Playable discs DVD video discs video CDs CD TEXT Audio CDs A CD Extra disc is a disc in which a total of two sessions have been recorded. The first session is Audio session and the sedond session Data sessioin.
Basic Operations Note: Be sure to read this chapter referring to the front diagrams of chapter “3. CONTROLS” on page 5 (unfold). ACC or engine ON position Turning on and off the power Note: • Be careful about using this unit for a long time without running the engine. If you drain the car’s battery too far, you may not be able to start the engine and this can reduce the service life of the battery. 1. Press the [FUNC] button. 2. The illumination and display on the unit light up.
English Basic Operations Opening and turning the display WARNING Owner’s manual • To prevent the battery from going dead, operate this unit with the engine running, if possible. • When the liquid crystal panel is operating, be careful not to get your hand or finger caught between the panel and main unit or the instrument panel of the car. Standing up the liquid crystal panel 1. Press the [OPEN] button and the liquid crystal panel comes out and stand up automatically. Adjusting the angel, etc.
When the way the liquid crystal panel is mounted hinders the operation of the air conditioner, the position of the panel can be turned horizontal temporarily. 1. Press and hold the [OPEN] button when the liquid crystal panel is upright, and release the button when a beep is heard. 2. The liquid crystal panel turns horizontal. ∗ Press the [OPEN] button again when the liquid crystal panel is in the horizontal position, and the panel returns to the original position.
English Basic Operations Adjusting the MID Owner’s manual The MID gain, MID frequency (center frequency) and MID Q can be adjusted as follows. 1. Press the [A-M] button, then touch the [USER CUSTOM] key. 2. Touch the [DETAIL] key, then touch the [MID] key. 3. When the bass type selection screen is displayed, touch the key for the desirable type to select it. 4. Touch the [w] or [z] key to adjust to desirable level. GAIN : –6 to 6 (The factory default setting is “0”) FREQ.
Radio Operations Changing the setting of the display background FM reception 1. Press the [DISP] button for 1 second or longer to show the background setup menu. ∗ This menu appears only during Radio and DVD (with CD, MP3), CD/MD changer mode, and when the car is moving. 2. Touch the setting key to show the setup display. ●To set up the motion pattern 2-1. Touch the [MOTION] key to set a desired motion pattern. 2-2. Touch a desired MOTION PATTERN. ●To set up the sprite pattern 2-1.
English Radio Operations Owner’s manual Seek tuning Manual tuning 1. Press the [BND] button and select the desired band. (FM or AM) 2. Tune in to a station. There are 2 ways available: Quick tuning and step tuning. When you are in the step tuning mode, the frequency changes one step at a time. In quick tuning mode, you can quickly tune the desired frequency. 1. Press the [BND] button and select the desired band.
Instant station recall (ISR) Instant station recall is a special radio preset that instantly accesses a favorite radio station at a touch of a button. The ISR function even operates with the unit in other modes. ●ISR memory 1. Select the station that you wish to store in ISR memory. 2. Press and hold [ISR] button for 2 seconds or longer. ●Recalling a station with ISR 1. In any mode, press [ISR] button to turn on the radio function and tune the selected radio station. “ISR” appears in the display.
English DVD Video Player Operations Changing DVD system settings Owner’s manual Notes: • If the SETUP operation is performed in the middle of video CD/DVD video play, the disc plays from the beginning. • Various settings of the SETUP menu cannot be made with the remote control unit. ●When watching through a conventional type of the rear view monitor (4:3) • N PS : The leftmost and rightmost areas of the screen are cut off. Selecting the DVD SETUP menu 1.
2. Touch the key to select a desired language to set it. ∗ The factory default setting is “ENGLISH”. Setting up the audio language 1. Following the steps 1 to 2 in “Selecting the DVD SETUP menu”, touch the [AUDIO LANGUAGE] key. 2. Touch the key to select a desired language to set it. ∗ The factory default setting is “ENGLISH”. 3. Touch the [RTN] key to return previous mode. Setting up the subtitle language 1. Following the steps 1 to 2 in “Selecting the DVD SETUP menu”, touch the [SUB TITLE LANG.] key.
English DVD Video Player Operations Country Input code Owner’s manual NEW ZEALAND NICARAGUA 7890 7873 PALAU PANAMA PAPUA NEW GUINEA PARAGUAY PERU SAINT KITTS AND NEVIS SAINT LUCIA SAINT VINCENT AND THE GRENADINES SAMOA SOLOMON ISLANDS 8087 8065 8071 8089 8069 7578 7667 8667 8783 8366 SURINAME TONGA TRINIDAD AND TOBAGO TUVALU URUGUAY VANUATU VENEZUELA ANGUILLA ARUBA VIRGIN ISLANDS (BRITISH) 8382 8479 8484 8486 8589 8689 8669 6573 6587 8671 CAYMAN ISLAND CHRISTMAS ISLAND COCOS (KEELING) ISLANDS COOK
Basic Operations Loading a disc ∗ No adapter is required to play an 8 cm disc. ∗ Insert the 8 cm disc into the centre of the insertion slot. CAUTION 1. Press the [s] button to pause play. “PAUSE” appears in the display. 2. To resume disc play, press the [s] button again. Ejecting a disc 1. Press the [Q] button a disc ejects. “EJECT” appears in the display. ∗ If a disc (12 cm) is left in the ejected position for 15 seconds, the disc is automatically reloaded.
English DVD Video Player Operations Owner’s manual ∗ The KEY PAD displayed in the video CD mode always starts from the “Ten KEY PAD” when the mode is engaged. ∗ Use either the “Cross KEY PAD” or the “Ten KEY PAD” according to the disc contents menu displayed in DVD video/video CD mode. ∗ Only the sub KEY PAD is displayed while you are driving a car. ∗ The KEY PAD is not displayed in the menu screen while you are driving a car.
Stopping playback 1. Press the [MENU] button during playback. The DVD menus appears. The displayed contents may differ, depending on the DVD software. • Example showing menu display 1. Press and hold the [s] button for 1 second or longer during playback. Playback stops. 2. To resume playback. Press the [s] button, and playback resumes from the scene where playback is stopped. Pausing playback 1. Press the [s] button during playback. Playback pauses. 2. To resume playback.
English DVD Video Player Operations Owner’s manual Fast forward and fast backward Scan playback 1. Press and hold the [a] button or [d] button during playback. Press and hold the button, and the playback speed becomes 4-time faster first and then 16-time faster 3 seconds later. Release the button, and the normal speed is restored. • No audio is reproduced during fast forward and fast rewind operation. • The fast forward and fast rewind speed may differ depending on the disc.
Switching subtitles On DVD discs containing two or more titles, you can select from the title menu for playback. 1. Press and hold the [MENU] button for 1 second or longer during playback. The title menu screen appears. • Press the [MENU] button, and playback resumes from the scene played back before [MENU] button is pressed. • Depending on the disc, the title menu cannot be called. 2. Touch the [w], [z], [Å] or [Î] key to select the item.
English DVD Video Player Operations Switching angles Owner’s manual On DVD discs in which video images have been recorded in two or more angles, you can switch among the angles during playback. 1. Display the sub KEY PAD using the procedures described in the section “KEY PAD operation”. 2. Touch the [ANGLE] key during playback. Each time you touch the key, you can switch among angles. • Depending on the disc, up to 9 angles may be recorded.
Fast forward and fast backward 1. Press and hold the [a] button or [d] button during playback. Press and hold the button, and the playback speed becomes 4-time faster first and then 16-time faster 3 seconds later. Release the button, and the normal speed is restored. • No audio is reproduced during fast forward and fast rewind operation. • The unit may return to the menu screen when the button is pressed. Searching with a track number Pausing playback 1. Press the [s] button during playback.
English DVD Video Player Operations Owner’s manual Other various play functions On/off of Playback Control 1. Touch the screen, the MENU screen appears. 2. Touch the [SUB MODE] key in the MENU screen to show SUB MODE. 3. Touch the touch key of the function you want to play. ●[TRACK SCAN] This operation scans and plays back all tracks on the disc, the first 10 seconds for each. “TRACK SCN” will appear in the screen during play.
Skipping a track (searching) TOP function The TOP function resets the DVD player to the first track of the disc. 1. Press the [BND] button to playback the first track (track No. 1). Fast forward and fast backward 1. Press and hold the [a] button or [d] button during playback. Press and hold the button, and the playback speed becomes 4-time faster first and then 8-time faster 3 seconds later. Release the button, and the normal speed is restored.
English DVD Video Player Operations Listening to an MP3 Owner’s manual This unit is a ID3 Tag compatible model. This unit supports the title, artist and album display of the ID3 Tag versions 1 and 1.1. After disc loading, the play mode is automatically engaged. What is MP3? MP3 is an audio compression method and classified into audio layer 3 of MPEG standards. This audio compression method has penetrated into PC users and become a standard format.
Skipping a track (searching) ∗ This operation skips the track over the folder. Fast forward and fast rewind 1. Press and hold the [a] button or [d] button during playback. Press the button, and the playback speed becomes 4-time faster first and then 8-time faster 3 seconds later. Release the button, and the normal speed is restored. Selecting a file (track) on the screen 1. Press the [MENU] button during playback. Files (track) are displayed. 2.
English DVD Video Player Operations Owner’s manual Listening to one file repeatedly (Track repeat playback) Listening to tracks in a random order (Folder random playback) This operation plays back the file currently being played back repeatedly. 1. Touch the screen and touch the [SUB MODE] key. 2. Touch the [TRACK REPEAT] key, then touch the [RTN] key. The monitor displays “TRACK RPT” and file repeat playback starts. 3. To cancel file repeat playback, touch the [TRACK REPEAT] key again.
This function is available when a VTR, etc. is connected to the visual 1 or visual 2 terminal. WARNING For your safety, the driver should not watch the VTR, etc. or operate the controls while driving. Please note that watching and operating the VTR, etc. while driving are prohibited by law in some countries. Switching to the VISUAL mode Note: • For your safety, the VRX935VD has a safety function which turns off the picture when the car is moving, so only the audio can be heard.
English VISUAL Operations Owner’s manual Changing over monitor display size Monitoring the CCD camera ∗ This function is available only when the panel is open. Notes: • This function is not available while you are driving. • Switch to the VISUAL/DVD player(DVD video or video CD)/DVD changer/TV mode you see. The CCD camera can be connected to this unit. For the power supply of the camera, mount the power box sold separately (CAA-188). Note: • This function is not available when the display is stored.
English VISUAL Operations ●Lock system monitor image and sound 2 ZONE Rear monitor lock 3 ZONE Image of device connected to the Visual 2 terminal (∗3) Front image (receiver screen) Image of device connected to the Visual 2 terminal (∗3) Image of device connected to the Visual 2 terminal Displays image of mode selected using the [FUNC] button Rear monitor image (separately sold) Image of device connected to the Visual 2 terminal (∗3) Displays image of mode selected using the [FUNC] button (∗2) Ima
English VISUAL Operations Switching CONNECT(connect) Owner’s manual Make the following settings when an external device is connected to the VISUAL 2 terminal. NAVI: when a navigation system is connected ∗ When a navigation system is connected, use the monitor lock function. Locking the monitor locks the screen size in F.WIDE mode (full wide) and the VTR system to NTSC.
Switching disc titles and track titles (MD) This unit can display disc titles and track titles already entered on MDs. Titles up to 256 characters long can be displayed by scrolling the titles. ∗ Titles cannot be entered for MDs with this unit. When the panel is closed: 1. Press the [DISP] button to show the SUB display. The disc title or track title is displayed. 2. Each time you press and hold the [DISP] button for 1 second or longer, the display toggles between the disc title and the track title.
English CD/MD Changer Operations Selecting tracks with the KEY PAD Owner’s manual ∗ This function displays the KEY PAD on the screen and allows you to select and repeat tracks you wish to listen to. Press the [KEY PAD] button to display the KEY PAD. ●Track-down 1. Press the [a] button to move back to the beginning of the current track. 2. Press the [a] button twice to move to the beginning of the previous track.
Disc repeat play After all tracks in the current disc have been played, the disc repeat play automatically replays the current disc over from the first track. This function continues automatically until it is cancelled. 1. Touch the screen or press the [LIST] button, the MENU screen appears. 2. Touch the [SUB MODE] key in the MENU screen to show SUB MODE. Touch the [DISC REPEAT] key, disc repeat play starts, “DISC REPEAT” light in the display. 3.
English Owner’s manual DVD Changer Operations TV Operations This function allows you to control a connected DVD changer in the same way as described in DVD player Operation. For details on operations other than those described below, see DVD player Operation. For details on DVD changer precautions, refer to the supplied owner’s manual. TV functions Selecting a disc When the panel is closed : Each of the [DIRECT] button corresponds to a disc loaded into the DVD changer.
Manual tuning 1. Press the [BND] button and select the desired TV band (TV1 or TV2). There are 2 ways available: Quick tuning and step tuning. When you are in the step tuning mode, the frequency changes one step at a time. In quick tuning mode, you can quickly tune the desired frequency. 1. Press the [BND] button and select the desired band. (TV1 or TV2) ∗ If “MANU” is lit in the display, press and hold the [BND] button for 1 second or longer.
English TV Operations Owner’s manual Manual memory Setting the TV diver 1. Select the desired station with seek tuning, manual tuning or preset tuning. 2. Press and hold one of the [DIRECT] buttons for 2 seconds or longer to store the current station to that preset memory. ∗ This function is enabled only when the panel is open. ∗ Normally use the TV diver with the “ON” position. Auto store Auto store selects 6 TV stations automatically and stores each one into a preset memory.
Always turning on the button illumination on the operation panel The factory default setting is ON. ●“OFF”: Button illumination on the operation panel turns on for 5 seconds; ●“ON”: Button illumination is always on when the power is turned on; 1. When the panel is open, press the [ADJ] button to show the ADJUST MODE menu. 2. Touch the [ ] key to select “UPPER ILLUMI”. 3. Touch the [UPPER ILLUMI] key to select “ON” or “OFF”. 4. Touch the [ON] or [OFF] key for setting. 5.
English Other Functions Owner’s manual Setting the auto dimmer Setting the beep The brightness of the color LCD display is adjusted automatically in proportion to the surrounding light. The auto dimmer function can switch between ON and OFF. ON :Auto dimmer function is set. OFF :Auto dimmer function is cancelled. ∗ The sound heard when you make operations is called “beep”. The unit can be set up so that it does not produce this beep sound. ∗ The factory default is “BEEP ON”.
Setting the visual input sound level You can adjust an input sound level of visual1/2. ∗ The factory default setting is “HIGH”(high). Triggered audio mute for cellular telepones This unit requires special wiring to mute the audio signal automatically when a cellular telephone rings in the car. 5.1ch Surround Decoder control function This function is available when a 5.1ch Surround Decoder (DVH920) is connected. When the 5.1ch Surround Decoder (DVH920, sold separately) is CeNET connected, the 5.
English 5.1ch Surround Decoder Operations ●PL II Control Owner’s manual ∗ This function is available only when the MUSIC MODE is selected for Dolby PL II. For setup details, see “Selecting the Dolby PL II (Dolby Pro Logic II) type.” 3-1. Touch the [PL II CONTROL] key to show the submenu. 3-2. Touch the [PANORAMA], [DIMENSION] or [CENTER WIDTH] key to select respective item. [PANORAMA]: Touch the [ON] or [OFF] key. “OFF” is the default value.
1. Press the [A-M] button and touch the [DETAIL] key. 2. To make an adjustment on : ●Subwoofer volume adjustment 2-1. Touch the [SUBWOOFER VOL] key, then touch the [w] or [z] key to adjust to desirable level. ∗ The factory default setting is “0”. (Setting range : -6 to 3) ●Center volume adjustment 2-1. Touch the [CENTER VOL] key, then touch the [w] or [z] key to adjust to desirable level. ∗ The factory default is “0”. (Setting range : -6 to 0) ●Balance/Fader adjustment 2-1. Touch the [BAL/FAD] key.
English 5.1ch Surround Decoder Operations Setting and storing P.EQ Properties Owner’s manual 1. Press the [A-M] button to show the AUDIO MODE menu. 2. Touch the [P.EQ] key to show the P.EQ adjusting display. 3. Touch the key for the desirable type to select it. The P.EQ adjustment contents are as follows: ●SIGNAL ∗ The factory default setting is “P.NOISE”. This function selects [P. NOISE] or [MUSIC]. ●SPEAKER SELECT ∗ The factory default setting is “FRONT”.
Problem Cause English 12. IN CASE OF DIFFICULTY Measure Fuse is blown. Replace with a fuse of the same amperage. If the fuse blows again, consult your store of purchase. Incorrect wiring. Consult your store of purchase. Nothing happens when buttons are pressed. The microprocessor has malfunctioned due to noise, etc. Turn off the power, then press the [RELEASE] lever and remove the DCP. Press the reset button both of tuner amp unit and main unit for about 2 seconds with a thin rod.
English Problem TV Owner’s manual 60 Cause Measure The image is not displayed. The parking brake is not pulled. Check that the parking brake is applied. The display is dark. The brightness control is too low. Adjust the brightness properly. The operating condition is not good. The temperature inside the vehicle may be 0˚C or less. Set to an appropriate temperature (25˚C or so) and check it again. The headlight of the vehicle is lit.
English 13. ERROR DISPLAYS If an error occurs, one of the following displays is displayed. Take the measures described below to eliminate the problem. DVD PLAYER CD CHANGER MD CHANGER Cause Owner’s manual Error Display Measure ERROR 2 A CD is caught inside the CD deck and is not ejected. This is a failure of CD deck’s mechanism and consult your store of purchase. ERROR 3 A CD cannot be played due to scratches, etc. Replace with a non-scratched, non-warped-disc.
English FM Tuner Pixels: 336,960 (1440 × 234) Owner’s manual 14. SPECIFICATIONS Frequency Range: 87.50 MHz to 108.
English VRX935VD Installation and Wire connection manual 1. 2. 3. 4. 5. 6. 7. 8. 9. BEFORE STARTING ............................................................... PACKAGE CONTENTS ........................................................... GENERAL CAUTIONS ............................................................ CAUTIONS ON INSTALLATION .............................................. INSTALLING THE MAIN UNIT ................................................. REMOVING THE MAIN UNIT ....................
English 3. GENERAL CAUTIONS Installation and Wire connection manual 1. Do not open the case. There are no user serviceable parts inside. If you drop anything into the unit during installation, consult your dealer or an authorized Clarion service centre. 2. Use a soft, dry cloth to clean the case. Never use a rough cloth, thinner, benzine, or alcohol, etc. For tough dirt, apply a little cold or warm water to a soft cloth and wipe off the dirt gently. 4. CAUTIONS ON INSTALLATION 1.
English 5. INSTALLING THE MAIN UNIT ■ Universal Mount Notes: 1) Some car models require special mounting kits for proper installation. Consult your Clarion dealer for details. 2) Fasten the front stopper securely to prevent the main unit from coming loose.
English ■ Fixed Mount (TOYOTA, NISSAN and other ISO/DIN equipped vehicles) Installation and Wire connection manual This unit is designed for fixed installation in the dashboard. If the vehicle is equipped with a factory-installed radio, install the main unit with the parts and screws marked (∗). (Figure 8) If the vehicle is not equipped with a factory-installed radio, obtain an installation kit to install the main unit in the following procedure. 1. Remove the screws from both side of the main unit.
pull the main unit out by the hook plate. (Insert both the right and left edges of the hook plate.) (Figure 9) Note: Keep the hook plate. You cannot remove the main unit without disengaging the hook plate. Instrument panel Universal mounting bracket 2-Hook plate Main Unit Spring Outer escutcheon A B Figure 9 7. CAUTIONS ON WIRING 1. Be sure to turn the power off before wiring. 2. Be particularly careful where you route the wires. Keep them well away from the engine, and exhaust pipe, etc.
English 8. WIRE CONNECTION Installation and Wire connection manual Securely connect to the metal part of the car with a screw, etc. Black Choke coil Yellow Power supply lead Main unit Main power supply cord Fuse Connection cord (provided with this unit) CeNET cable (Sold separately) VIDEO output (RCA) ∗5 Power supply lead VISUAL 1 audio input terminal L+R (RCA) VISUAL 1 video input (RCA)/ DVD changer input (RCA) & TV TUNER input (RCA) Reset switch Top view of the tuner amp unit 5.
Purple/Black Purple 1 Green/Black 8 0 Green Brawn 7 *∗1 Glay Grass-green Glay/Black Orange/White White/Black Red White Yellow 3 ) 4 ! 6 @ 5 9 ( Black Blue Installation and Wire connection manual Blue/White English 2 # ¡ No.
English ■ Connecting the Accessories • Connection to the external amplifier The external amplifier can be connected unless the 5.1ch Surround Decoder is connected. For detailed information, refer to the instruction manual of the 5.1ch Surround Decoder. Installation and Wire connection manual • Connection to the CCD camera for vehicle The CCD camera for vehicle can be connected to the CCD terminal on the tuner amp unit. For detailed information, refer to the instruction sheet or manual for the CCD camera.
English 9. SAMPLE SYSTEMS ■ Sample System 1 Installation and Wire connection manual MAIN UNIT VRX935VD RCA Cable (Visual) VISUAL 2 IN VTR Tuner IN TUNER AMP UNIT CCA-389 TTX7501z TTX7503z/TTX7504z (CeNET TV TUNER) CeNET VISUAL 1 IN Rear view monitor RCA Cable (Visual) RCA Cable (Visual) CeNET VCZ625 (DVD CHANGER) CeNET Mode* Front Speaker Rear Speaker CCA-519-500 *Switch the MODE switch to the CeNET mode.
English ■ Sample System 2 Installation and Wire connection manual MAIN UNIT VRX935VD Optical Digital Cable (included the DVH920) (Gray) RCA Cable (Visual) VISUAL 2 IN VTR Tuner IN (CeNET TV TUNER) TUNER AMP UNIT CCA-389 TTX7501z TTX7503z/TTX7504z CeNET (LINE IN)D RCA Cable (Visual) RCA Cable (Visual) Rear view monitor N(LINE OUT) Set the select switch to "(LINE IN)D".
English ■ Sample System 3 (Gray) Installation and Wire connection manual MAIN UNIT VRX935VD Optical Digital Cable (included the DVH920) RCA Cable (Visual) VISUAL 2 IN Tuner IN TUNER AMP UNIT VTR TTX7501z TTX7503z/TTX7504z (CeNET TV TUNER) CeNET CCA-389 VISUAL 1 IN (LINE IN)D N(LINE OUT) Set the select switch to "N(LINE OUT)". Rear view monitor RCA cable RCA Cable (Visual) RCA Cable (Visual) DVH920 (5.