FM Solutions for Cochlear Implants Including Dynamic FM!
Table of Contents 4 Dynamic FM 30 FAQ 5 Dynamic FM Transmitters 31 Programming a receiver with FM SuccessWare 6 FM receivers 32 Programming options 6 MLxi/MLxi Baha 32 Programming interfaces 7 MicroMLxS 32 Programming MLxi 8–9 MicroLink CI S 33 Changing the default channel 9 MicroLink Freedom 33 Changing the FM gain or other settings 10 MyLink+ 34–35 Notes 11 MyLink 12 Choose the right FM receiver for your cochlear implant or Baha sound processor 12 Miscellaneous 13
FM: a must for every cochlear implant Phonak’s FM systems improve the signal–to-noise ratio and thus the user’s ability to understand speech in noise. Three major factors that influence the signal-to-noise ratio and the quality of the speech signal are: background noise, reverberation, and distance. By delivering the signal of interest via FM (radio waves), the strength and quality of the sound remains constant across the distance from the speaker to the hearing impaired individual.
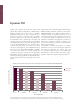
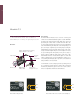
Dynamic FM Dynamic FM is Phonak’s latest and most advanced FM platform. It has completely reshaped the face of FM technology. Dynamic FM systems are not merely pieces of hardware transmitting sound from one place to another. They are masterpieces of wireless technology, capable of adapting themselves continuously to the actual surroundings. The most important feature of Dynamic FM is its adaptive FM advantage. It adjusts the gain of the FM receiver, depending on the ambient noise.
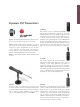
Dynamic FM Transmitters inspiro is the Dynamic FM transmitter that is ideally suited to the needs of both regular and special school teachers. inspiro’s award-winning design, comfortable form factor and easy-to-read color display make using this transmitter a cinch, plus it features programmable soft keys, an alarm clock, a wide range of housing options and many more features designed to help teachers enjoy the performance benefits of Dynamic FM without technical know-how.
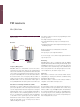
FM receivers MLxi / MLxi Baha The MLxi / MLxi Baha is a universal Dynamic FM receiver. Overview Connector If no FM SuccessWare is available for programming the MLxi you may experience: Hearing a strong tone burst on startup Freedom BW and 3G speech processor having incorrect FM levels Harmony / Auria and Freedom Bodyworn showing incorrect Monitoring results On the following processors AutoConnect works fine: MED-El OPUS2 All speech processor using MicroLink CI S.
MicroMLxS The MicroMLxS is an universal Classic FM receiver. Connector MLxi features an universal euro connector, which ensures compatibility with virtually all behind the ear (BTE) hearing instruments and CI systems.
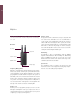
MicroLink CI S The MicroLink CI S is an interface to connect a universal FM receiver, such as MLxi or MicroMLxS, to a variety of speech processors Overview Battery compartment (size 13 battery must be inserted “+” side down) Audio output Off patch cable Gain control MLxi receiver On/Off Switch (1=On, 0 =Off) MicroLink CI S with gain wheel Connection to CI Speech Processor Gain Control The MicroLink CI S interface has a screw-set or wheel gain control.
Patch Cables To achieve the predicted performance with your MicroLink CI S and cochlear implant, the correct patch cable must be connected. Please use the following list to select the correct cable.
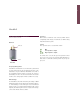
MyLink+ The MyLink+ is a Dynamic FM receiver and can be used with cochlear implants featuring a T-coil Overview Neck loop Status LED Volume control On/Off switch Charger plug Frequency Management MyLink+ is a multichannel Dynamic FM and can be synchronized to any desired channel by the synchronization feature of the transmitter or by the WallPilot. MyLink+ comes with a pre-programmed default channel. Every time the system is turned On, it will come on to this default channel.
MyLink The MyLink is a Classic FM receiver and can be used with cochlear implants featuring a T-coil Overview Neck loop Status LED Volume control On/Off switch Charger plug Frequency Management MyLink is a multichannel FM receiver and can be synchronized to any desired channel by the synchronization feature of the transmitter or by the WallPilot. MyLink comes with a pre-programmed default channel. Every time the system is turned On, it will come on to this default channel.
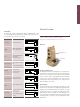
Choose the right FM receiver for your cochlear implant or Baha sound processor Cochlear Implant / Baha Model MLxi MicroMLxS MicroLink Freedom MicroLink CI S with MLxi or MicroMLxS MyLink+ MyLink Advanced Bionics Harmony Auria Clarion CII BTE Platinum BTE Platinum (PSP) bodyworn Clarion S-Serie Clarion 1.
Fitting guidelines Introduction Successful application of an FM system with cochlear implants depends on several clinical-adjustable parameters. In the receiver, the FM gain may influence speech recognition. Within the speech processor, the input dynamic range (IDR), microphone sensitivity and audio mixing ratio may affect performance. Recent studies have evaluated the best settings for optimal FM performance. With Dynamic FM, the need for adjusting processor parameters in noise should be negligible.
Achieving FM only In some cases, adults prefer an FM only setting to focus on the primary signal delivered over the FM channel. The table below shows how to achieve FM only. Cochlear Corp Select the highest possible mixing ratio or reduce the microphone sensitivity to 1. BP100: Select the optional DAI program Cochlear Baha® Divino, Intenso, Compact: move switch of MicroMLxS to one dot. Advanced Bionics Select AUX only audio mixing setting MED-EL MED-EL processors are DPAI no hearing instruments.
Cochlear Nucleus® Freedom BTE 8. When FM is not in use, press both sides of the increase/ decrease button to toggle back to M only. This will resume normal processor microphone function. To re-engage the FM, toggle with the button until “EA” flashes on the display and the M remains active. 9. Evaluate FM benefit as well as the appropriateness of FM settings through speech-recognition assessment in the clinic and standardized questionnaires completed by the recipient, family members and teachers.
Cochlear Nucleus® Freedom Bodyworn 3 1 2 4 List of required parts 1 Nucleus Freedom speech processor 2 MLxi or MicroMLxS 3 Bodyworn controller 4 Bodyworn FM cable Pre-Fitting Enable auto sensitivity control (ASC) and use an audio mixing ratio of 1:1 for the dedicated FM program. Keep the pre-processing e.g. ADRO strategy when used in the default program. When using MLxi, it should be programmed for the Cochlear Freedom Bodyworn (see page 32). Fitting with the user 1. Turn all equipment Off. 2.
Cochlear ESPrit 3G 1 2 3 List of required parts 1 ESPrit 3G speech processor 2 FM 3G adapter 3 MLxi or MicroMLxS Pre-Fitting Enable auto sensitivity control (ASC) and use an audio mixing ratio of 1:1 for the dedicated FM program. Keep the pre-processing e.g. ADRO strategy when used in the default program. It is recommended that the monitoring earphones are disabled in P1 to conserve power for the FM system. Failure to do this may result in intermittency for CI of FM.
Cochlear ESPrit / ESPrit 22 3 4 5 1 2 6 List of required parts 1 ESPrit speech processor 2 ESPrit audio cover 3 Accessory adaptor cable 4 Blue long cable 5 MicroLink CI S 6 MLxi or MicroMLxS Pre-Fitting Enable auto sensitivity control (ASC) and use an audio mixing ratio of 1:1 for the dedicated FM program. Keep the pre-processing e.g. ADRO strategy when used in the default program. Fitting with the user 1. Turn all equipment Off. 2. Attach the ESPrit audio cover to the processor. 3.
Cochlear SPrint / Spectra 22 2 1 3 4 Note: Picture shows SPrint List of required parts Spectra 22, SN > 340.000 Spectra 22, SN < 340.000 1 MLxi or MicroMLxS MLxi or MicroMLxS MLxi or MicroMLxS 2 Orange cable Orange cable Blue short cable 3 MicroLink CI S MicroLink CI S MicroLink CI S 4 SPrint processor Spectra 22 processor Spectra 22 processor SPrint Pre-Fitting Enable auto sensitivity control (ASC) and use an audio mixing ratio of 1:1 for the dedicated FM program.
Advanced Bionics Auria/ Harmony 1 2 3 List of required parts 1 MLxi or MicroMLxS 2 iConnect™ Adaptor, available in two sizes 3 Auria/ Harmony speech processor Pre-Fitting Set audio mixing ratio to 50/50. When using MLxi, it should be programmed for the Advanced Bionics Auria/ Harmony speech processor (see page 32). Fitting with the user 1. Turn all equipment Off. 2. Remove the standard earhook by twisting it Off. 3.
Advanced Bionics Platinum BTE / CII BTE 1 9. Determine speech recognition ability in quiet with the FM signal. Ensure that results are similar to implant alone condition. MicroLink CI S gain may need further adjustments. 10. Evaluate FM benefit as well as the appropriateness of FM settings through speech-recognition assessment in the clinic and standardized questionnaires completed by the recipient, family members and teachers.
Advanced Bionics PSP / Clarion S-Series / Clarion 1.2 2 1 3 4 Picture shows PSP List of required parts Platinum Sound Processor (PSP) Clarion S-Series Clarion 1.2 1 MLxi or MicroMLxS MLxi or MicroMLxS MLxi or MicroMLxS 2 Blue-red short cable Blue short cable Black short cable 3 MicroLink CI S MicroLink CI S MicroLink CI S 4 PSP Clarion S-Series SP Clarion 1.
MED-EL OPUS2 3 2 1 List of required parts 1 Opus2 speech processor 2 FM Battery Pack Cover 3 MLxi or MicroMLxS Fitting with the user 1. Turn all equipment Off. 2. Replace the standard battery cover by the FM Battery Pack Cover. 3. Plug the FM receiver into the bottom of the FM Battery Pack Cover. The MicroMLxS is usually used in the two green dot position. 4. Switch the speech processor and FM transmitter On. 5.
MED-EL DUET1 / DUET2 / OPUS1 / TEMPO+ with angled battery pack 2 Picture shows OPUS1 3 1 4 List of required parts 1 Speech processor with Angled Battery Pack 2 MLxi or MicroMLxS 3 MicroLink CI S 4 Red cable Fitting with the user 1. Turn all equipment Off. 2. Connect the red cable to the MicroLink CI S and to the back of speech processor. Make sure the cable is attached correctly to the processor. Please check the processor user guide. 3. Plug the FM receiver into the MicroLink CI S.
MED-EL OPUS1 / OPUS2 / TEMPO+ with remote battery pack 5 2 4 1 3 Picture shows OPUS2 with remote battery pack List of required parts 1 MLxi or MicroMLxS 2 Remote Battery Pack 3 White cable 4 MicroLink CI S 5 Speech processor Fitting with the user 1. Turn all equipment Off. 2. Connect the white cable to the MicroLink CI S and to the Remote Battery Pack. 3. Plug in the FM receiver into the MicroLink CI S. When using MicroMLxS, switch it to the double green dot position. 4.
Neurelec Digi SP and Digisonic BTE 1 2 List of required parts 1 Digi SP/ Digisonic BTE speech processor 2 MLxi or MicroMLxS Pre-Fitting When using MLxi, it should be programmed for the specific speech processor using FM SuccessWare (see page 32). The Digi SP and Digisonic BTE processors provide two additional programs (P3/P4) dedicated to an auxiliary input connection. These two programs need to be adapted to different sound environments according to the procedure below. Fitting with the user 1.
Neurelec Digi SP’K 1 2 List of required parts 1 Digi SP’K speech processor 2 MLxi or MicroMLxS Pre-Fitting When using MLxi, it should be programmed for the specific speech processor using FM SuccessWare (see page 32). The Digi SP’K processor provides different programs that can be configured for use by any auxiliary system. These programs need to be adapted to different sound environments following the procedure below. Fitting with the user 1. Switch Off all equipment. 2.
Cochlear Baha® BP100 1 2 MLxi List of required parts 1 Cochlear Baha® BP100 2 MLxi or MicroMLxS Fitting with the user 1. Turn all equipment Off. 2. Plug the MLxi into the Baha sound processor. 3. Switch On the Baha sound processor. 4. In all programs, the output of the FM receiver is mixed with the signal of the Baha microphones. 5.
Cochlear Baha® Divino / Baha® Intenso / Baha® Compact Listening check Use the MLxi Baha adaptor to connect the MLxi Baha to the headset checker (see page 12). Turn On the headset checker and FM transmitter and you should hear the FM signal. Use the MLxi Baha adaptor to connect the MLxi Baha to an audioshoe attached to a hearing instrument. Turn On the hearing instrument and switch it to the FM program if required.
FAQ How do I perform a system check? Some manufactures offer monitoring headphones, which can be connected to the processors. The headphones usually allow listening to the processor microphones and FM signal in parallel. Phonak offers a headset checker which has a euro plug. Here you can plug in all universal FM receivers or another receiver over the dedicated adaptor. The universal FM receivers can also be plugged into an audioshoe connected to a hearing instrument.
Programming a receiver with FM SuccessWare MicroMLxS, MyLink+, MyLink and MicroLink Freedom are pre-programmed and ready to be used. However even when the fitting instructions in this brochure are followed closely it might be necessary to change the default channel, adjust the FM Advantage (FM gain) and/or the Confirmation Beep level. For MLxi it is recommended to program this with FM SuccessWare prior to use with a CI speech processor, in order to achieve optimum interface matching characteristics.
Programming options Programming interfaces Programming MLxi Via the FM programming interface 1. Click Express Fitting. 2. Select MLxi and click “Next”. 3. Choose “Detect receiver channel” or manually select the desired channels and define the default channel, then click “Next”. 4. Select the specific processor from the drop-down list in the upper right corner. All receivers can be programmed by the FM programming interface: 1. Make sure all equipment has a battery and switch everything On. 2.
Changing the default channel 1 2 5. Choose “Detect receiver channel”, or manually select channels as well as a default channel. Then click “Next”. 6. Select the specific processor from the drop-down list. Do not choose “UNKNOWN“. Adjust the FM Advantage as required. Other options can also be changed (e. g. the beep type). The screen may be different depending on the receiver you use. Click on “Next”. 3 1 Click on the flag icon at the top of the screen.
Notes
Notes
Your online comprehensive FM support tool for schools: www.eSchoolDesk.com The latest set-up tips for FM systems in combination with cochlear implants and hearing instruments: www.phonak.com\FM_Configurator Cert. no. SQS-COC-100214 ©1996 FSC Phonak‘s professional hompage: www.phonakpro.com Mix Online resources Check quickly if your C.I. or hearing instrument is FM compatible: www.phonak.com\mlx Cochlear www.cochlear.com Advanced Bionics www.advancedbionics.com MED-EL www.medel.com www.phonakpro.