
Owner's Manual
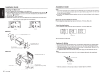
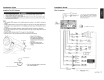
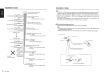
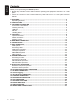
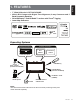
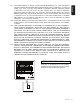
Table Of Contents
- Quick Start Guide / Installation Manual
- Owners Manual (Supplied on CD-ROM)
- Table of Contents
- Features
- Parts & Controls
- Speaker Setting Mode
- Sensor Control
- Main Menu Operation
- System Setup
- Disc Operation
- SD / USB Operation
- Bluetooth Operation
- SiriusXM Operation
- HD Radio Operation
- iTunes Tagging
- iPod / iPhone Operation
- Pandora Operation
- Navigation Operation
- AUX Input
- Troubleshooting
- Error Displays
- Specs
- Wiring and Connections
- Navigation Owners Manual (Supplied on CD-ROM)
- Scan of CD-ROM
- Warranty

Installation
Guide
Installing
The
Main
Unit
This unit is designed for fixed
installation
in
the dashboard.
1.
When installing
the main unit
in
NISSAN vehicles,
use the parts attached to the unit (see
"•
NISSAN"). When
installing
the main unit
in
TOYOTA
vehicles,
use the parts attached to the
vehicle
(see"
• TOYOTA").
2.
Wire as shown
in
"Wire Connection".
3.
Reassemble and secure the unit
in
the dashboard and
set
the face
panel
and center
panel.
Mounting Screw Holes
(Side View of the Main Unit)
NISSAN
.NISSAN
~
~
~
6-Spacer (thickness 1 mm)
""'
~;
~~~o~,
X~
~~
TOYOTA
..
m~4
: o
~~~
6-Fiat head screw (M5 x
6)
'~~}'(attached
to
the
main unit)
Mounting bracket . .
__
>(
~
(1
pair
tor
the
lett
and nght Sides)
~
• TOYOTA
8-Hexagonal
screw (M5 x
6)
'------Mounting
bracket
(1
pair
tor
the
lett
and right sides)
Screws
marked*
and mounting bracket are attached
to
the
vehicle.
10
NX702
Installation Guide
Note:
*1
Some
panel openings are too small for the unit depending on the vehicle type
and
model.
In
such a case, trim the upper
and
lower sides
of
the panel frame
by
about 0.5
to 1.5 mm so the
unit can be inserted smoothly.
*2
If
a hook on the installation bracket interferes with the unit, bend
and
flatten it with a nipper
or
similar tool.
• Vehicles
other than
NISSAN and
TOYOTA
In
some
cases the center
panel
may
require modification. (Trimming,
filling,
etc.)
Typical
Mounting
Brackets
In
some
cases the center
panel
may require modification. (Trimming,
filling,
etc.)
JUID[o.ll~
Example
1-3
Affix the screws to the
e
marks.
Cautions
On Wiring
•
Be sure to turn the power off before wiring. Be
particularly careful
where you route the wires.
•
Keep them
well away from the engine, and exhaust pipe, etc. Heat
may
damage the wires.
• If
the fuse
should blow,
check to
see
if the wiring is correct.
If
a fuse is
blown, replace
it with a
new one of the
same
specification as the
original.
•
To
replace
the fuse, remove the old
fuse of the power
supply
cord
and insert
the
new
one .
Note:
•
There are various types
of
fuse holder. Do not let the battery side touch other metal parts.
~~FUSE)
Fuse
holder
•
After the connection, fix the cord by a
clamp
or
insulation tape for protection.