Owner's manual & Installation manual NX602 2-DIN DVD MULTIMEDIA STATION WITH BUILT-IN Navigation & 6.
English 1 NX602
English Contents Thank you for purchasing this Clarion product. • Please fully read this owner’s manual before operating this equipment. • Check the contents of the enclosed warranty card and store it in a safe place with this manual. 1. FEATURES......................................................................................................................... 3 Expanding Systems............................................................................................................ 3 2.
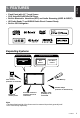
• • • • • Fixed Panel with 6.2” Touch Screen DVD-Video/DVD±R/DVD±RW Player Built-in Bluetooth® Handsfree (HFP) and Audio Streaming (A2DP & AVRCP) HD Radio Ready™ and SIRIUS Radio Direct Connect Ready Built-in GPS Navigation English 1.
English 2. PRECAUTIONS WARNING For your safety, the driver should not operate the controls while driving. Also, while driving, keep the volume to a level at which external sounds can be heard. 1. When the inside of the car is very cold and the player is used soon after switching on the heater, moisture may form on the disc or the optical parts of the player and proper playback may not be possible. If moisture forms on the disc, wipe it off with a soft cloth.
English INFORMATION FOR USERS: Changes or modifications to this product unapproved by the manufacturer will void the warranty and will violate FCC approval.
English 3. CAUTIONS ON HANDLING Front Panel / Generalities For a longer service life, be sure to read the following cautions. • Do not allow any liquids on the set from drinks, umbrellas, etc. Doing so may damage the internal circuitry. • Do not disassemble or modify the set in any way. Doing so may result in damage. • Do not let cigarettes burn the display. Doing so may damage or deform the body. • If a problem should occur, have the set inspected at your store of purchase.
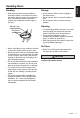
Handling Discs Storage • New discs may have some roughness around the edges. If such discs are used, the player may not work or the sound may skip. Use a ball-point pen or the like to remove any roughness from the edge of the disc. • Do not expose discs to direct sunlight or any heat source. • Do not expose discs to excess humidity or dust. • Do not expose discs to direct heat from heaters. Ball-point pen Roughness • Never stick labels on the surface of the disc or mark the surface with a pencil or pen.
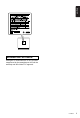
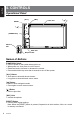
English 4. CONTROLS Operational Panel [ ALL ] [MIC] RESET [ Disc Slot [ ] ] [POWER/VOL] SD Card Slot NX602 AUX Jack Map Card Slot Names of Buttons [POWER/VOL] Knob • Press to power on the system when ignition on. • When power on, short press to cut the sound. • Rotate the knob to increase or decrease the volume. • Press and hold this key more than 2 seconds to turn off the system. [ ALL ] Button • Short press to show/exit shortcut menu. • Long press to show/exit main source menu.
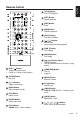
• [TITLE] Button DVD TITLE MENU • [RPT] Button Repeat playback • [ENT] Button Enter • [RDM] Button Random playback • [ROOT] Button DVD ROOT MENU • • [ ], [ ] Buttons Manual tune Fast backward/forward playback • [SUB.
English Remote Control • • [ / STOP ] Button Play/Pause Stop (long press) • • [ ], [ ] Buttons Previous / next preset station Auto tune (long press) • [ ZOOM ] Button ZOOM (DVD) • [AUDIO] Button DVD audio • [SRC] Button (Rear) Change next source • • [ ] Button (Rear) Play/Pause Stop (long press) Use and care of the remote control Using the remote control oint the remote control in the direction of the P front panel to operate.
Long press [ALL] button on the PANEL to show main source menu. Front Zone Source Touch [Front] on the bottom of screen to show front zone sources. Touch the icons on the screen to enter corresponding work mode, such as Disc mode, USB mode, iPod mode, etc. Touch [2ZoneOff] to turn off the rear zone monitor. English 5. MAIN MENU OPERATIONS Custom Setting Touch [Custom] on the bottom of screen to show custom setting menu. Change page by draging left or right.
English 6. SYSTEM SETUP At all mode, long press [ALL] button to enter main source menu. Touch [Custom] on the bottom left of the screen, then select [Settings] on the screen to enter Setting menu. Touch the icons on the left of screen to select category: General, Time, Sound, Display or Setup. To exit Setting menu, touch [ ] on the bottom left of the screen. General System language Touch the button to the right of “System language” to show language list.
Sound Beat EQ Touch the button to the right of “Beat EQ” to show EQ setting menu. You can select : “Bass Boost”, “Impact”, “Excite”, “Custom” or “Off”. To adjust the value, touch [-] or [+] button on the screen. Touch [Back] to exit. Balance/Fader Touch [Set ] to the right of “Balance/Fader” to show Balance/Fader setting menu. Touch [ ] or [ ] button to adjust Fader, and touch [ ] or [ ] button to adjust Balance. Touch [Center] to reset the value. Touch [Back] to exit.
DVD English • Menu Language Select menu language from list. • Audio Language Select audio language from list. • Subtitle Language Select subtitle language from list. • Set Password To set password for parental control, Touch [Set] to show password menu. Input numbers by touching the digit and [OK] buttons. Touch [X] button to delete a digit inputted. Touch [Back] to exit. • Parental Control Touch the button to the right of “Parental Control” to show parental control menu.
English 7. Disc Operations DVD System DVD video is a high-quality digital video source that provides crisp and clear images. One 12 cm disc contains either one film or four hours of music. DVD Video Features This unit provides the following functions in addition to the high image quality and sound quality of DVD video. Note: • The functions described in this section, for example, the recorded language, subtitles, angles, etc. differ depending on the DVD video disc.
English session is Data session. Your personallycreated CDs with more than second data sessions recorded cannot be played on this DVD video player. Note: • When you have a CD Extra disc, only the first session will be recognized. About playing a CD-R/CD-RW disc (MP3, WMA) This player can play CD-R/CD-RW discs previously recorded in music CD format (MP3. WMA) About playing a DVD-R/RW or DVD+R/ RW disc This player cannot play DVD-R/RW and DVD+R/RW discs previously recorded in video CD format.
English Accessing a Disc CAUTION For your satety, the driver should not insert or eject a disc while driving. Eject function Just pressing the [ ] button, ejects the disc even if the power to the unit was not turned on. Notes: • If you force a disc into before auto reloading, this can damage the disc. • If a disc (12 cm) is left ejected for 15 seconds, the disc is automatically reloaded (Auto reload).
English DVD Video Player Operation Playback menu Touch the bottom half of screen to show operation bar. Repeat During playback, touch [ buttons to repeat play. ], [ Repeat ] Search function During playback, touch [ ], [ ] buttons to show search menu. Input number by digit buttons, touch [ OK ] to began searching or touch [ Close ] to clear inputting. Touch [Chapter] or [Title] to show DVD chapter/title list. DVD audio select 1. Play/Pause 2. Show cursor keys in DVD title menu 3.
Playback menu Touch the bottom half of screen to show operation bar. Fast-forward/Fast-reverse Fast-forward Touch and hold the [ ] button . Fast-reverse Touch and hold the [ ] button . * F or MP3/WMA discs, it takes some time until the start of searching and between tracks. In addition, some error may occur in the play time. English CD Player Operation Search Function 1. Show track list. 2. Title/Artist/Album information 3. Track information Touch and drag left/right to look through the tracks. 4.
English MP3/WMA Playback This unit is an ID3 Tag compatible model. This unit supports the ID3 TAGs of the Version 2.4, 2.3, 1.1 and 1.0. In displaying, this unit gives priority to the Version 2.3 and 2.4 TAGs. What is MP3/WMA MP3 is an audio compression method and classified into audio layer 3 of MPEG standards. WMA is an audio compression method developed by Microsoft Corporation. These audio compression methods have penetrated into PC users and become a standard format.
1 2 3 5 ♪① ♪② ♪③ ♪④ ♪⑤ 4 Folder Select This function allows you to select a folder containing MP3/WMA files and start playing from the first track in the folder. ] button on the upper left of Touch the [ the screen to show folder/file list. You can select a folder or file by touching it. ♪⑥ ♪⑦ ♪⑧ 6 7 English Fast-forward (long press) 9. Random play 10.
English 8. SD/USB OPERATION Accessing a USB 1. Insert a USB device into the USB cable. When connecting a USB device, the unit will read the files automatically. 2. To remove the USB device, you should first select another source or turn off the power, in order to avoid damaging the USB device. Then take off the USB device. 3. T o a c c e s s a U S B d e v i c e a l r e a d y connected to the unit, long press [ ALL ] button to enter main source menu, then select [ USB ] to enter USB mode.
This system can play audio files (MP3/WMA) stored in an SD card or USB memory. You can use it as an audio device by simply copying desired audio files into it. Note: This system will not operate or may operate improperly with some card or USB. Files protected with any DRM cannot be played. Select SD/USB Audio mode Touch top left corner of the screen until SD Audio or USB Audio appears. English SD/USB Audio Operations Operations about SD/USB audio operations are almost same as MP3/WMA playback mode.
English played in the folder repeatedly. ] button and touch Touch the [ [Repeat] button to select File Repeat, Folder Repeat, All Repeat or Repeat Off. Search function 1. At video main menu, touch the [ ] button to show folder/file list. 2. T ouch [ ] button to enter search menu. 3 Input numbers by touching digit buttons, then touch [Search] to began searching. To delete numbers, touch [ ] button.
The Bluetooth allows you to utilize your car’s built-in audio system for wireless mobile phone or music handsfree communication. Some Bluetooth mobile phones have the audio features, and some portable audio players support Bluetooth feature. This system can play audio data stored in a Bluetooth audio device. The car stereo with Bluetooth will be able to retrieve phonebook contacts, received call, dialled call, missed call, incoming calls, outgoing call and listen to music. English 9.
Making a call Note: English • Dial Number 1. Input numbers by digit-keys on the screen. 2. Touch [ ] button to dial. ] button to delete characters. Touch [ 3. Touch [ ] button to terminate call. • Dialed/Received/Missed Call History You can search any Dialled/Missed/Received Call History. 1. T ouch [ ] button to show following history categories: Dialed, Received, Missed and Contacts. Touch [Dialer] to dial number manually. 2. Touch to select a category, the numbers of the category are displayed.
1. 2. 3. 4. 5. 6. 7. 8. English Please make sure both device and main unit are in the same play/pause status in Bluetooth Audio mode. Title/Artist/Album information Device Information Play/Pause Previous track Fast-reverse (long press) Stop Next track Fast-forward (long press) Bluetooth indicator System time Play / Pause a track 1. T ouch the [ ] button to pause audio playback. 2. To resume audio playback, touch the [ ] button. Selecting a track Track-up 1.
English 10. RADIO OPERATION Select tuner as playing source Long press [ ALL ] button to enter main source menu, then select [Tuner] to enter Tuner mode. If Tuner is not on the current source menu, touch [Front] on the bottom of the screen, then hold the center of screen and drag left/ right to show more icons. Playback menu Touch the bottom half of screen to show operation bar. operation bar to tune in a higher / lower station.
English Touch [ ] button near the center of screen to hide the preset station list. Recall the stored stations Touch [ ] button on the right edge of the screen to show the preset station list, touch to select a preset station. Touch [ ] button near the center of screen to hide the preset station list. Local seeking When LOCAL seeking is on, only those radio stations with strong radio signal could be received.
English 11. Satellite Radio OPERATION Listeners can subscribe to SIRIUS® Radio on the Web by visiting www.sirius.com, or by calling (888) 539-SIRIUS. Customers should have their SIRIUS ID ready (SIRIUS ID is located on the SCC1: SIRIUS Connect Vehicle Tuner, solid separately). Customers can listen to music samples by tuning to channel 184. Accessing satellite radio mode Long press [ ALL ] button to enter main source menu, then select [SiriusXM] to enter SiriusXM mode.
English Category and Channel search 1. Touch [ ] button on the upper left of the screen to show list menu. ], then select Channel or 2. T ouch [ Category list. 3. H old the list and drag it up or down to scroll. 4. Touch to select it. Direct search To access search menu, touch following buttons: [ ] -> [ ] . Input numbers by touching digit buttons, then touch [Search] to began searching. ] button.
English 12. HD Radio OPERATION About HD Radio™ Technology HD Radio Technology allows CD-quality digital broadcasting of your local AM and FM radio stations. HD Radio broadcasts can include multiple channels on the same frequency, which is called multicasting. With multicasting, you can receive up to eight additional multicast channels: HD1~HD8. With an HD Radio tuner connected, you will receive HD Radio digital broadcasts automatically when tuned to a station that offers HD Radio Technology.
English 1. Touch the [ ] button on the operation bar. 2. When a desired station is tuned in, press the [ ] button to continue receiving that station. Automatic store (AS) Only stations with sufficient signal strength will be detected and stored in the memory. To star automatic station search, touch following buttons on the operation bar in sequence: [ ] -> [ ] -> [Auto Store] -> [OK] . To stop auto store, press other buttons having radio functions.
English 13. iPod & iPhone Operations Connect an iPod or iPhone to the USB connector via CCA-748 cable. When connecting a device, the unit will read the files automatically. The track information display on the screen once playback start. CCA-748 7. Progress bar 8. Next track Fast-forward (long press) 9. Random play 10. Show other options Pausing play 1. Touch the [ ] button on the bottom left of the screen to pause play. “PAUSE” appears in the display, and [ ] button becomes [ ] . 2.
Search function Setting iPod simple control mode Use this function if you wish to operate through your iPod connected to this unit via the USB cable. Touch the [ ] button, then touch [Simple Control] to set it to [On]. 4. Progress bar 5. Next file Fast-forward (long press) 6. Show iPod menu 7. Show other options English 1. Touch the [ ] button to show file list. Touch [ ] button to enter search menu. 2 Input characters by touching buttons on the screen, then touch [Search] to began searching.
English 14. PANDORA Operations Connect an iPhone to the unit via CCA-748 cable. (see “Wiring and Connections”) Enable the Pabdora function in your iPhone. Then the unit will switch to Pandora mode. Touch the bottom half of screen to show operation bar. 1. Show file list. 2. Song/Title/Artist/Album information 3. Current song/station information 4. Play/Pause 5. Skip 6. Thumbs Down 7. Progress bar 8. Thumbs Up 9. Add bookmark 10.
Access navigation mode 1. Push the cover of the card slot located on the bottom left of the panel to the right. Insert a map card into the mini card slot. 2. To remove the card, you should first select another source or turn off the power, in order to avoid damaging the card. Press to pop it out, then take off the card. Close the cover to the left. ] button on panel to visit 3. P ress [ Navigation mode. English 15. Navigation Operations Control buttons 1.
English 17. TROUBLE SHOOTING GENERAL Problem Unit can not power on. Cause Replace with new fuse of correct rating. Car battery fuse blown. Replace with new fuse of correct rating. Turn off the power and remove the DCP. Press the [RESET] button with a thin rod. Unit can not power on. Nothing happens The microprocessor has when buttons are malfunctioned due to noise, etc. pressed. Display is not accurate. Remote control does not work. Measure Unit fuse blown.
USB Devices USB device cannot be inserted. USB device is not recognized. Sound skips or is noisy. Cause Measure The USB device has been inserted with wrong direction. Reversing the connection direction of the USB device, try it again. The USB connector is broken. Replace with a new USB device. The USB device is damaged. Disconnect the USB device and reconnect. If the device is still not recognized, try replacing with a different USB device. Connectors are loose.
English 18. ERROR DISPLAYS If an error occurs, one of the following displays is displayed. Take the measures described below to solve the problem. Display Disc loading No Disc Bad Disc Cause Measure Disc is being read Please wait, it may take several minutes for some disc or storage device.
English 19. SPECIFICATIONS FM Tuner 6.2 Inch TFT LCD Frequency range: 87.9-107.9MHz Usable sensitivity: 8dBμ Frequency response: 30Hz-15kHz Stereo separation: 30dB(1kHz) Signal/noise ratio: >55dB Display resolution (dot): 800RGB (H) x 480(V) Active area (mm): 137.52(H) x 77.232 (V) Screen size (inch): 6.2 (Diagonal) Dot pitch (mm): 0.1719(H) x 0.
English 20. Wiring and Connections GPS Antenna (Black) Black External Microphone Connection Black (Black) Radio Antenna Refer to the right. iPod/iPhone Red Red AUX IN 2 White Video Out Black VISUAL IN Yellow CCA-748 (sold separately) Black CAMERA Yellow Gray Gray Video Out Rear Vision Camera Steering Wheel Remote Control Terminal Yellow Black VIDEO OUT Red Green Rear Zone Monitor Video In 2 ZONE OUT White Black Black SIRIUS/XM (sold separately.
English 18-Pin Connector Extension Lead (attached to the source unit) Gray Front Right Gray/Black White Brown wire (Phone mute lead) Connect to cellular phone mute lead.
FCC STATEMENT English 1. This device complies with Part 15 of the FCC Rules. Operation is subject to the following two conditions: (1) This device may not cause harmful interference. (2) This device must accept any interference received, including interference that may cause undesired operation. 2. Changes or modifications not expressly approved by the party responsible for compliance could void the user's authority to operate the equipment.