Owner’s manual Mode d’emploi Manual de instrucciones DRX8675z AM/FM CD PLAYER WITH CD/MD CHANGER CONTROL • COMBINÉ RADIO/CD AM/FM AVEC PILOTE DE CHANGEUR CD/MD • RADIO DE AM/FM Y REPRODUCTOR DE DISCOS COMPACTOS CON CONTROL DE CAMBIADOR DE DISCOS COMPACTOS/MINIDISCOS OPEN DRX8675z ISR Clarion Co., Ltd. 1999/8 (CL·C) All Rights Reserved. Copyright © 1999: Clarion Co., Ltd.
Thank you for purchasing this Clarion product. ∗ Please read this owner’s manual in its entirety before operating this equipment. ∗ After reading this manual, be sure to keep it in a handy place (e.g., glove compartment). ∗ Check the contents of the enclosed warranty card and keep it carefully with this manual. ∗ This manual includes the operating procedures of the CD changer, MD changer, TV tuner and digital sound processor (DSP) connected via the CeNET cable.
6. REMOTE CONTROL 1. When the inside of the car is very cold and the player is used soon after switching on the heater moisture may form on the disc or the optical parts of the player and proper playback may not be possible. If moisture forms on the disc, wipe it off with a soft cloth. If moisture forms on the optical parts of the player, do not use the player for about one hour. The condensation will disappear naturally allowing normal operation. 2.
3. CONTROLS / LES COMMANDES / CONTROLES 4. NOMENCLATURE 5. DCP Note: • Be sure to read this chapter referring to the front diagrams of chapter “3. CONTROLS” on page 5 (unfold).
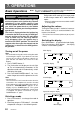
Functions of Remote Control Unit Buttons Button Mode Radio CD CD changer MD changer TV , FUNC Turns power on and off. When pressed and held for 1 second: Turns power off. Switches among radio, CD, CD changer, MD changer and TV. - BAND DISC UP PROG TOP Switches reception band. . VOLUME Increases and decreases volume (in all modes). / SEARCH Moves preset channels up and down. Moves tracks up and down. When pressed and held for 1 second: Fast-forward/ fast-backward. : PLAY/PAUSE No function.
7. OPERATIONS Basic Operations Note: Be sure to read this chapter referring to the front diagrams of chapter “3. CONTROLS” on page 5 (unfold). CAUTION Be sure to lower the volume before switching off the unit power or the ignition key. The unit remembers its last volume setting. If you switch the power off with the volume up, when you switch the power back on, the sudden loud volume may hurt your hearing and damage the unit.
Basic Operations ∗ The spectrum analyzer display is only displayed when the DPH7500z is connected. ∗ Once selected, the preferred display becomes the display default. When a function adjustment such as volume is made, the screen will momentarily switch to that function’s display, then revert back to the preferred display several seconds after the adjustment. ∗ When you have entered a title in a CD, it appears in the sub display. If you have not entered a title, “NO-TTL” appears in the title display instead.
Basic Operations Adjusting the balance Turning on/off the loudness 1. Press A-M button $ and select “BALANCE”. 2. Turning the Rotary knob & clockwise emphasizes the sound from the right speaker; turning it counterclockwise emphasizes the sound from the left speaker. The loudness effect emphasizes the bass and treble to create a natural sound tone. When you are listening to music at a low volume, it is recommended to use the loudness effect. 1.
Radio Operations FM reception ® For enhanced FM performance the tuner includes signal actuated stereo control, Enhanced Multi AGC, Impulse noise reduction circuits and Multipath noise reduction circuits. Changing the reception area This unit is initially set to USA frequency intervals of 10kHz for AM and 200kHz for FM. When using it outside the USA, the frequency reception range can be switched to the intervals below. ● Setting the reception area 1.
Radio Operations CD Operations Auto store Loading a CD Auto store is a function for storing up to 6 stations that are automatically tuned in sequentially. If 6 stations cannot be received, a previously stored station remains unoverwritten at the memory position. 1. Press BND button # and select the desired band (FM or AM). 2. Press and hold AS button 5 for 2 seconds or longer. The stations with good reception are stored automatically to the Preset buttons 9. 1.
CD Operations Note: • If the CD playing is not a CD-text CD or no user title has been input, “NO-TTL” appears in the display. ● Scrolling a CD-text title When a CD-text title is longer than 11 characters, you can scroll the display as follows. 1. Display the CD-text title (disc or track). 2. Press TITLE button 4. The title scrolls. Ejecting a CD 1. Press OPEN button 1 to open the FLIP DOWN PANEL. 2. Press Eject button ) to eject the CD. Take it out from the ejected position.
Other Handy Functions Setting the clock 1. Press and hold ADJ button 4 for 1 second or longer to switch to the adjustment selection display. 2. Press the right or left side of SEARCH button % to select “CLOCK”. 3. Press ENT button 2. 4. Press the right or left side of SEARCH button % to select the hour or the minute. 5. Turn the Rotar y knob & clockwise or counterclockwise to set the correct time. ∗ The clock is displayed in 12-hour format. 6. Press ENT button 2 to store the time into memory. 7.
Other Handy Functions Adjusting the display contrast Message display You can adjust the display contrast according to the angle of installation of the unit. When the unit is powered on or off, a message is displayed. The user can turn this message display on or off. ∗ The factory default setting is “6”. (Adjustment level: 1 to 11) ∗ The factory default setting is “ON”. 1. Press and hold ADJ button 4 for 1 second or longer to switch to the adjustment selection display. 2.
8. OPERATIONS OF ACCESSORIES CD Changer Operations CD changer functions Selecting a CD When an optional CD changer is connected through the CeNET cable, this unit controls all the CD changer functions. This unit can control a total of 2 changers (MD and/or CD). Press FNC button 3 and select the CD changer mode to star t play. If 2 CD changers are connected, press FNC button 3 to select the CD changer for play. Each of the Direct button 9 corresponds to a disc loaded into the magazine.
CD Changer Operations Top function Disc repeat play The top function plays from the first track (track No. 1) of the disc. ● When playing a disc 1 to 6 Press the Direct button 9 (1 to 6) with the same number as the CD playing. ● When playing a disc 7 to 12 (only when a 12 disc CD changer is used.) Press and hold for 1 second or longer the Direct button 9 (7 to 12) with the same number as the CD playing.
MD Changer Operations MD changer functions When an optional MD changer is connected through the CeNET cable, this unit controls all the MD changer functions. This unit can control a total of 2 changers (MD and/or CD). Press FNC button 3 and select the MD changer mode to star t play. If 2 MD changers are connected, press FNC button 3 to select the MD changer for play. ∗ If “NO DISC” appears in the display, load MDs into the MD changer. 2.
MD Changer Operations TV Operations Repeat play TV tuner functions The repeat play continuously plays the current track. This function continues automatically until it is canceled. 1. Press RPT button 6. “RPT” lights in the display and the current track is repeated. 2. To cancel the repeat play, press RPT button 6 again. “RPT” goes off from the display and normal play resumes. When an optional TV tuner is connected through the CeNET cable, this unit controls all TV tuner functions.
TV Operations Manual tuning There are 2 ways available: Quick tuning and step tuning. When you are in the step tuning mode, the frequency changes one step at a time. In quick tuning mode, you can quickly tune the desired frequency. 1. Press BND button # and select the desired band (TV1 or TV2). ∗ If “MANU” is not lit in the display, press and hold BND button # for 1 second or longer. “MANU” is lights in the display and manual tuning is now available. 2. Tune into a station.
DSP Operations DSP control function If the DSP (DPH7500z), sold separately, is connected to this unit using the CeNET cable, all the functions of the DSP can be controlled. DSP functions There are 2 modes available in DPH7500z, easy mode and professional mode. Choose one of them and adjust the sound field and the sound quality. • Functions common to each mode: Spectrum analyzer display, auto loudness, etc. • Easy mode: Adjustment using the graphic equalizer function and the DSP function.
DSP Operations Inputting a title Selecting a G.EQ menu You can give a title to the user memory of the DSP, G.EQ, S.EQ and P.EQ that you have adjusted yourself. 1. Press A-M button $ to select the adjustment mode in which you want to give a title. 2. Press BND button # to select “USER”. “USER” appears in the function mode indication #. 3. Press one of the Preset buttons 9 to select the user memory to which you want to give a title. 4. Press TITLE button 4. 5.
DSP Operations Note: • If the DSP effect is set to OFF, the adjustment made in the “DSP operations” is not reflected in the music source. Setting a listening position menu 1. Press A-M button $ and select “DSP”. “DSP” blinks in the display. 2. Press the right or left side of SEARCH button % to set the listening position type. There are FULL SEAT, FRONT-RIGHT (only right seat), FRONT-LEFT (only left seat), FRONT (only front seats), REAR (only rear seats) and PASS available for the listening position types.
DSP Operations Editing/storing a S.EQ menu (User memory) 1. Select a S.EQ menu which you want to edit on the basis of. 2. Press and hold ADJ button 4 for 1 second or longer. 3. Press the right or left side of SEARCH button % to select the item to be adjusted. There are DIFFUZE, CAR WIDTH and CAR LENGTH available for the items to be adjusted. ∗ For details on each adjustment item, refer to the owner’s manual supplied with the DPH7500z. 4.
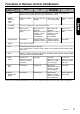
9. TROUBLESHOOTING General Problem Cause Measure Power does not turn on. (No sound is produced.) Fuse is blown. Replace with a fuse of the same amperage. If the fuse blows again, consult your store of purchase. Incorrect wiring. Consult your store of purchase. No sound output when operating the unit with amplifiers or power antenna attached. Power antenna lead is shorted to ground or excessive current is required for remote-on the amplifiers or power antenna. 1. Turn the unit off. 2.
10. ERROR DISPLAYS If an error occurs, one of the following displays is displayed. Take the measures described below to eliminate the problem. MD changer CD changer CD Error Display Cause Measure ERROR 2 A CD is caught inside the CD deck and is not ejected. This is a failure of CD deck’s mechanism and consult your store of purchase. ERROR 3 A CD cannot be played due to scratches, etc. Replace with a non-scratched, non-warped-disc.
11. SPECIFICATIONS FM Tuner Audio Frequency Range: 87.9 MHz to 107.
Memo 30 DRX8675z