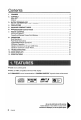
Contents 1. FEATURES 2 2. CONTROLS MAIN UNIT 3 3 DISPLAY 3. BUTTON TERMINOLOGY 3 4 4 Names of the Buttons and Their Functions 4. PRECAUTIONS 6 5. 6. HANDLING COMPACT DISCS DCP (Detachable Control Panel) 7 8 7. REMOTE CONTROL 9 Inserting the Battery Functions of Remote Control Unit Buttons 9 8. 10 OPERATIONS 11 11 13 14 16 18 21 Basic Operations Radio Mode Operations CD/MP3IWMA Mode Operations USB Mode Operation Operation Common to CD and USB Drive Operations Common to Each Mode 9.
/ UNIDAD PRINCIPAL [ROTARY] r -........................... [~] [SCN] [CD SLOT] ~~I~1 [ROM] [0] [T] D~PLAY/AFACHEUR/WSUAL~ADOR ••••• ••••• ••••• ••••• ••••• ••••• ••••• ••••• Z c ~ i:ili i:ili i:ili i:ili·i:ili i:ili·i:ili i:ili ~ ~~~~~~~~~~~~~~~~~~ \M="'B~ :::~: :::u : : L.!IJ5. ~ ••••• ••••• :::~: ••••• :::~:.:::~: ••••• ••••• :::~:·:::u •••••• ••••• :::~: ••••• p- :=: ~ALL···SCNRPTRDMMANU mSTm MUTE Note: Be sure to unfold this page and refer to the front diagrams as you read each chapter.
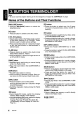
Note: • Be sure to read this chapter referring to the front diagrams of chapter "2. CONTROLS" on page 3. Names of the Buttons and Their Functions [RELEASE] button [Z] button • Press the [RELEASE] button to unlock the detachable panel. • Press the button to select one of the 3 types of sound characteristics already stored in memory. [A] button • Press the button to switch to the ADJ mode. [ 1'llII'llII, ~I] buttons • Select a station while in the Radio mode or select a track when listening to a CD/USB.
Names of the Buttons and Their Functions [~] button • Eject a CD when it is loaded into the unit. [CD SLOT] • CD insertion slot. [SENSOR] • Receiver for remote control unit. • Operating range: 30° in all directions. [ ~II] button • Perform preset scan while in the Radio mode. Press and hold the button for 2 seconds or longer to perform auto store. • Play or pause a track while in the CD/MP31 WMA or USB mode. [ROTARY] knob • Adjust the volume by turning the knob clockwise or counterclockwise.
During extreme cold temperatures, condensation may form on the disc and/or the optical part of the player. If the disc exhibits condensation, carefully wipe off the disc with a soft cloth. In the event the disc still does not play properly, eject the disc and allow the condensation to disappear naturally from the optical parts of the player. Radio, Auxiliary and USB functions can still be during this time which may take up to an hour.
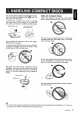
This unit has been designed specifi back of compact discs bearing the other discs can be played. II for playmark. No Note on compact discs Never stick labels on the surface of the compact disc or mark the surface with a pencil or pen. To remove the compact disc from its storage case, press down on the center of the case and lift the disc out, holding it carefully by the edges. Removing the disc I Proper way to hold the compact disc ~ Always handle the compact disc by the edges.
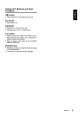
The control panel can be detached to prevent theft. When detaching the control panel, store it in the DCP (Detachable Control Panel) case to prevent scratches. We recommend taking the DCP with you when leaving the car. Storing the DCP in the DCP case Hold the DCP, in the orientation as shown in the figure below, and put it into the supplied DCP case. (Ensure the DCP is in the correct orientation.) DCP Removing the DCP 1. Press the [SRC] button for 1 second or longer to switch off the power. 2.
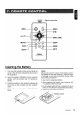
OND [SRC] • l II ~II II"~"·' II 8GJG Mur:,..>fsR DISP I+l~ [ISRlj DISC UP TOP I+C [i], [f] [MUTE] G II SEARCH , 8QG RP~DM SCN PS/AS TV/VTR [SCN] II I II [BND] [~II] [~],[~] [DISP] [ROM] [RPT] clarion • WIRELESS REMOTE CONTROllER • Inserting the Battery 1. Turn over the remote control unit and slide the cover in the direction indicated by the arrow in the illustration. 2. Insert the battery (CR2025) into the insertion guides, with the printed side (+) facing upwards. 3.
Functions of Remote Control Unit Buttons Press the button to power on. Press and hold the button for 1 second or longer: Power off. Switch among Radio, CO/MP3IWMA, USB and AUX. [BND] [!], [T] [I~~], [~~I] Switch reception band. Play the first track. Top play. Increase and decrease volume (in all modes). Move preset channels up and down. Move tracks up and down. Press and hold the button for 1 second or longer: Fastforward/fast-backward. [~II] Switch between playback and pause.
Basic Operations Note: Be sure to read this chapter referring to the front diagrams of chapter "2. CONTROLS" on page 3. Be sure to lower the volume before switching off the unit power or the ignition key. The unit remembers its last volume setting. If you switch the power off with the volume up, when you switch the power back on, the sudden loud volume may hurt your hearing and damage the unit. • Radio/CD Mode: Main display ~ Clock display ~ Main display • MP3IWMAlUSB Mode: Main-1 display (Track No.
Basic Operations Setting the Z-Enhancer Adjusting MAGNA BASS EX This unit are provided with 3 types of sound tone effects stored in memory. Select the one you prefer. The MAGNA BASS EX does not adjust the low sound area like the normal sound adjustment function, but emphasizes the deep bass sound area to provide you with a dynamic sound. * The factory default setting is "Z-EHCR OFF".
Radio Mode Operations Listening to the radio • 1. Press the [SRC] button and select the Radio mode, then the radio will be on. Press the [I~~ , ~I] button to perform manual tuning. 2. To select a preset band, press the [BND] button, then select one of the preset bands such as FM1, FM2, FM3 or AM. Every time the [BND] button is pressed, the display will change as: FM1-+FM2 -+ FM3 -+ AM -+ FM1 ... 3. Press the [I~~, ~I] button to tune in the desired station. Seek tuning 1.
Radio Mode Operations CD/MP3IWMA Mode Operations Recalling a preset station What is MP3? A total of 24 preset positions (6-FM1, 6-FM2, 6FM3, 6-AM) exists to store individual radio stations in memory. Pressing the corresponding [DIRECT] button recalls the stored radio frequency automatically. MP3 is an audio compression method and classified into audio layer 3 of MPEG standards. This audio compression method has penetrated into PC users and become a standard format.
CD/MP3IWMA Mode Operations • File extensions • Always add a file extension ".MP3" or ".WMA" to MP3 or WMA file by using single byte letters. If you add a file extension other than specified or forget to add the file extension, the file cannot be played. Disc-In-Play function As long as the ignition key is turned to the ON or ACC position, this function allows you to turn the power to the unit and start playing the disc automatically when the disc is inserted even if the power is not turned on.
CD/MP3IWMA Mode Operations USB Mode Operation Loading a CD What is USB? Insert a CD into the center of the CD SLOT with the labeled side facing up. "LOADING" appears in the display, the CD plays automatically after loading. USB is the abbreviation of Universal Serial Bus, an external bus standard that supports data transfer rates of 12Mbps. The main unit is USB 2.0 compatible. (It is compliant with Universal Serial Bus Revision 1.
USB Mode Operation • USB drives may have different shape depends on brands. Some USB drives may not be able to plug into the port due to the shape design. Please use an extension cable instead. • The company will not guarantee that every USB drive brands will be able to work with the main unit. • Please remove your USB drive while you are not inside your vehicle because USB drive may not have automotive specification and it will be damaged by overheating environment.
Operation Common to CD and USB Drive Pausing play Title display mode 1. Press the [ ~II] button to pause play. "PAUSE" appears in the display. 1. There are 5 types of display for the Title Display mode. 2. To resume track play, press the [~II] button again. 2. To select the next type, press the [T] button for less than 1 second. The arrangement is shown below. Displaying CD titles After 2 seconds This unit can display title data for MP3IWMA. 1. Press the [0] button to display the title.
Operation Common to CD and USB Drive Fast-forwardlfast-backward Example of a medium's folder/file hierarchy. • Fast-forward Press and hold the [ ~~I] button for 1 second or longer. • o Fast-backward Press and hold the [ I... ] button for 1 second or longer. * For Audio CD mode pressing the [1
Operation Common to CD and USB Drive * * Press the [UP] button while in the final folder to shift to the first folder. Folder without an MP3IWMA file is not selectable. 2. Press the [I........ , ~~I] button to select a track. • Folder repeat play MP3IWMA: This function allows you to play all tracks in the MP3IWMA folder repeated Iy. 1. Press and hold the [RPT] button for 1 second or longer to perform folder repeat play. Top function The indications "ALL..." and "RPT" light in the display.
Operations Common to Each Mode To change display setting 2-1. Select "SCRN SVR". 1. Press the [A] button to switch to the adjustment selection display. 3-1. Turn the [ROTARY] knob to select the setting. Each time you turn the [ROTARY] knob, the setting changes in the following order: 2. Press the [ I.- , ~~I] button to select the "item name". "CLOCK(E)" ~ "SCRN SVR" ~ "A-SCROLL" 3. Turn the [ROTARY] knob to select the "desired setting value".
Replace with a fuse of the same amperage. If the fuse blows again, consult your store of purchase. Incorrect wiring. Consult your store of purchase. No sound output when operating the unit with amplifiers or power an-' tenna attached. Power antenna lead is shorted to ground or excessive current is required for remote-on the amplifiers or power antenna. 1. Turn the unit off. 2. Remove all wires attached to the power antenna lead. Check each wire for a possible short to ground using an ohm meter. 3.
Troubleshooting Sound skips or is noisy. Files are not recognized as an MP3IWMA file. Use MP3IWMA files encoded properly. File system is not correct. Use IS09660 level 1, 2 or JOLIET or Romeo file system. Disc is dirty. Clean the disc with a soft cloth. e:( Disc is heavily scratched Replace with a disc with no scratches. or warped. a..t------------+-----------t--------------------t ~ Sound is cut or skipped. MP3IWMA files are not Use MP3IWMA files encoded properly.
This is a failure of CD deck's mechanism and consult your store of purchase. ERROR 2 w > a: c m en ERROR 3 A DISC cannot be played due to scratches, loaded upsidedown inside the CD deck etc. Replace with a non-scratched, non-warpeddisc. Eject the disc then reload it properly. NO FILE No audio file is detected in the DISC. Replace with audio contents loaded DISC. MNT ERR Failure detection of USB drive when it is plugged into the port. Unplug the USB drive and re-plug into the port.
Specifications CD Audio Maximum Power Output: 200 W (50 W X 4 ch) Decode Format MPEG 1, 2 and 2.5 - Layer 3 Sampling rate (kHz) MPEG-1 : 32,44.1,48 MPEG-2 : 16, 22.05, 24 MPEG-2.5 : 11 .025, 44.1 Bit-rate (kbps) MPEG-1 : 32 - 320 MPEG-2 : 8 - 160 MPEG-2.5 : 8 - 160 VBR CD-ROM Format ISO 9660 Level 1, 2, Romeo and Joliet Bass Control Action (100 Hz): ±14 dB Treble Control Action (10 kHz): ±14 dB Line Output (with AIC 1 kHz, 10 kQ): 1.8 V General Power Supply Voltage: 14.4 V DC (10.8 V to 15.
Clarion Co., Ltd. All Rights ReseNed. Copyright © 2006: Clarion Co., Ltd.
Printed in Malaysia / Imprime en Malasie / Impreso en Malasia 2006/03 (CM) 284-0816-00 InstallationlWire Connection Guide i n Gufa de instalaci6n/conexi6n de cables B·;'' ·'· R@' BEFORE STARTING I PR P -1. a 1. This set is exclusively for use in cars with a negative ground, 12 V power supply. 12 V 2. Read these instructions carefully. 3. Be sure to disconnect the battery" 8 " terminal before starting. This is to prevent short circuits during installation (Figure 1).
• Fixed Mount (TOYOTA, NISSAN and other ISO/DIN equipped vehicles) • MO:flt::lge fixe NISSAN et 8utres vehicules This unit is designed for fixed installation in the dashboard. If the vehicle is equipped with a factory-installed radio, install the source unit with the parts and screws marked (*) (Figure 7). If the vehicle is not equipped with a factory-installed radio, obtain an installation kit to install the source unit in the following procedure.
-5 GAUIIONS ON WIRING I PREG UIIO S AU SUJEI DES 0 NEXIONS I PREGAUGIONES PARA LA GONEXION DE CABLES n 1. Be sure to turn the power off when wiring. 1. S'assurer de meitre l'apparel! hors circuit avant de faire Ie ca 2. Be particularly careful where you route the wires. Keep them well away from the engine, exhaust pipe, etc. Heat may damage the wires. 2. 3. If the fuse should blow, check that the wiring is correct.
'w®. -8. ••$1 ,i.'. WIRE CONNECTIONS I CONNECTIQUE I CONEXION DE CABLES • Rear Layout III Disposition arriere • Disposici6n trasera No. Description CD ® AUX INPUT RIGHT (Red) AUX INPUT LEFT (White) ® FRONT RIGHT (Red) @ FRONT LEFT (White) ® ® No. CD Description No.
281-0632-00 2005/9 CLARION 2006 LIMITED WARRANTY For USA and Canada only Except as noted, Clarion products purchased from an authorized Clarion dealer are warranted against all defects in materials and workmanship for a period of one (1) year from the date of original purchase.