Black plate (2,1) Foreword Welcome to the growing family of new NISSAN owners. This vehicle is delivered to you with confidence. It was produced using the latest techniques and strict quality control. This manual was prepared to help you understand the operation and maintenance of your vehicle so that you may enjoy many miles of driving pleasure. Please read through this manual before operating your vehicle.
Black plate (3,1) All information, specifications and illustrations in this manual are those in effect at the time of printing. NISSAN reserves the right to change specifications or design at any time without notice. Arrows in an illustration that are similar to those above call attention to an item in the illustration. CALIFORNIA PROPOSITION 65 WARNING IMPORTANT INFORMATION ABOUT THIS MANUAL WARNING You will see various symbols in this manual.
Black plate (4,1) Bluetooth® is a trademark owned by Bluetooth SIG, Inc., U.S.A. and lisenced to Visteon Corporation and Clarion Co., Ltd. Gracenote® is a registered trademark of Gracenote, Inc. The Gracenote logo and logo type, and the “Powered by Gracenote” logo are trademarks of Gracenote. XM Radio® requires a subscription, sold separately. It is not available in Alaska, Hawaii or Guam. For more information, visit www.xmradio.com. C 2010 NISSAN MOTOR CO., LTD. * All rights reserved.
Black plate (5,1) NISSAN CUSTOMER CARE PROGRAM NISSAN CARES ... Both NISSAN and your NISSAN dealer are dedicated to serving all your automotive needs. Your satisfaction with your vehicle and your NISSAN dealer are our primary concerns. Your NISSAN dealer is always available to assist you with all your automobile sales and service needs.
Black plate (1,1) Table of Contents Illustrated table of contents 0 Safety — Seats, seat belts and supplemental restraint system 1 Instruments and controls 2 Pre-driving checks and adjustments 3 Monitor, heater, air conditioner, audio, phone and voice recognition systems 4 Starting and driving 5 In case of emergency 6 Appearance and care 7 Maintenance and do-it-yourself 8 Technical and consumer information 9 Index 10 Model "Z51-D" Edited: 2010/ 7/ 23
Black plate (1,1) 0 Illustrated table of contents Seats, seat belts and Supplemental Restraint System (SRS) . . . . . . . . . . . . . . . . . . . . . . . . . . . . . . . . . . . . . . . . . . . . . . . . . . . 0-2 Exterior front . . . . . . . . . . . . . . . . . . . . . . . . . . . . . . . . . . . . . . . . . . . . . . . . . . . . . 0-3 Exterior rear . . . . . . . . . . . . . . . . . . . . . . . . . . . . . . . . . . . . . . . . . . . . . . . . . . . . . . 0-4 Passenger compartment . . . . . . . . . . . .
Black plate (4,1) SEATS, SEAT BELTS AND SUPPLEMENTAL RESTRAINT SYSTEM (SRS) 1. 2. 3. 4. 5. 6. 7. 8. 9. 10. 11. 12. 13. 14. Rear center seat belt (Page 1-21) Adjustable headrest (P.1-12) Seat belts (P.1-15) Armrest (P.1-14) Head restraints (P.1-9) — Front-seat Active Head Restraints (P.1-11) Roof-mounted curtain side-impact and rollover supplemental air bags (P.1-43) Supplemental front-impact air bags (P.1-43) Child restraint anchor points (for top tether strap child restraint) (P.
Black plate (5,1) EXTERIOR FRONT 5. 6. 7. 8. 9. 10. 11. 12. 13. 14. *: Moonroof* (P.2-53) Power windows (P.2-50) Recovery hook (P.6-15) License plate installation (P.9-11) Fog lights* — Switch operation (P.2-36) — Bulb replacement (P.8-27) Tires — Wheel and tires (P.8-30, P.9-7) — Flat tire (6-2) — Tire Pressure Monitoring System (TPMS) (P.2-12, P.5-3) Outside mirrors (P.3-30) Doors — Keys (P.3-2) — Door locks (P.3-4) — Intelligent Key system (P.3-7) — Security system (P.
Black plate (6,1) EXTERIOR REAR *: if so equipped SSI0813 1. 2. 3. 0-4 Lift gate (P.3-19) — Remote keyless entry system (P.3-15) — Intelligent Key system (P.3-7) Rear window wiper and washer — Switch operation (P.2-31) — Window washer fluid (P.8-12) Rear window defroster (P.2-32) 4. 5. 6. 7. High-mounted stop light — Bulb replacement (P.8-27) Antenna (P.4-81) — Satellite radio antenna* (P.4-34) Rear view camera* (P.4-21) Rear combination light — Bulb replacement (P.
Black plate (7,1) PASSENGER COMPARTMENT 9. Mood light (P.2-56) 10. Sunglasses holder (P.2-44) 11. Inside rearview mirror (P.3-28) — HomeLink® universal transceiver* (P.2-57) — Compass* (P.2-7) 12. Cargo area — Storages (P.2-47) — Luggage hooks (P.2-48) — Cargo light (P.2-57) — Spare tire (P.6-4) 13. Rear cup holders (P.2-43) 14. Heated seat switch (rear)* (P.2-38) 15. Console box (P.2-45) — Power outlet* (P.2-41) — Auxiliary input jacks* (P.4-77) — iPod® connector* (P.4-67) — USB connector* (P.4-58) 16.
Black plate (8,1) INSTRUMENT PANEL 8. 9. 10. 11. 12. 13. 14. 15. 16. 17. SSI0805 1. 2. 3. 4. 5. 0-6 Heated steering wheel switch* (P.2-38) Side ventilator (P.4-27) Power lift gate switch* (P.3-19) Headlight, fog light* and turn signal switch (P.2-33) Fuel-filler door opener switch (P.3-24) 6. 7. Steering-wheel-mounted controls (left side)* — Audio control* (P.4-79) — Bluetooth® Hands-Free Phone System control (models with navigation system)* (P.
Black plate (9,1) 25. Audio system (P.4-33) — Clock* (P.2-40) 26. Heated seat switch* (P.2-38) 27. Selector lever (P.5-14) 28. Front passenger air bag status light (P.1-50) 29. Power outlet (P.2-41) 30. All-Wheel Drive (AWD) LOCK switch* (P.5-21) 31. Rear window and outside mirror* defroster switch (P.2-32) 32. Heater/air conditioner control (P.4-28) or Audio system (P.4-33) 33. Glove box (P.2-45) *: if so equipped **: Refer to the separate Navigation System Owner’s Manual (if so equipped).
Black plate (10,1) METERS AND GAUGES SSI0816 1. 2. 3. 4. 5. 6. 0-8 Instrument brightness control switch (P.2-36) Tachometer (P.2-6) Speedometer (P.2-5) Fuel gauge (P.2-7) Warning/indicator lights (P.2-10) Trip computer switch (P.2-21) 7. Dot matrix liquid crystal display (P.2-17) — Trip computer (P.2-36) 8. Engine coolant temperature gauge (P.2-6) 9. Odometer/twin trip odometer (P.2-5)/ Continuously Variable Transmission (CVT) position indicator (P.2-15) 10. RESET switch for trip odometer (P.
Black plate (11,1) ENGINE COMPARTMENT SDI2172 VQ35DE ENGINE 1. 2. 3. 4. 5. Power steering fluid reservoir (P.8-11) Drive belt location (P.8-15) Engine oil filler cap (P.8-8) Brake fluid reservoir (P.8-12) Air cleaner (P.8-16) 6. 7. 8. 9. 10. 11. Fuse/fusible link holder (P.8-20) Window washer fluid reservoir (P.8-12) Engine coolant reservoir (P.8-7) Radiator filler cap (P.8-7) Engine oil dipstick (P.8-8) Battery (P.
Black plate (12,1) WARNING AND INDICATOR LIGHTS Warning light Page 2-10 All-Wheel Drive (AWD) LOCK indicator light (AWD models)* 2-15 2-15 2-11 Continuously Variable Transmission (CVT) position indicator light Cruise indicator light 2-15 Front passenger air bag status light 2-15 High beam indicator light 2-15 Low beam indicator light 2-15 Malfunction Indicator Light (MIL) 2-15 Overdrive off indicator light 2-16 Slip indicator light 2-16 Page All-Wheel Drive (AWD) warning light (AWD mo
Black plate (4,1) 1 Safety — Seats, seat belts and supplemental restraint system Seats . . . . . . . . . . . . . . . . . . . . . . . . . . . . . . . . . . . . . . . . . . . . . . . . . . . . . . . . . . . . . . 1-2 Front seats . . . . . . . . . . . . . . . . . . . . . . . . . . . . . . . . . . . . . . . . . . . . . . . . . . . 1-3 Rear seats. . . . . . . . . . . . . . . . . . . . . . . . . . . . . . . . . . . . . . . . . . . . . . . . . . . . 1-6 Head restraints . . . . . . . . . . . . . . . . . . . . . .
Black plate (16,1) SEATS . The seatback should not be reclined any more than needed for comfort. Seat belts are most effective when the passenger sits well back and straight up in the seat. If the seatback is reclined, the risk of sliding under the lap belt and being injured is increased. CAUTION SSS0133 well back in the seat with both feet on the floor and adjust the seat properly. See “PRECAUTIONS ON SEAT BELT USAGE” later in this section. WARNING . .
Black plate (17,1) SSS0793 SSS0792 FRONT SEATS Front manual seat adjustment Forward and backward: 1 up and hold it while you slide Pull the lever * the seat forward or backward to the desired position. Release the lever to lock the seat in position. The reclining feature allows adjustment of the seatback for occupants of different sizes for added comfort and to help obtain proper seat belt fit. (See “PRECAUTIONS ON SEAT BELT USAGE” later in this section.
Black plate (18,1) Front power seat adjustment Operating tips: SSS0684 . The power seat motor has an auto-reset overload protection circuit. If the motor stops during operation, wait 30 seconds, then reactivate the switch. . Do not operate the power seat switch for a long period of time when the engine is off. This will discharge the battery. See “AUTOMATIC DRIVE POSITIONER” in the “3. Pre-driving checks and adjustments” section for the seat position memory function.
Black plate (19,1) SSS1027 SSS1026 Forward and backward: Moving the switch * forward or backward will slide the seat forward or backward to the desired position. 1 the vehicle is stopped and the transmission is in the P (Park) position. Seat lifter (if so equipped): Push the front or rear end of the switch up or down to adjust the angle of the front portion or height of the seat. Reclining: 2 backward until the Move the recline switch * desired angle is obtained. To bring the seatback 2 forward.
Black plate (20,1) To fold down the seatbacks: A . Pull the lever Pull the strap on the rear seat * beside the cargo area and fold the seatback. B * SSS1028 SSS0569 Lumbar support (if so equipped): REAR SEATS The lumbar support feature provides lower back support to the driver. Folding 1 or back * 2 end of the switch Push the front * to adjust the seatback lumbar area. 1-6 Before folding the rear seats: . Secure the seat belts on the seat belt hooks on the side wall.
Black plate (21,1) If the control unit detects any obstacle or malfunctions while in the power operation, a beep sounds for 4 seconds and the seatback will return to the folded position automatically. Check if there are any obstacles caught that prevent seats from returning to the folded position. See a NISSAN dealer if the beep still sounds. . Do not fold down the rear seats when occupants are in the rear seat area or any luggage is on the rear seats. .
Black plate (22,1) center seat belt connector is completely secured. . WARNING If the rear center seat belt connector and the seatbacks are not secured in the correct position, serious personal injury may result in an accident or sudden stop. . Do not ride in a moving vehicle when the seatback is reclined. This can be dangerous. The shoulder belt will not be against your body. In an accident, you could be thrown into it and receive neck or other serious injuries.
Black plate (23,1) HEAD RESTRAINTS WARNING Head restraints supplement the other vehicle safety systems. They may provide additional protection against injury in certain rear end collisions. Adjust the head restraints properly, as specified in this section. Check the adjustment after someone else uses the seat. Do not attach anything to the head restraint stalks or remove the head restraint. Do not use the seat if the head restraint has been removed.
Black plate (24,1) SSS0997 Adjustment SSS0993 To raise the head restraint, pull it up. Adjust the head restraint so the center is level with the center of your ears. SSS0994 To lower, push and hold the lock knob and push the head restraint down.
Black plate (25,1) SSS0995 SSS0996 SSS0508 Removal Install Front-seat Active Head Restraint Use the following procedure to remove the adjustable head restraints. 1. Align the head restraint stalks with the holes in the seat. Make sure that the head restraint is facing the correct direction. The stalk with 1 must be inthe adjustment notches * 2 .
Black plate (26,1) Adjust the Active Head Restraints properly as described earlier in this section. ADJUSTABLE HEADREST WARNING The adjustable headrests supplement the other vehicle safety systems. They may provide additional protection against injury in certain rear end collisions. Adjust the headrests properly, as specified in this section. Check the adjustment after someone else uses the seat. Do not attach anything to the adjustable headrest stalks or remove the adjustable headrests.
Black plate (27,1) SSS0997 Adjustment Adjust the headrest so the center is level with the center of your ears. SSS0993 To raise the headrest, pull it up. SSS0994 To lower, push and hold the lock knob and push the headrest down.
Black plate (28,1) SSS0995 SSS0996 SSS0229A Removal Install ARMREST Use the following procedure to remove the adjustable headrests. 1. Align the headrest stalks with the holes in the seat. Make sure that the headrest is facing the correct direction. The stalk with 1 must be inthe adjustment notches * 2 . stalled in the hole with the lock knob * Rear armrest 1. Pull the headrest up to the highest position. 2. Push and hold the lock knob. 3. Remove the headrest from the seat. 4.
Black plate (29,1) SEAT BELTS PRECAUTIONS ON SEAT BELT USAGE If you are wearing your seat belt properly adjusted, and you are sitting upright and well back in your seat with both feet on the floor, your chances of being injured or killed in an accident and/or the severity of injury may be greatly reduced. NISSAN strongly encourages you and all of your passengers to buckle up every time you drive, even if your seating position includes a supplemental air bag. Most U.S.
Black plate (30,1) WARNING . . SSS0016 . . SSS0014 Every person who drives or rides in this vehicle should use a seat belt at all times. Children should be properly restrained in the rear seat and, if appropriate, in a child restraint. The seat belt should be properly adjusted to a snug fit. Failure to do so may reduce the effectiveness of the entire restraint system and increase the chance or severity of injury in an accident. Serious injury or death can occur if the seat belt is not worn properly.
Black plate (31,1) activated, it cannot be reused and must be replaced together with the retractor. See a NISSAN dealer. . Removal and installation of the pretensioner system components should be done by a NISSAN dealer. . All seat belt assemblies, including retractors and attaching hardware, should be inspected after any collision by a NISSAN dealer.
Black plate (32,1) Then smoothly pull the belt out of the retractor. SSS0292 Fastening the seat belts 1. Adjust the seat. (See “SEATS” earlier in this section.) 2. Slowly pull the seat belt out of the retractor and insert the tongue into the buckle until you hear and feel the latch engage. . . The retractor is designed to lock during a sudden stop or on impact. A slow pulling motion permits the belt to move and allows you some freedom of movement in the seat.
Black plate (33,1) restrict further belt movement. allow the driver and passengers some freedom of movement in the seat. The ELR locks the seat belt when the vehicle slows down rapidly or during certain impacts. If the retractor does not lock during this check or if you have any question about seat belt operation, see a NISSAN dealer. The Automatic Locking Retractor (ALR) mode (child restraint mode) locks the seat belt for child restraint installation.
Black plate (34,1) WARNING SSS0351A . After adjustment, release the adjustment button and try to move the shoulder belt anchor up and down to make sure it is securely fixed in position. . The shoulder belt anchor height should be adjusted to the position best for you. Failure to do so may reduce the effectiveness of the entire restraint system and increase the chance or severity of injury in an accident.
Black plate (35,1) SSS0846 SSS0241 Rear center seat belt The rear center seat belt has a connector tongue 1 2 . Both the and a seat belt tongue * * connector tongue and the seat belt tongue must be securely latched for proper seat belt operation. WARNING . Always fasten the connector tongue and the seat belt in the order shown. . Always make sure both the connector tongue and the seat belt tongue are secured when using the seat belt or installing a child restraint.
Black plate (36,1) Stowing rear center seat belt: When folding down the rear seat, the rear center seat belt can be retracted into a stowed position as follows: in the correct position, serious personal injury may result in an accident or sudden stop. 1 so that the 1. Hold the connector tongue * seat belt does not retract suddenly when the tongue is released from the connector buckle. Release the connector tongue by A into inserting a suitable tool such as key * the connector buckle. 2.
Black plate (37,1) Attaching rear center seat belt: belt connector, be certain that the seatbacks are completely secured in the latched position and the rear center seat belt connector is completely secured. Always be sure the rear center seat belt connector tongue and connector buckle are attached. Disconnect only when folding down the rear seat. . To connect the buckle: 1. Pull out the connector tongue from the 1 . retractor base * 2. Pull out the seat belt tongue from the 2 .
Black plate (38,1) belts may retract slowly. Wipe the shoulder belt guide with a clean, dry cloth. WARNING SSS0235 Storing rear seat belt buckles Before folding down the seat, put the buckles in the storage of the seat cushion to avoid dropping it under the seat cushion. . Only NISSAN seat belt extenders, made by the same company which made the original equipment seat belts, should be used with NISSAN seat belts. . Adults and children who can use the standard seat belt should not use an extender.
Black plate (39,1) CHILD SAFETY Children need adults to help protect them. They need to be properly restrained. In addition to the general information in this manual, child safety information is available from many other sources, including doctors, teachers, government traffic safety offices, and community organizations. Every child is different, so be sure to learn the best way to transport your child. There are three basic types of child restraint systems: . Rear-facing child restraint .
Black plate (40,1) CHILD RESTRAINTS commercially available booster seat if the shoulder belt fits close to the face or neck or if the lap portion of the seat belt goes across the abdomen. The booster seat should raise the child so that the shoulder belt is properly positioned across the top, middle portion of the shoulder and the lap belt is low on the hips. A booster seat can only be used in seating positions that have a three-point type seat belt.
Black plate (41,1) — — — — — — install a forward-facing child restraint in the front seat, see “FORWARD-FACING CHILD RESTRAINT INSTALLATION USING THE SEAT BELTS” later in this section. Even with the NISSAN Advanced Air Bag System, never install a rear-facing child restraint in the front seat. An inflating air bag could seriously injure or kill a child. A rear-facing child restraint must only be used in the rear seat. Be sure to purchase a child restraint that will fit the child and vehicle.
Black plate (42,1) LATCH lower anchor WARNING Failure to follow the warnings and instructions for proper use and installation of child restraints could result in serious injury or death of a child or other passengers in a sudden stop or collision: — Attach LATCH system compatible child restraints only at the locations shown in the illustration.
Black plate (43,1) SSS0643 LATCH webbing-mounted attachment Installing child restraint LATCH lower anchor attachments LATCH compatible child restraints include two rigid or webbing-mounted attachments that can be connected to anchors located at certain seating positions in your vehicle. With this system, you do not have to use a vehicle seat belt to secure the child restraint. Check your child restraint for a label stating that it is compatible with LATCH.
Black plate (44,1) tether strap is damaged. . Do not allow cargo to contact the top tether strap when it is attached to the top tether anchor. Properly secure the cargo so it does not contact the top tether strap. Cargo that is not properly secured or cargo that contacts the top tether strap may damage the top tether strap during a collision. Your child could be seriously injured or killed in a collision if the child restraint top tether strap is damaged.
Black plate (45,1) properly secured prior to each use. If the child restraint is loose, repeat steps 1 through 4. SSS0639 SSS0650 Rear-facing — step 3 Rear-facing — step 4 3. For child restraints that are equipped with webbing-mounted attachments, remove any additional slack from the anchor attachments. Press downward and rearward firmly in the center of the child restraint with your hand to compress the vehicle seat cushion and seatback while tightening the webbing of the anchor attachments. 4.
Black plate (46,1) passenger air bag. See “Front passenger air bag and status light” later in this section. . When installing a child restraint system in the rear center position, both the center seat belt connector tongue and buckle tongue must be secured. See “Rear center seat belt” earlier in this section. SSS0100 SSS0100 Rear-facing — step 1 REAR-FACING CHILD RESTRAINT INSTALLATION USING THE SEAT BELTS WARNING .
Black plate (47,1) SSS0654 SSS0655 SSS0656 Rear-facing — step 2 Rear-facing — step 3 Rear-facing — step 4 2. Route the seat belt tongue through the child restraint and insert it into the buckle until you hear and feel the latch engage. Be sure to follow the child restraint manufacturer’s instructions for belt routing. 3. Pull the shoulder belt until the belt is fully extended. At this time, the seat belt retractor is in the Automatic Locking Retractor (ALR) mode (child restraint mode).
Black plate (48,1) through 6. After the child restraint is removed and the seat belt fully retracted, the ALR mode (child restraint mode) is canceled. FORWARD-FACING CHILD RESTRAINT INSTALLATION USING LATCH Refer to all Warnings and Cautions in the “Child safety” and “Child restraints” sections before installing a child restraint. SSS0657 SSS0658 Rear-facing — step 5 Rear-facing — step 6 5.
Black plate (49,1) SSS0645 SSS0646 SSS0647 Forward-facing web-mounted — step 2 Forward-facing rigid-mounted — step 3 Forward-facing — step 4 2. Secure the child restraint anchor attachments to the LATCH lower anchors. Check to make sure the LATCH attachment is properly attached to the lower anchors. 3. The back of the child restraint should be secured against the vehicle seatback. 4.
Black plate (50,1) through 6. FORWARD-FACING CHILD RESTRAINT INSTALLATION USING THE SEAT BELTS WARNING . SSS0638 Forward-facing — step 6 6. After attaching the child restraint, test it before you place the child in it. Push it from side to side while holding the child restraint near the LATCH attachment path. The child restraint should not move more than 1 inch (25 mm), from side to side. Try to tug it forward and check to see if the LATCH attachment holds the restraint in place.
Black plate (51,1) turer’s instructions. The back of the child restraint should be secured against the vehicle seatback. If necessary, adjust or remove the head restraint or headrest to obtain the correct child restraint fit. If the head restraint or headrest is removed, store it in a secure place. Be sure to reinstall the head restraint or headrest when the child restraint is removed.
Black plate (52,1) SSS0652 SSS0653 SSS0641 Forward-facing — step 5 Forward-facing — step 6 Forward-facing — step 8 5. Allow the seat belt to retract. Pull up on the shoulder belt to remove any slack in the belt. 6. Remove any additional slack from the seat belt; press downward and rearward firmly in the center of the child restraint with your knee to compress the vehicle seat cushion and seatback while pulling up on the seat belt. 8.
Black plate (53,1) through 8. SSS0823 SSS0822 Forward-facing — step 10 10. If the child restraint is installed in the front passenger seat, place the ignition switch in the ON position. The front passenger air bag should illuminate. If this status light light is not illuminated, see “Front passenger air bag and status light” in this section. Move the child restraint to another seating position. Have the system checked by a NISSAN dealer.
Black plate (54,1) the seatback. 2. Secure the top tether strap to the tether anchor point on the back of the seatback behind the child restraint. stalled in a seating position that has a lap/shoulder belt. 3. Refer to the appropriate child restraint installation procedure steps in this section before tightening the tether strap. If you have any questions when installing a top tether strap, consult your NISSAN dealer for details.
Black plate (55,1) Booster seat installation CAUTION Do not use the lap/shoulder belt Automatic Locking Retractor (ALR) mode when using a booster seat with the seat belts. LRS0453 . . Make sure the child’s head will be properly supported by the booster seat or vehicle seat. The seatback must be at or above the center of the child’s ears. For example, if a 1 is chosen, the low back booster seat * vehicle seatback must be at or above the center of the child’s ears.
Black plate (56,1) adjustable head restraint or headrest and it is interfering with the proper booster seat fit, try another seating position or a different booster seat. 4. Position the lap portion of the seat belt low and snug on the child’s hips. Be sure to follow the booster seat manufacturer’s instructions for adjusting the seat belt routing. SSS0640 1. If you must install a booster seat in the front seat, move the seat to the rearmost position. 2. Position the booster seat on the seat.
Black plate (57,1) SUPPLEMENTAL RESTRAINT SYSTEM PRECAUTIONS ON SUPPLEMENTAL RESTRAINT SYSTEM This Supplemental Restraint System (SRS) section contains important information concerning the following systems: SSS0823 7. If the booster seat is installed in the front passenger seat, place the ignition switch in the ON position. The front passenger air bag may or may not illuminate status light depending on the size of the child and the type of booster seat used.
Black plate (58,1) WARNING . The front air bags ordinarily will not inflate in the event of a side impact, rear impact, rollover, or lower severity frontal collision. Always wear your seat belts to help reduce the risk or severity of injury in various kinds of accidents. . The front passenger air bag will not inflate if the passenger air bag status light is lit or if the front passenger seat is unoccupied. See “Front passenger air bag and status light” later in this section. .
Black plate (59,1) back against the seatback and as far-away as practical from the steering wheel or instrument panel. Always use the seat belts. . The driver and front passenger seat belt buckles are equipped with sensors that detect if the seat belts are fastened. The Advanced Air Bag System monitors the severity of a collision and seat belt usage then inflates the air bags. Failure to properly wear seat belts can increase the risk or severity of injury in an accident. .
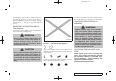
Black plate (60,1) WARNING SSS0008 SSS0009 . Never let children ride unrestrained or extend their hands or face out of the window. Do not attempt to hold them in your lap or arms. Some examples of dangerous riding positions are shown in the illustrations. . Children may be severely injured or killed when the front air bags, side air bags or curtain and rollover air bags inflate if they are not properly restrained. Pre-teens and children should be properly restrained in the rear seat, if possible. .
Black plate (61,1) SSS0059A SSS0140 SSS0159 Do not lean against doors or windows. WARNING SSS0188A SSS0162 Front seat-mounted side-impact supplemental air bags and roof-mounted curtain side-impact and rollover supplemental air bags: . The side air bags and curtain and rollover air bags ordinarily will not inflate in the event of a frontal impact, rear impact or lower severity side collision. Always wear your seat belts to help reduce the risk or severity of injury in various kinds of accidents.
Black plate (62,1) . The seat belts, the side air bags and curtain and rollover air bags are most effective when you are sitting well back and upright in the seat with both feet on the floor. The side air bag and curtain and rollover air bag inflate with great force. Do not allow anyone to place their hand, leg or face near the side air bag on the side of the seatback of the front seat or near the side roof rails.
Black plate (63,1) NISSAN ADVANCED AIR BAG SYSTEM (front seats) This vehicle is equipped with the NISSAN Advanced Air Bag System for the driver and front passenger seats. This system is designed to meet certification requirements under U.S. regulations. It is also permitted in Canada. However, all of the information, cautions and warnings in this manual still apply and must be followed.
Black plate (64,1) Based on information from the sensors, only one front air bag may inflate in a crash, depending on the crash severity and whether the front occupants are belted or unbelted. Additionally, the front passenger air bag may be automatically turned OFF under some conditions, depending on the information provided by the occupant classification sensor.
Black plate (65,1) Status light: in your vehicle are not part of this system. The front passenger air bag status light is located on the instrument panel below the air conditioner controls. After the ignition switch is placed in the ON position, the front passenger air bag status light illuminates for about 7 seconds and then turns off or illuminates depending on the front passenger occupied status.
Black plate (66,1) pied. The light will not illuminate when the front passenger seat is unoccupied. If an adult occupant is in the seat but the passenger air bag status light is illuminated (indicating that the air bag is OFF), it could be that the person is a small adult, or is not sitting on the seat properly. If a child restraint must be used in the front seat, the passenger air bag status light may or may not be illuminated, depending on the size of the child and the type of child restraint being used.
Black plate (67,1) . . . may result in serious personal injury. Tampering with the supplemental air bag system may result in serious personal injury. Tampering includes changes to the steering wheel and the instrument panel assembly by placing material over the steering wheel pad and above the instrument panel or by installing additional trim material around the air bag system. Modifying or tampering with the front passenger seat may result in serious personal injury.
Black plate (68,1) side collisions, although they may inflate if the forces in another type of collision are similar to those of a higher severity side impact. They are designed to inflate on the side where the vehicle is impacted. They may not inflate in certain side collisions. Curtain and rollover air bags are also designed to inflate in certain types of rollover collisions or near rollovers.
Black plate (69,1) air bag. . * Work around and on the side air bag and curtain and rollover air bag systems should be done by a NISSAN dealer. Installation of electrical equipment should also be done by a NISSAN dealer. The Supplemental Restraint System (SRS) wiring harnesses* should not be modified or disconnected. Unauthorized electrical test equipment and probing devices should not be used on the side air bag and curtain and rollover air bag systems.
Black plate (70,1) reduce forces against the chest. The supplemental air bag warning light is used to indicate malfunctions in the pretensioner system. (See “SUPPLEMENTAL AIR BAG WARNING LIGHT” later in this section for more details.) If the supplemental air bag warning light indicates there is a malfunction, have the system checked by a NISSAN dealer.
Black plate (71,1) the supplemental air bag warning light illuminates for about 7 seconds and then turns off. This means the system is operational. If any of the following conditions occur, the front air bag, side air bag, curtain and rollover air bag and pretensioner systems need servicing: . The supplemental air bag warning light remains on after approximately 7 seconds. . The supplemental air bag warning light flashes intermittently. . The supplemental air bag warning light does not come on at all.
Black plate (7,1) 2 Instruments and controls Instrument panel . . . . . . . . . . . . . . . . . . . . . . . . . . . . . . . . . . . . . . . . . . . . . . . . 2-2 Meters and gauges. . . . . . . . . . . . . . . . . . . . . . . . . . . . . . . . . . . . . . . . . . . . . 2-4 Speedometer and odometer . . . . . . . . . . . . . . . . . . . . . . . . . . . . . 2-5 Tachometer. . . . . . . . . . . . . . . . . . . . . . . . . . . . . . . . . . . . . . . . . . . . . . . . . . . 2-6 Engine coolant temperature gauge .
Black plate (8,1) Coat hooks. . . . . . . . . . . . . . . . . . . . . . . . . . . . . . . . . . . . . . . . . . . . . . . . . Windows . . . . . . . . . . . . . . . . . . . . . . . . . . . . . . . . . . . . . . . . . . . . . . . . . . . . . . . Power windows . . . . . . . . . . . . . . . . . . . . . . . . . . . . . . . . . . . . . . . . . . . Moonroof (if so equipped) . . . . . . . . . . . . . . . . . . . . . . . . . . . . . . . . . . Automatic moonroof and sunshades . . . . . . . . . . . . . . . . .
Black plate (74,1) INSTRUMENT PANEL 8. 9. 10. 11. 12. 13. 14. SSI0805 1. 2. 3. 4. 5. 2-2 Heated steering wheel switch* Side ventilator Power lift gate switch* Headlight, fog light* and turn signal switch Fuel-filler door opener switch 6. 7. Steering-wheel-mounted controls (left side)* — Audio control* — Bluetooth® Hands-Free Phone System control* Meters and gauges 15. 16. 17. 18. 19. 20. 21. 22. 23. 24. 25. 26. 27. 28.
Black plate (75,1) 29. 30. 31. 32. 33. *: **: Power outlet All-Wheel Drive (AWD) LOCK switch* Rear window and outside mirror* defroster switch Heater/air conditioner control or Audio system Glove box if so equipped Refer to the separate Navigation System Owner’s Manual (if so equipped).
Black plate (76,1) METERS AND GAUGES after the ignition switch is pushed to the LOCK position. This is not a malfunction. SSI0816 1. 2. 3. 4. 5. 6. Instrument brightness control switch Tachometer Speedometer Fuel gauge Warning/indicator lights Trip computer switch 7. Dot matrix liquid crystal display — Trip computer 8. Engine coolant temperature gauge 9. Odometer/twin trip odometer/Continuously Variable Transmission (CVT) position indicator 10.
Black plate (77,1) Resetting the trip odometer: 3 for more Pushing the TRIP RESET switch * than 1 second resets the trip odometer to zero. SIC3571 Speedometer SPEEDOMETER AND ODOMETER Speedometer The speedometer indicates vehicle speed in miles per hour (MPH) and kilometers per hour (km/h). SIC4699 Odometer/twin trip odometer Odometer/twin trip odometer 1 and twin trip odometer * 2 The odometer * are displayed when the ignition switch is in the ON position.
Black plate (78,1) CAUTION SIC3573 TACHOMETER The tachometer indicates engine speed in revolutions per minute (RPM). Do not rev the 1 . engine into the red zone * CAUTION When engine speed approaches the red zone, shift to a higher gear or reduce engine speed. Operating the engine in the red zone may cause serious engine damage. 2-6 SIC4690 If the gauge indicates engine coolant temperature near the hot (H) end of the normal range, reduce vehicle speed to decrease temperature.
Black plate (79,1) COMPASS (if so equipped) “E”. There will be a small reserve of fuel in the tank when the fuel gauge needle reaches “E”. indicates that the fuel-filler door is The located on the driver’s side of the vehicle. CAUTION . SIC4691 FUEL GAUGE The gauge indicates the approximate fuel level in the tank. . If the vehicle runs out of fuel, the malfunction indicator light (MIL) may come on. Refuel as soon as possible. After a few driving trips, the light should turn off.
Black plate (80,1) If the display reads “C”, calibrate the compass by driving the vehicle in 3 complete circles at less than 5 MPH (8 km/h). You can also calibrate the compass by driving your vehicle on your everyday route. The compass will be calibrated once it has tracked 3 complete circles. To turn on and off the compass manually, push A while the ignition switch is in switch * the the ON position.
Black plate (81,1) ZONE VARIATION CHANGE PROCEDURE pass point when the vehicle moves to an area where the geomagnetism is stabilized.) The difference between magnetic north and geographical north is known as variance. In some areas, this difference can sometimes be great enough to cause false compass readings. Follow these instructions to set the variance for your particular location if this happens: . switch for more than 3 1. Push the seconds. The current zone number will appear in the display.
Black plate (82,1) WARNING/INDICATOR LIGHTS AND AUDIBLE REMINDERS All-Wheel Drive (AWD) warning light (AWD models)* Low tire pressure warning light High beam indicator light Master warning light Malfunction Indicator Light (MIL) Seat belt warning light Low beam indicator light Supplemental air bag warning light Overdrive off indicator light All-Wheel Drive (AWD) LOCK indicator light (AWD models)* Slip indicator light Charge warning light Continuously Variable Transmission (CVT) position indicat
Black plate (83,1) blink. (See “ALL-WHEEL DRIVE (AWD)” in the “5. Starting and driving” section.) CAUTION . . If the warning light comes on while driving there may be a malfunction in the AWD system. Reduce the vehicle speed and have your vehicle checked by a NISSAN dealer as soon as possible. If the AWD warning light blinks when you are driving: — blinks rapidly (about twice a second): Pull off the road in a safe area, and idle the engine.
Black plate (84,1) WARNING . . . Your brake system may not be working properly if the warning light is on. Driving could be dangerous. If you judge it to be safe, drive carefully to the nearest service station for repairs. Otherwise, have your vehicle towed because driving it could be dangerous. Pressing the brake pedal with the engine stopped and/or low brake fluid level may increase your stopping distance and braking will require greater pedal effort as well as pedal travel.
Black plate (85,1) Low tire pressure warning: If the vehicle is being driven with low tire pressure, the warning light will illuminate. A CHECK TIRE PRESSURE warning also appears on the dot matrix liquid crystal display. When the low tire pressure warning light illuminates, you should stop and adjust the tire pressure to the recommended COLD tire pressure shown on the Tire and Loading Information label. The low tire pressure warning light does not automatically turn off when the tire pressure is adjusted.
Black plate (86,1) CAUTION . The TPMS is not a substitute for the regular tire pressure check. Be sure to check the tire pressure regularly. . If the vehicle is being driven at speeds of less than 16 MPH (25 km/h), the TPMS may not operate correctly. . Be sure to correctly install the specified size of tires to the four wheels.
Black plate (87,1) dealer as soon as possible. INDICATOR LIGHTS All-Wheel Drive (AWD) LOCK indicator light (AWD models) This light illuminates when the ignition switch is placed in the ON position, and turns off within 1 second. When selecting the LOCK mode while the engine is running, this light will illuminate. (See “ALL-WHEEL DRIVE (AWD)” in the “5. Starting and driving” section.
Black plate (88,1) section.) Operation: The malfunction indicator light will come on in one of two ways: . . Malfunction indicator light on steady — An emission control system and/or CVT malfunction has been detected. Check the fuelfiller cap if the LOOSE FUEL CAP warning appears on the dot matrix liquid crystal display. If the fuel-filler cap is loose or missing, tighten or install the cap and light continue to drive the vehicle. The should turn off after a few driving trips.
Black plate (89,1) DOT MATRIX LIQUID CRYSTAL DISPLAY AUDIBLE REMINDERS Brake pad wear warning Key reminder chime The disc brake pads have audible wear warnings. When a brake pad requires replacement, it will make a high pitched scraping sound when the vehicle is in motion. This scraping sound will first occur only when the brake pedal is depressed. After more wear of the brake pad, the sound will always be heard even if the brake pedal is not depressed.
Black plate (90,1) SIC4680 INDICATORS FOR OPERATION 1. Engine start operation indicator This indicator appears when the selector lever is in the P (Park) position. This indicator means that the engine will start by pushing the ignition switch with the brake pedal depressed. 2. Steering lock release malfunction indicator (if so equipped) You can start the engine directly in any position. This indicator appears when the steering wheel cannot be released from the LOCK position.
Black plate (91,1) wheel right and left. Unregistered key: 3. Key insertion indicator This indicator appears when the key needs to be inserted into the key port. (For example, the Intelligent Key battery is discharged.) The warning appears when the ignition switch is pushed from the LOCK position and the key cannot be recognized by the system. You cannot start the engine with an unregistered key. Use the registered key.
Black plate (92,1) 11. Low washer fluid warning 15. “TIMER” indicator This warning appears when the washer tank fluid is at a low level. Add washer fluid as necessary. (See “WINDOW WASHER FLUID” in the “8. Maintenance and do-it-yourself” section.) This indicator appears when the set “TIMER” indicator activates. You can set the time for up to 6 hours. (See “TRIP COMPUTER” later in this section.) 12. Door/lift gate open warning (ignition switch is in the ON position) 16.
Black plate (93,1) Current and average fuel consumption ? Average fuel consumption and speed ? Elapsed time and trip odometer ? Distance to empty (dte) ? Outside air temperature (ICY) ? Setting ? Warning check INDICATORS FOR MAINTENANCE 1. Engine oil replacement indicator This indicator appears when the set time comes for changing the engine oil. You can set or reset the distance for changing the engine oil. (See “TRIP COMPUTER” later in this section.) 2.
Black plate (94,1) vehicle speed since the last reset. Resetting is B for longer switch * done by pushing the than 1 second. (The average fuel consumption is also reset at the same time.) The display is updated every 30 seconds. The first 30 seconds after a reset, the display shows “——”.
Black plate (95,1) pushed to the OFF position may continue to be displayed. . SIC4701 Elapsed time and trip odometer (miles or km) Elapsed time: The elapsed time mode shows the time since the last reset. The displayed time can be reset B for longer than switch * by pushing the 1 second. (The trip odometer is also reset at the same time.) Trip odometer: The trip odometer mode shows the total distance the vehicle has been driven since the last reset.
Black plate (96,1) ALERT: Alert menu can be set to notify the following items. . TIMER Select this submenu to specify when the “TIMER” indicator activates. . ICY Select this submenu to display the low outside temperature warning. SIC4703 SIC3678 To return to the top page of the setting mode, select “BACK”. MAINTENANCE: Outside air temperature (ICY — 8F or 8C) Setting The outside air temperature is displayed in 8F or 8C in the range of −22 to 1408F (−30 to 608C).
Black plate (97,1) . OTHER SKIP: Select this submenu and set or reset the distance for replacing items other than the engine oil, oil filter and tires. Push the switch warning check mode. Push the A * to move to the B to select other menus. switch * To return to the top page of the setting mode, select “BACK”. DETAIL: OPTIONS: This item is available only when a warning is displayed. The 3 option menus can be set to your preference. Select this menu to see the details of warnings. .
Black plate (98,1) SECURITY SYSTEMS vibration occurs. The system helps deter vehicle theft but cannot prevent it, nor can it prevent the theft of interior or exterior vehicle components in all situations. Always secure your vehicle even if parking for a brief period. Never leave your keys in the vehicle, and always lock it when unattended. Be aware of your surroundings, and park in secure, well-lit areas whenever possible. SIC2133 Your vehicle has two types of security systems, as follows: .
Black plate (99,1) . the key — master or mechanical A 5. Confirm that the security indicator light * comes on. The security indicator light stays on for about 30 seconds. The vehicle security system is now pre-armed. After about 30 seconds the vehicle security system automatically shifts into the armed phase. The security light begins to flash once every approximately 3 seconds.
Black plate (100,1) WINDSHIELD WIPER AND WASHER SWITCH service as soon as possible. Please bring all registered keys that you have when visiting a NISSAN dealer for service. WARNING In freezing temperatures the washer solution may freeze on the windshield and obscure your vision which may lead to an accident. Warm windshield with the defroster before you wash the windshield. CAUTION . Do not operate the washer continuously for more than 30 seconds. .
Black plate (101,1) The windshield wiper and washer operates when the ignition switch is in the ON position. mix the washer fluid concentrate and water. Push the lever down to operate the wiper at the following speed: 1 * 1 * SIC3664 Type A 2 * 3 * INT (Type A) — intermittent operation can A be adjusted by turning the knob toward * B (Faster). (Slower) or * AUTO (Type B) — For models with the rainsensing auto wiper system, see “RAINSENSING AUTO WIPER SYSTEM” later in this section.
Black plate (102,1) . High — High sensitive operation . Low — Low sensitive operation To turn the rain-sensing auto wiper system off, push up the lever to the OFF position, or pull down the lever to the LO or HI position. CAUTION Do not touch the rain sensor and around it when the wiper switch is in the AUTO position and the ignition switch is in the ON position. The wipers may operate unexpectedly and cause to an injury or a wiper damage. SIC4017 RAIN-SENSING AUTO WIPER SYSTEM (if so equipped) .
Black plate (103,1) REAR WINDOW WIPER AND WASHER SWITCH WARNING In freezing temperatures the washer solution may freeze on the rear window glass and obscure your vision. Warm the rear window with the defroster before you wash the rear window. CAUTION . Do not operate the washer continuously for more than 30 seconds. . Do not operate the washer if the reservoir tank is empty. . Do not fill the window washer reservoir tank with washer fluid concentrates at full strength.
Black plate (104,1) REAR WINDOW AND OUTSIDE MIRROR DEFROSTER SWITCH The rear window wiper and washer operate when the ignition switch is in the ON position. To defog/defrost the rear window glass and outside mirrors (if so equipped), start the engine 1 on. The indicator light and push the switch * 2 will come on. Push the switch again to turn * the defroster off. Turn the switch clockwise from the OFF position to operate the wiper.
Black plate (105,1) HEADLIGHT AND TURN SIGNAL SWITCH off the headlights for short intervals (for example, when the vehicle stops at a traffic signal). Even when the daytime running lights are active (Canada only), the xenon headlights do not turn on. This way the life of the xenon headlights is not reduced. XENON HEADLIGHTS (if so equipped) WARNING HIGH VOLTAGE . When xenon headlights are on, they produce a high voltage. To prevent an electric shock, never attempt to modify or disassemble.
Black plate (106,1) The autolight system can turn on the headlights automatically when it is dark and turn off the headlights when it is light. If the ignition switch is pushed to the OFF position and one of the doors is opened and this condition is continued, the headlights remain on for 5 minutes. Automatic headlights off delay: You can keep the headlights on for up to 180 seconds after you push the ignition switch to OFF and open any door then close all the doors.
Black plate (107,1) or When the headlight switch is in the position while the ignition switch is in the ON position, the lights will automatically turn off 5 minutes after the ignition switch has been pushed to the OFF position. When the headlight switch remains in the or position after the lights automatically turn off, the lights will turn on when the ignition switch is pushed to the ON position. CAUTION .
Black plate (108,1) SIC3585 SIC3671 Instrument brightness control TURN SIGNAL SWITCH The instrument brightness control operates when the ignition switch is in the ON position. 1 Turn signal * SIC3672 FOG LIGHT SWITCH (if so equipped) A once will change Pushing the control switch * the brightness to the night mode. Move the lever up or down to signal the turning direction. When the turn is completed, the turn signals cancel automatically.
Black plate (109,1) HAZARD WARNING FLASHER SWITCH HORN . Turn signals do not work when the hazard warning flasher lights are on. The flasher can be actuated with the ignition switch in any position. Some state laws may prohibit the use of the hazard warning flasher switch while driving. SIC2574 Push the switch on to warn other drivers when you must stop or park under emergency conditions. All turn signal lights will flash. WARNING .
Black plate (110,1) HEATED STEERING WHEEL (if so equipped) HEATED SEATS (if so equipped) NOTE: If the surface temperature of the steering wheel is above 688F (208C) when the switch is turned on, the system will not heat the steering wheel. This is not a malfunction. WARNING Do not use or allow occupants to use the seat heater if you or the occupants cannot monitor elevated seat temperatures or have an inability to feel pain in body parts that contact the seat.
Black plate (111,1) . Any liquid spilled on the heated seat should be removed immediately with a dry cloth. 3. To turn off the heater, return the switch to the level position. Make sure the indicator light goes off. . When cleaning the seat, never use gasoline, thinner, or any similar materials. . If any malfunctions are found or the heated seat does not operate, turn the switch off and have the system checked by a NISSAN dealer.
Black plate (112,1) CLOCK 5. Push the CLOCK button 2 to enter. knob * MODELS WITH COLOR DISPLAY To adjust the clock on the front color display, use the SETTING button on the center multifunction control panel. See “HOW TO USE SETTING BUTTON” in the “4. Center display, heater, air conditioner, audio, phone and voice recognition systems” section. 1 * or AUDIO The display will return to the regular clock display after 10 seconds.
Black plate (113,1) VEHICLE DYNAMIC CONTROL (VDC) OFF SWITCH POWER OUTLET SSD1153 The vehicle should be driven with the Vehicle Dynamic Control (VDC) system on for most driving conditions. SIC3652 SIC3587 Console box — Type A Center console If the vehicle is stuck in mud or snow, the VDC system reduces the engine output to reduce wheel spin. The engine speed will be reduced even if the accelerator is depressed to the floor.
Black plate (114,1) CIGARETTE LIGHTER AND ASHTRAY (if so equipped) To use the power outlet, pull the cover as illustrated. contact the outlet. CAUTION . The outlet and plug may be hot during or immediately after use. . Do not use with accessories that exceed a 12 volt, 120W (10A) power draw. Do not use double adapters or more than one electrical accessory. . Use power outlet with the engine running to avoid discharging the vehicle battery. .
Black plate (115,1) STORAGE CAUTION . . The cigarette lighter socket is a power source for the cigarette lighter element only. The use of the cigarette lighter socket as a power source for any other accessory is not recommended. Do not use any other power outlet for an accessory lighter. CUP HOLDERS CAUTION . Avoid abrupt starting and braking when the cup holder is being used to prevent spilling the drink. If the liquid is hot, it can scald you or your passenger. .
Black plate (116,1) direct sunlight. The heat may damage the glasses. SIC3042 SIC3589 Rear Pull the armrest forward until it is horizontal. SUNGLASSES HOLDER WARNING Keep the sunglasses holder closed while driving to prevent an accident. To open the sunglasses holder, push 1 . * CAUTION . Do not use for anything other than glasses. .
Black plate (117,1) SIC3590 SIC3654 Front GLOVE BOX CONSOLE BOX WARNING Keep glove box lid closed while driving to help prevent injury in an accident or a sudden stop. To open the glove box, pull the handle A (driver’s seat side) is pulled, When the lever * the upper case is available for storing some B (front passensmall items. When the lever * ger’s seat side) is pulled, the bottom case is available for storing some larger ones. 1 . * To close, push the lid in until the lock latches.
Black plate (118,1) SIC3591 To open, push the Rear knob 1 * and pull out 2 . * SIC3593 SIC3655 Type A STORAGE BOX (if so equipped) To open, push the storage box lid illustrated. 1 * as 2 as illustrated. The inner tray can be removed * Do not place valuable items in the storage box. Do not use the storage box as an ashtray.
Black plate (119,1) CARGO FLOOR BOX Type A 1. To open the cargo floor box, pull the strap A . * B from the back side of 2. Remove the strap * the board and hang it on the opening of the lift gate. Type B A . To close, To open the cargo floor box, push * push the lid until the lock latches. The net partitions can be removed a larger storage space. B * to make The cargo floor box needs to be removed when you need a spare tire. (See “FLAT TIRE” in the “6. In case of emergency” section.
Black plate (120,1) To use the sub cover, hang the straps on the 2 . back of the headrest * restraint top tether strap is damaged. To stow the cargo cover, remove it from the hooks and hold until it is retracted. — If the cargo cover contacts the top tether strap when it is attached to the top tether anchor, remove the cargo cover from the vehicle or secure it on the cargo floor below its attachment location. If the cargo cover is not removed, it may damage the top tether strap during a collision.
Black plate (121,1) Technical and consumer information” section. ropes and hooks. . Unsecured cargo can become dangerous in an accident or sudden stop. WARNING . Drive extra carefully when the vehicle is loaded at or near the cargo carrying capacity, especially if the significant portion of that load is carried on the roof rack. . Heavy loading of the roof rack has the potential to affect the vehicle stability and handling during sudden or unusual handling maneuvers. .
Black plate (122,1) WINDOWS POWER WINDOWS rack from the ground, use a ladder or stool. WARNING SIC3505 COAT HOOKS The coat hooks are equipped beside the rear personal lights. CAUTION Do not place items which are more than 2 lb (1 kg) on the hook. . Make sure that all passengers have their hands, etc. inside the vehicle while it is in motion and before closing the windows. Use the window lock switch to prevent unexpected use of the power windows. .
Black plate (123,1) Locking passengers’ windows C is pushed in, only the When the lock button * driver side window can be opened or closed. Push it in again to cancel. SIC3283A Main power window switch (driver’s side) 1. 2. 3. 4. 5. Driver side window Front passenger side window Rear left passenger side window Rear right passenger side window Window lock button SIC3241 Passenger side power window switch The passenger side switch will open or close only the corresponding window.
Black plate (124,1) Auto reverse function WARNING There are some small distances immediately before the closed position which cannot be detected. Make sure that all passengers have their hands, etc., inside the vehicle before closing the window. SIC3285 Automatic operation (for front door windows) To fully open or close the window, completely push down or pull up the switch and release it; it need not be held. The window will automatically open or close all the way.
Black plate (125,1) MOONROOF (if so equipped) WARNING . . In an accident you could be thrown from the vehicle through an open moonroof. Always use seat belts and child restraints. Do not allow anyone to stand up or extend any portion of their body out of the moonroof opening while the vehicle is in motion or while the moonroof is closing. CAUTION . Remove water drops, snow, ice or sand from the moonroof before opening. . Do not place any heavy object on the moonroof or surrounding area. .
Black plate (126,1) 1 , CLOSE operation, push either of the OPEN * 2 or UP * 5 of the switch. * Tilting moonroof To tilt up the moonroof, push the moonroof 5 . switch to the up position * To tilt down the moonroof, push the switch to the 5 or push the CLOSE side * 2 of up position * the switch. When the moonroof is tilted up, push the CLOSE side of the moonroof switch to the 4 . The moonroof will tilt down second detent * and the sunshades will close.
Black plate (127,1) INTERIOR LIGHTS SIC3250 SIC3249 SIC3251 MAP LIGHTS PERSONAL LIGHTS INTERIOR LIGHT CONTROL SWITCH Push the button as illustrated to turn the light on or off. Rear The interior light control switch has three positions: ON, DOOR and OFF. Push the button as illustrated to turn the light on or off. ON position 1 the When the switch is in the ON position * map lights and rear personal lights will illuminate.
Black plate (128,1) MOOD LIGHTS — remain on for about 15 seconds. . doors are unlocked by pushing the UNLOCK button on the Intelligent Key or door handle request switch with the ignition switch in the LOCK position — remain on for about 15 seconds. . any door is opened and then closed with the ignition switch in the LOCK position — remain on for about 15 seconds. . any door is opened with the ignition switch in the ACC or ON position — remain on while the door is opened.
Black plate (129,1) VANITY MIRROR LIGHTS HomeLink® UNIVERSAL TRANSCEIVER (if so equipped) CARGO LIGHTS HomeLink® Universal Transceiver provides a convenient way to consolidate the functions of up to three individual hand-held transmitters into one built-in device. HomeLink® Universal Transceiver: SIC2064 The light on the vanity mirror will turn on when the cover on the vanity mirror is opened. When the cover is closed, the light will turn off.
Black plate (130,1) reverse features as required by federal safety standards. (These standards became effective for opener models manufactured after April 1, 1982.) A garage door opener which cannot detect an object in the path of a closing garage door and then automatically stop and reverse, does not meet current federal safety standards. Using a garage door opener without these features increases the risk of serious injury or death. . .
Black plate (131,1) SIC3613 3. Using both hands, simultaneously push and hold both the HomeLink® button you want to program and the hand-held transmitter button. DO NOT release the buttons until step 4 has been completed. 4. Hold down both buttons until the indicator light on HomeLink® flashes, changing from a “slow blink” to a “rapid blink”. This could take up to 90 seconds. When the indicator light blinks rapidly, both buttons may be released. The rapidly flashing light indicates successful programming.
Black plate (132,1) NOTE: If programming a garage door opener, etc., it is advised to unplug the device during the “cycling” process to prevent possible damage to the garage door opener components. OPERATING THE HomeLink® UNIVERSAL TRANSCEIVER HomeLink® Universal Transceiver (once programmed) may now be used to activate the garage door, etc. To operate, simply push the appropriate programmed HomeLink® Universal Transceiver button.
Black plate (133,1) device must accept any interference that may be received, including interference that may cause undesired operation. The transmitter has been tested and complies with FCC and DOC/MDC rules. Changes or modifications not expressly approved by the party responsible for compliance could void the user’s authority to operate the device. DOC: ISTC 1763K1313 FCC I.D.
Black plate (134,1) MEMO 2-62 Instruments and controls Model "Z51-D" EDITED: 2010/ 7/ 23
Black plate (10,1) 3 Pre-driving checks and adjustments Keys . . . . . . . . . . . . . . . . . . . . . . . . . . . . . . . . . . . . . . . . . . . . . . . . . . . . . . . . . . . . . . . 3-2 NISSAN Vehicle Immobilizer System keys . . . . . . . . . . . . 3-2 Intelligent Key system. . . . . . . . . . . . . . . . . . . . . . . . . . . . . . . . . . . . . . 3-3 Mechanical key . . . . . . . . . . . . . . . . . . . . . . . . . . . . . . . . . . . . . . . . . . . . . . 3-4 Valet hand-off. . . . . . . . . . . . .
Black plate (136,1) KEYS 1. 2. 3. A key number plate is supplied with your keys. Record the key number and keep it in a safe place (such as your wallet), not in the vehicle. If you lose your keys, see a NISSAN dealer for duplicates by using the key number. NISSAN does not record any key numbers so it is very important to keep track of your key number plate.
Black plate (137,1) ging it, please note the following. CAUTION Do not allow the NISSAN Vehicle Immobilizer System key, which contains an electrical transponder, to come in contact with salt water. This could cause the system to malfunction. INTELLIGENT KEY SYSTEM Your vehicle can only be driven with the Intelligent Keys which are registered to your vehicle’s Intelligent Key system components and NISSAN Vehicle Immobilizer System components.
Black plate (138,1) DOORS CAUTION WARNING . To prevent the glove box from being opened during valet hand-off, follow the procedures below. Always have the doors locked while driving. Along with the use of seat belts, this provides greater safety in the event of an accident by helping to prevent persons from being thrown from the vehicle. This also helps keep children and others from unintentionally opening the doors, and will help keep out intruders. . 1.
Black plate (139,1) SETTING BUTTON” in the “4. Center display, heater, air conditioner, audio, phone and voice recognition systems” section.) OPENING AND CLOSING WINDOWS WITH THE MECHANICAL KEY The driver’s door key operation also allows you to open and close the window that is equipped with the automatic open/close function. (See “POWER WINDOWS” in the “2. Instruments and controls” section).
Black plate (140,1) switch to the unlock position 2 . * Lockout protection When the power door lock switch (driver or front passenger) is moved to the lock position with the Intelligent Key in the port and any door open, all doors will lock and unlock automatically. With the Intelligent Key left in the vehicle (not in the Intelligent Key port) and any door open, all doors will unlock automatically and a chime will sound after the door is closed.
Black plate (141,1) INTELLIGENT KEY SYSTEM CAUTION WARNING . . SPA2433 CHILD SAFETY REAR DOOR LOCK The child safety rear door lock helps prevent doors from being opened accidentally, especially when small children are in the vehicle. When the levers are in the lock position 1 , the rear doors can be opened only * from the outside. To disengage, move the levers to the unlock 2 . position * Radio waves could adversely affect electric medical equipment.
Black plate (142,1) computer. . When the vehicle is parked near a parking meter. In such cases, correct the operating conditions before using the Intelligent Key function or use the mechanical key. Although the life of the battery varies depending on the operating conditions, the battery’s life is approximately 2 years. If the battery is discharged, replace it with a new one. the purchase and use of additional Intelligent Keys, contact a NISSAN dealer. CAUTION .
Black plate (143,1) SPA2407 SPA2074 INTELLIGENT KEY OPERATING RANGE The Intelligent Key functions can only be used when the Intelligent Key is within the specified 1 . operating range from the request switch * When the Intelligent Key battery is discharged or strong radio waves are present near the operating location, the Intelligent Key system’s operating range becomes narrower, and the Intelligent Key may not function properly. The operating range is within 31.50 in (80 cm) 1 .
Black plate (144,1) . Do not pull the door handle before pushing the door handle request switch. The door will be unlocked but will not open. Release the door handle once and pull it again to open the door. . The Intelligent Key system (opening/closing doors with the door handle request switch) can be set to remain inactive. (See “VEHICLE INFORMATION AND SETTINGS” in the “4. Center display, heater, air conditioner, audio, phone and voice recognition systems” section.
Black plate (145,1) When you carry the Intelligent Key with you, you can lock or unlock all doors by pushing the door A or the lift gate handle request switch * B within the range of operarequest switch * tion. When you lock or unlock the doors or the lift gate, the hazard indicator will flash and the horn (or the outside chime) will sound as a confirmation. For details, see “Setting hazard indicator and horn mode” later in this section. Locking doors open.
Black plate (146,1) In hazard indicator mode, when the LOCK button is pushed, the hazard indicator flashes button is twice. When the UNLOCK pushed, neither the hazard indicator nor the horn operates.
Black plate (147,1) Switching procedure: BATTERY SAVER SYSTEM 1 and UNLOCK 2 Push the LOCK * * buttons simultaneously for more than 2 seconds to switch the mode from one to the other. When all the following conditions are met for 60 minutes, the battery saver system will cut off the power supply to prevent battery discharge. When pushing the buttons to set the hazard indicator mode, the hazard indicator flashes 3 times. . The ignition switch is in the ACC position, and .
Black plate (148,1) TROUBLESHOOTING GUIDE Symptom Possible cause Action to take The SHIFT P warning appears on the display When pushing the ignition switch and the inside warning chime sounds conto stop the engine tinuously. The selector lever is not in the P (Park) Shift the selector lever to the P (Park) position. position. When shifting the selector lever to the P (Park) position. The ignition switch is in the ACC or ON Push the ignition switch to the OFF posiposition. tion.
Black plate (149,1) REMOTE KEYLESS ENTRY SYSTEM WARNING The Intelligent Key transmits radio waves when the buttons are pushed. The FAA advises that radio waves may affect aircraft navigation and communication systems. Do not operate the Intelligent Key while on an airplane. Make sure the buttons are not operated unintentionally when the unit is stored for a flight.
Black plate (150,1) 1 LOCK button * 2 UNLOCK button * 3 Power lift gate button * 4 PANIC button * Unlocking doors (if so equipped) HOW TO USE REMOTE KEYLESS ENTRY SYSTEM When you lock or unlock the doors or the lift gate, the hazard indicator will flash and the horn (or the outside chime) will sound as a confirmation. For details, see “Setting hazard indicator and horn mode” later in this section. 1. Push the UNLOCK button * 2 once. 2. The hazard indicator flashes once.
Black plate (151,1) operated when the ignition switch is in the ON position. Using panic alarm If you are near your vehicle and feel threatened, you can activate the alarm according to the following procedure to call attention. 1. Push the PANIC than 1 second. button 4 * In hazard indicator mode, when the LOCK 1 button * is pushed, the hazard indicator button flashes twice. When the UNLOCK 2 is pushed, neither the hazard indicator nor * the horn operates. for more 2.
Black plate (152,1) Hazard indicator and horn mode: Switching procedure: DOOR LOCK Intelligent Key system (Using door handle or lift gate request switch) Remote keyless entry system (Using or button) DOOR UNLOCK HAZARD - twice OUTSIDE CHIME - twice HAZARD - once OUTSIDE CHIME - once HAZARD - twice HORN - once HAZARD - once HORN - none Hazard indicator mode: DOOR LOCK Intelligent Key system (Using door handle or lift gate request switch) Remote keyless entry system (Using or button) DOOR UNLOCK
Black plate (153,1) HOOD LIFT GATE WARNING . Always be sure the lift gate has been closed securely to prevent it from opening while driving. . Do not drive with the lift gate open. This could allow dangerous exhaust gases to be drawn into the vehicle. See “EXHAUST GAS (carbon monoxide)” in the “5. Starting and driving” section of this manual. . Do not leave children unattended inside the vehicle. They could unknowingly activate switches or controls.
Black plate (154,1) . inserting the mechanical key into the driver’s door key cylinder and turning it to the rear of the vehicle twice. To close the lift gate, pull down until it securely locks. OPERATING POWER LIFT GATE (if so equipped) To operate the power lift gate, the selector lever must be in the P (Park) position. The power lift gate will not operate if the battery voltage is low.
Black plate (155,1) Power open When the lift gate is fully closed, the lift gate will fully open automatically by: A * . pushing the power lift gate switch the instrument panel . pushing the lift gate opener switch . C on pushing the power lift gate button * the Intelligent Key for more than 1 second on B * The hazard flashes 4 times and the outside chime sounds when the lift gate starts opening.
Black plate (156,1) the Intelligent Key for more than 1 second The hazard flashes 4 times and the outside chime sounds when the lift gate starts closing. Reverse function The power lift gate will reverse immediately if one of the following actions is performed during power open or power close. A * . pushing the power lift gate switch the instrument panel . D on the lower pushing the lift gate switch * part of the lift gate . pushing the lift gate button the Intelligent Key.
Black plate (157,1) pinching, keep hands and fingers away from lift gate opening. CAUTION . If the power lift gate does not stay open or if the lift gate unexpectedly closes at any time, do not operate the lift gate. There may be a pressure loss in one or both of the lift gate gas stays. Have the lift gate inspected by a NISSAN dealer. . Do not activate the power lift gate if one or both of the lift gate gas stays are removed. Damage to the lift gate or power lift gate mechanisms may occur. SPA2464 .
Black plate (158,1) FUEL-FILLER DOOR FUEL-FILLER CAP WARNING SPA1915 LIFT GATE RELEASE Gasoline is extremely flammable and highly explosive under certain conditions. You could be burned or seriously injured if it is misused or mishandled. Always stop engine and do not smoke or allow open flames or sparks near the vehicle when refueling. . Do not attempt to top off the fuel tank after the fuel pump nozzle shuts off automatically.
Black plate (159,1) cle. . light (MIL) to illuminate. If the light illuminates because the fuelfiller cap is loose or missing, tighten or install the cap and continue to drive the vehicle. The light should turn off after a few driving trips. If the light does not turn off after a few driving trips, have the vehicle inspected by a NISSAN dealer. Do not fill a portable fuel container in the vehicle or trailer.
Black plate (160,1) TILT/TELESCOPIC STEERING WARNING SPA2833 LOOSE FUEL CAP warning The LOOSE FUEL CAP warning appears on the dot matrix liquid crystal display when the fuelfiller cap is not tightened correctly after the vehicle has been refueled. To turn off the warning, perform the following steps: 1. Remove and install the fuel-filler cap as soon as possible. (See “FUEL-FILLER CAP” earlier in this section.) 2. Tighten the fuel-filler cap until it clicks. A on the right side 3.
Black plate (161,1) SUN VISORS POSITIONER” later in this section. SPA2444A ELECTRIC OPERATION Tilt or telescopic operation Move the lever to adjust the steering wheel up or down, forward or rearward to the desired position. Entry/Exit function operation (if so equipped): The automatic drive positioner system will make the steering wheel move up automatically when the driver’s door is opened with the ignition switch in the LOCK position. This lets the driver get into and out of the seat more easily.
Black plate (162,1) MIRRORS CAUTION . Do not store the main sun visor before storing the extension sun visor. . Do not pull the extension sun visor forcedly downward. 1. To block out glare from the front, swing 1 . down the main sun visor * 2. To block glare from the side, remove the main sun visor from the center mount and 2 . swing it to the side * 3 from 3. Draw out the extension sun visor * the main sun visor to block from further glare.
Black plate (163,1) Automatic anti-glare type The inside mirror is designed so that it automatically changes reflection according to the intensity of the headlights of the following vehicle. For the HomeLink® Universal Transceiver operation, see “HomeLink® UNIVERSAL TRANSCEIVER” in the “2. Instruments and controls” section. The anti-glare system will be automatically turned on when the ignition switch is pushed to the ON position.
Black plate (164,1) The outside mirror will operate only when the ignition switch is in the ACC or ON position. Turn the switch right or left to select the right or 1 , then adjust using the control left side mirror * 2 . switch * Defrosting outside mirrors (if so equipped) The outside mirrors will be heated when the rear window defroster switch is operated. SPA2319 OUTSIDE MIRRORS WARNING SPA1829 Foldable outside mirrors Fold the outside mirror by pushing it toward the rear of the vehicle.
Black plate (165,1) AUTOMATIC DRIVE POSITIONER (if so equipped) The automatic drive positioner system has two features: canceled by pressing and holding the SET switch for more than 10 seconds. . Entry/exit function . Memory storage The indicator lights on the memory switches (1 and 2) will blink once when the function is canceled, and the indicator lights will blink twice when the function is activated. Note that the indicator lights may illuminate after 5 seconds while holding the SET switch.
Black plate (166,1) “TILT/TELESCOPIC STEERING” earlier in this section and “OUTSIDE MIRRORS” earlier in this section. 4. Push the SET switch and, within 5 seconds, push the memory switch (1 or 2). The indicator light for the pushed memory switch will stay on for approximately 5 seconds after pushing the switch. Push the ignition switch to the OFF position, and button on the Intelligent Key. then push the The driver’s seat, steering wheel and outside mirrors will move to the memorized position.
Black plate (167,1) . Push the ignition switch to the ON position and push the memory switch (1 or 2). . Within 45 seconds of opening the driver’s door, push the memory switch (1 or 2). The driver’s seat, steering column and outside mirrors will move to the memorized position with the indicator light flashing, and then the light will stay on for approximately 5 seconds. . When the engine is started while moving the automatic drive positioner. .
Black plate (13,1) 4 Center display, heater, air conditioner, audio, phone and voice recognition systems Safety note . . . . . . . . . . . . . . . . . . . . . . . . . . . . . . . . . . . . . . . . . . . . . . . . . . . . . . . 4-2 Center multi-function control panel (models with color display screen) . . . . . . . . . . . . . . . . . . . . . . . . . 4-2 How to use multi-function controller . . . . . . . . . . . . . . . . . . . 4-4 How to use touch screen (models with navigation system) . . . . . . . . . .
Black plate (14,1) Vehicle phonebook . . . . . . . . . . . . . . . . . . . . . . . . . . . . . . . . . . . . . . . 4-85 Making a call. . . . . . . . . . . . . . . . . . . . . . . . . . . . . . . . . . . . . . . . . . . . . . . 4-88 Receiving a call . . . . . . . . . . . . . . . . . . . . . . . . . . . . . . . . . . . . . . . . . . . 4-89 During a call . . . . . . . . . . . . . . . . . . . . . . . . . . . . . . . . . . . . . . . . . . . . . . . 4-90 Phone setting. . . . . . . . . . . . . . . . . . . . . . .
Black plate (170,1) CENTER MULTI-FUNCTION CONTROL PANEL (models with color display screen) SAFETY NOTE WARNING . Do not disassemble or modify this system. If you do, it may result in accidents, fire, or electric shock. . Do not use this system if you notice any abnormality, such as a frozen screen or lack of sound. Continued use of the system may result in accident, fire or electric shock. .
Black plate (171,1) SAA1846 Without navigation system 1. 2. 3. 4. 5. “INFO” vehicle information button (P.4-7) “STATUS” status display button (P.4-7) Multi-function controller (P.4-4) OFF” brightness control and display ON/ “ OFF button (P.4-7) “SETTING” button (P.4-12) SAA1847 With navigation system When you use this system, make sure the engine is running.
Black plate (172,1) HOW TO USE MULTI-FUNCTION CONTROLLER cessary, use a small amount of neutral detergent with a soft cloth. Never use a rough cloth, alcohol, benzine, thinner or any kind of solvent or paper towel with a chemical cleaning agent. They will scratch or deteriorate the panel. Choose an item on the display using the main 2 (or additional directional directional buttons * 6 with navigation system) or center buttons * 3 , and push the ENTER button * 1 for dial * operation.
Black plate (173,1) . Space: Inserts a space. . Delete: Deletes the last character that has been input with one touch. Push and hold the button to delete all of the characters. . OK: Completes character inputs. Touch screen maintenance SAA2474 Adjusting an item: Touch the + settings. * 1 or − SAA2475 Inputting characters: * 2 button to adjust the 3 or 4 button to move Touch the * * to the previous or next item. 5 or 6 button to move Touch the * * to the previous or next page.
Black plate (174,1) SAA1860 MENU OPTIONS (models with navigation system) The start menu can be displayed using the menu control switch on the steering-wheel-mounted controls. 1. While the MAP or STATUS screen is displayed, push and hold the menu control switch until the “Menu Options” screen appears. 2. Highlight the preferred item by tilting the menu control switch up or down, and then push the menu control switch to select it.
Black plate (175,1) VEHICLE INFORMATION AND SETTINGS (if so equipped) HOW TO SELECT MENUS ON THE SCREEN Vehicle functions are viewed on the display screen in menus. To select each key item, highlight the preferred item using the multifunction controller and push the ENTER button. Whenever a menu selection is made or menu item is highlighted, different areas on the screen provide you with important information. See the following for details. 1. Header: Shows the path used to get to the current screen. (i.e.
Black plate (176,1) a guide to determine the condition of the vehicle. See the following for details. Vehicle information display 1. Push the INFO button on the control panel. 2. Select an item from the INFO menu. 3. After viewing or adjusting the information on the following screens, push the BACK button to return to the INFO menu. See the separate Navigation System Owner’s Manual for the following items: SAA2478 Models with navigation system . Where am I? . Traffic Info . Weather Info .
Black plate (177,1) Fuel Economy information The distance to empty, average fuel economy and current fuel economy will be displayed for reference. To reset the average fuel economy (Avg Fuel Econ or Average Fuel Economy), select the “Reset Fuel Eco” or “Reset” key. If the “Fuel Eco History” or “View” key is selected, the average fuel consumption history will be displayed in graph form along with the average for the previous Reset-to-Reset period.
Black plate (178,1) Maintenance information The maintenance intervals can be displayed for the engine oil, oil filter, tire and other reminders. To set a maintenance interval, select a preferred item from the list. You can also set to display a message to remind you that the maintenance needs to be performed. The following example shows how to set the engine oil maintenance information. Use the same steps to set the other maintenance information.
Black plate (179,1) 1. Set the interval (mileage) of the maintenance schedule. To determine the recommended maintenance interval, refer to your “NISSAN Service and Maintenance Guide”. 2. To display the reminder automatically when the desired distance is reached, select the “Reminder” key. 3. Reset the driving distance to the new maintenance schedule. 4. To return to the previous screen, push the BACK button. The unit can be converted between “US” and “Metric”.
Black plate (180,1) HOW TO USE SETTING BUTTON The display as illustrated will appear when the SETTING button is pushed. For navigation settings, refer to the separate Navigation System Owner’s Manual.
Black plate (181,1) Audio settings The display as illustrated will appear when pushing the SETTING button and selecting the “Audio” key. Bass/Treble/Balance/Fade: To adjust the speaker tone quality and sound balance, select the “Bass”, “Treble”, “Balance” or “Fade” key and adjust it with the multifunction controller. These items can also be adjusted by pushing and turning the AUDIO knob. Speed Sensitive Vol.: The audio system’s volume is increased with the vehicle speed. Select the “Speed Sensitive Vol.
Black plate (182,1) “Guidance Volume” and adjust it with the multifunction controller. You can also adjust the guidance voice volume by turning the VOLUME control knob while voice guidance is being announced. Ringtone/Incoming Call/Outgoing Call: For the details of these items, see “BLUETOOTH ® HANDS-FREE PHONE SYSTEM (models with navigation system)” later in this section. Switch Beeps: When this item is turned to ON, you will hear a beep sound when you use a button.
Black plate (183,1) button for more than 2 seconds. Brightness/Contrast/Background Color: When any mode button is pushed with the screen off, the screen turns on for further operation. The screen will turn off automatically 5 seconds after the operation is finished. To adjust the brightness, contrast and background color of the screen, select the appropriate “Brightness”, “Contrast” or “Background Color” key and push the ENTER button.
Black plate (184,1) Clock settings Daylight Saving Time: The display as illustrated will appear when pushing the SETTING button and selecting the “Clock” key. Turn this item to ON for daylight saving time application. The clock settings display cannot be operated while driving. Stop the vehicle in a safe place and apply the parking brake before setting the clock. Models with navigation system Pacific . Mountain . Central .
Black plate (185,1) Comfort settings Models with navigation system The display as illustrated will appear when pushing the SETTING button, selecting the “Others” key and then selecting the “Comfort” key. This key does not appear on the display until the ignition switch is pushed to the ON position.
Black plate (186,1) the steering wheel moves to the previous position. Slide Driver Seat Back on Exit (if so equipped): When this item is turned to ON, the driver’s seat moves backward for easy exit if the ignition switch is in the OFF position and the driver’s door is opened. After getting into the vehicle and pushing the ignition switch to the ACC position, the driver’s seat moves to the previous position.
Black plate (187,1) Language & Units settings CAMERA settings (if so equipped) The Language & Units settings display will appear when pushing the SETTING button, selecting the “Others” key, and then selecting the “Language & Units” key. The “CAMERA” screen will appear when selecting the “Camera” key. For the details about the camera system operation, see “REARVIEW MONITOR” later in this section. Select Language: Select the “Select Language” key.
Black plate (188,1) brake. SAA2491 Image Viewer (models with navigation system) The image files in the USB memory will be displayed. To display the Image Viewer, push the SETTING button, select the “Other” key and then select the “Image Viewer” key. The image of the selected file is displayed on the right side of the screen. When a number of folders are included in the USB memory, select a folder from the list to display the file list.
Black plate (189,1) REARVIEW MONITOR (if so equipped) . (Stop) Select the “ . ” key to stop the slideshow. . (Next) Select the “ . Operating tips: — Image type: JPEG ” key to display the next file. — File Extensions: *.jpg, *jpeg (Previous) Select the “ file. — Maximum Resolution: 2048 6 1536 pixels ” key to display the previous . — Maximum File Name lengths: 253-Bytes Select the “Slideshow Order” key. From the following display, select “Random” or “Order List”.
Black plate (190,1) Vehicle width guide lines because of its monitoring range limitation. . Indicate the vehicle width when backing up. Do not put anything on the rear view camera. The rear view camera is installed above the license plate. . When washing the vehicle with high-pressure water, be sure not to spray it around the camera. Otherwise, water may enter the camera unit causing water condensation on the lens, a malfunction, fire or an electric shock. . Do not strike the camera.
Black plate (191,1) . On a snow-covered or slippery road, there may be a difference between the predicted course line and the actual course line. . If the battery is disconnected or becomes discharged, the predicted course lines may be displayed incorrectly. If this occurs, drive the vehicle on a straight road for more than 5 minutes. . When the steering wheel is turned with the ignition switch in the ACC position, the predicted course lines may be displayed incorrectly. .
Black plate (192,1) 5. When the vehicle is parked in the space completely, move the selector lever to the P (Park) position and apply the parking brake. DIFFERENCE BETWEEN PREDICTED AND ACTUAL DISTANCES The distance guide line and the vehicle width guide line should be used as a reference only when the vehicle is on a level, paved surface. The distance viewed on the monitor is for reference only and may be different than the actual distance between the vehicle and displayed objects. SAA1898 3.
Black plate (193,1) the hill is viewed in the monitor closer than it appears. the hill is viewed in the monitor further than it appears. SAA1979 Backing up on a steep downhill When backing up the vehicle down a hill, the distance guide lines and the vehicle width guide lines are shown further than the actual distance. For example, the display shows 3 ft (1 m) to the A , but the actual 3 ft (1 m) distance on place * B .
Black plate (194,1) course. HOW TO ADJUST THE SCREEN To adjust the Display ON/OFF, Brightness, Tint, Color, Contrast and Black Level of the RearView Monitor, push the SETTING button with the RearView Monitor on, select the item key and adjust the level using the multi-function controller. Do not adjust the Brightness, Tint, Color, Contrast and Black Level of the RearView Monitor while the vehicle is moving. Make sure the parking brake is firmly applied and the engine is not running.
Black plate (195,1) VENTILATORS . When the temperature is extremely high or low, the screen may not clearly display objects. This is not a malfunction. . When strong light directly enters the camera, objects may not be displayed clearly. This is not a malfunction. . Vertical lines may be seen in objects on the screen. This is due to strong reflected light from the bumper. This is not a malfunction. . The screen may flicker under fluorescent light. This is not a malfunction. .
Black plate (196,1) HEATER AND AIR CONDITIONER WARNING . The air conditioner cooling function operates only when the engine is running. . Do not leave children or adults who would normally require the support of others alone in your vehicle. Pets should not be left alone either. On hot, sunny days, temperatures in a closed vehicle could quickly become high enough to cause severe or possibly fatal injuries to people or animals.
Black plate (197,1) For the models with the color display screen, push the “STATUS” button to display the heater and air conditioner status screen. (See “HOW TO USE STATUS BUTTON” earlier in this section.) SAA2040 Type A 1. 2. 3. 4. 5. 6. 7. 8. 9.
Black plate (198,1) Adjust the temperature to about 758F (248C) for normal operation. . SAA2834 Type B 1. 2. 3. 4. 5. 6. 7. 8. 9.
Black plate (199,1) . . . The temperature of the passenger compartment will be maintained automatically. Air flow distribution and fan speed are also controlled automatically. MANUAL OPERATION Do not set the temperature lower than the outside air temperature. Otherwise the system may not work properly. Fan speed control Not recommended if windows fog up. Push the “AUTO” button to return to automatic control of the fan speed. Dehumidified defrosting or defogging 1.
Black plate (200,1) TO TURN THE SYSTEM ON/OFF The filter should be replaced if air flow is extremely decreased or when windows fog up easily when operating heater or air conditioning system. Push the “OFF” or “ON·OFF” button when the heater and air conditioner is off. The system will turn on with the settings that were used immediately before the system was turned off. SERVICING AIR CONDITIONER SAA1989 OPERATING TIPS A on the instrument panel The sunload sensor * helps maintain a constant temperature.
Black plate (201,1) AUDIO SYSTEM AUDIO OPERATION PRECAUTIONS function in your NISSAN radio system. Radio Reception conditions will constantly change because of vehicle movement. Buildings, terrain, signal distance and interference from other vehicles can work against ideal reception. Described below are some of the factors that can affect your radio reception. Push the ignition switch to the ACC or ON position and push the radio band select button to turn on the radio.
Black plate (202,1) Static and flutter: During signal interference from buildings, large hills or due to antenna position, usually in conjunction with increased distance from the station transmitter, static or flutter can be heard. This can be reduced by lowering the treble setting to reduce the treble response. Multipath reception: Because of the reflective characteristics of FM signals, direct and reflected signals reach the receiver at the same time.
Black plate (203,1) . . The player may skip while driving on rough roads. . The CD player sometimes cannot function when the passenger compartment temperature is extremely high. Decrease the temperature before use. . Only use high quality 4.7 in (12 cm) round discs that have the “COMPACT disc DIGITAL AUDIO” logo on the disc or packaging. . Do not expose the CD to direct sunlight. .
Black plate (204,1) may malfunction due to humidity. If this occurs, remove the CD/DVD and dehumidify or ventilate the player completely. . The player may skip while driving on rough roads. . The CD/DVD player sometimes cannot function when the passenger compartment temperature is extremely high. Decrease the temperature before use. . . Do not expose the CD/DVD to direct sunlight. .
Black plate (205,1) . Modifying or disassembling is prohibited. be supported with this system. . Dolby digital is manufactured under license from Dolby Laboratories, Inc. . Make sure that the USB device is connected correctly into the USB connector. . Dolby and the double D mark “ ” are trademarks of Dolby Laboratories, Inc. . . DTS and DTS 2.0 “ trademarks of DTS, Inc. Do not force the memory stick or USB cable into the USB connector. This could damage the connector. .
Black plate (206,1) . An incorrect song title may appear when the Play Mode is changed while using the iPod nano® (2nd generation) iPod® is a trademark of Apple Inc., registered in the U.S. and other countries. Compressed Audio Files (MP3/WMA/ AAC) . AAC/M4A — Advanced Audio Coding (AAC) is a lossy audio compression format. Audio files that have been encoded with AAC are generally smaller in size and deliver a higher quality of sound than MP3. .
Black plate (207,1) . The playback order is the order in which the files were written by the writing software, so the files might not play in the desired order. . Music playback order of compressed audio files is as illustrated in the next figure. SAA2494 Playback order: . The folder names of folders not containing compressed audio files are not shown in the display. . If there is a file in the top level of a disc/USB, “Root Folder” is displayed.
Black plate (208,1) Specification chart (for FM-AM radio with Compact Disc (CD) changer): Supported media CD, CD-R, CD-RW Supported file systems CD, CD-R, CD-RW: ISO9660 LEVEL1, ISO9660 LEVEL2, Romeo, Joliet * ISO9660 Level 3 (packet writing) is not supported. * Files saved using the Live File System component (on a Windows Vista-based computer) are not supported.
Black plate (209,1) Specification chart (for FM-AM-SAT radio with Compact Disc (CD) player): Supported media CD, CD-R, CD-RW, DVD-ROM*5, DVD+R, DVD+RW, DVD+R DL, USB2.0 CD, CD-R, CD-RW, DVD-ROM*5, DVD+R, DVD+RW, DVD+R DL: ISO9660 LEVEL1, ISO9660 LEVEL2, Romeo, Joliet * ISO9660 Level 3 (packet writing) is not supported. * Files saved using the Live File System component (on a Windows Vista-based computer) are not supported. UDF Bridge (UDF1.02+ISO9660), UDF1.5, UDF2.0 * VDF1.5/VDF2.
Black plate (210,1) Displayable character codes*3 *1 *2 *3 *4 *5 01: ASCII, 02: ISO-8859-1, 03: UNICODE (UTF-16 BOM Big Endian), 04: UNICODE (UTF-16 Non-BOM Big Endian), 05: UNICODE (UTF-8), 06: UNICODE (Non-UTF-16 BOM Little Endian), 07: SHIFT-JIS Files created with a combination of 48 kHz sampling frequency and 64 kbps bit rate cannot be played. Protected WMA files (DRM) cannot be played. Available codes depend on what kind of media, versions and information are going to be displayed.
Black plate (211,1) Troubleshooting guide: Symptom Cause and Countermeasure Check if the disc or USB device was inserted correctly. Check if the disc is scratched or dirty. Check if there is condensation inside the player, and if there is, wait until the condensation is gone (about 1 hour) before using the player. If there is a temperature increase error, the player will play correctly after it returns to the normal temperature.
Black plate (212,1) Compressed Video Files (models with navigation system) Explanation of terms: . DivX - DivX refers to the DivX codec owned by DivX, Inc. used for a lossy compression of video based on MPEG-4. . AVI - AVI stands for Audio Video Interleave. It is a standard file format originated by Microsoft Corporation. A “.divx” encoded file can be saved into the “.avi” file format for playback on this system if it meets the requirements stated in the table in this section. However, not all the “.
Black plate (213,1) Bluetooth® Audio player (models with navigation system) . . . . Some Bluetooth® audio devices may not be recognized by the in-vehicle audio system. It is necessary to set up the wireless connection between a compatible Bluetooth® audio device and the in-vehicle Bluetooth® module before using the Bluetooth® audio player. Operating procedure of the Bluetooth ® audio player will vary depending on the device.
Black plate (214,1) 13. FF (fast forward) button for SEEK/TRACK 14. AUX in jack FM-AM RADIO WITH COMPACT DISC (CD) CHANGER For all operation precautions, see “AUDIO OPERATION PRECAUTIONS” earlier in this section. Audio main operation Head unit: The radio has an FM diversity reception system, which employs two antennas printed on the rear window. This system automatically switches to the antenna which is receiving less interference.
Black plate (215,1) Adjusting sound quality: Push the Audio control knob to change the selecting mode as follows. Bass ? Treble ? Fade ? Balance ? Speed Sensitive Volume ? Beep Rotate the Audio control knob to adjust Bass, Treble, Fade and Balance to the desired level. Fade adjusts the sound level between the front and rear speakers and Balance adjusts the sound between the right and left speakers. CLOCK adjust: Push the CLOCK adjust button for more than 1.5 seconds to turn on the CLOCK display.
Black plate (216,1) 3. Select the desired station/channel and keep pushing any of the desired station preset 1 to * 6 until a beep sound is buttons * heard. (The radio mutes when the select button is pushed.) 4. The channel indicator will then come on and the sound will resume. Memorizing is now complete. 5. Other buttons can be set in the same manner. If the battery cable is disconnected, or if the fuse blows, the radio memory will be erased. In that case, reset the desired stations.
Black plate (217,1) REPEAT (RPT), RANDOM (RDM): When the RPT button is pushed while the compact disc is played, the play pattern can be changed as follows: If the compact disc comes out and is not removed, it will be pulled back into the slot to protect it. NISSAN strongly recommend using a stereo mini plug cable when connecting your music device to the audio system. Music may not be played properly when you use a monaural cable. SCAN tuning: (CD) When the SCAN tuning button is pushed for less than 1.
Black plate (218,1) SAA1851 With navigation system 1. 2. 3. AM·FM band select button SAT button DISC·AUX button SAA3474 1. 2. 3. 4. 5. 6. CD EJECT button ON·OFF/VOLUME control knob Radio station and CD selector buttons Radio tuning/AUDIO control knob Radio SCAN (tuning) button CD RPT (repeat)/RDM (random) play button 7. 8.
Black plate (219,1) FM-AM-SAT RADIO WITH COMPACT DISC (CD) PLAYER For all operation precautions, see “AUDIO OPERATION PRECAUTIONS” earlier in this section. The satellite radio mode requires an active XM Satellite Radio subscription. The satellite radio is not available in Alaska, Hawaii and Guam. SAA1852 Without navigation system 1. 2. 3. AM·FM band select button DISC button AUX/SAT band select button It may take some time to receive the activation signal after subscribing the XM Satellite Radio.
Black plate (220,1) Switching the display: . Models with navigation system radio (SAT) band select (models with navigation system): Pushing the DISC·AUX button will switch the displays as follows: Pushing the radio band select button will change the band as follows: iPod®/USB ? CD/DVD ? Music Box® ? Bluetooth® Audio ? AUX ? iPod®/USB XM1 ? XM2 ? XM3 ? XM1 .
Black plate (221,1) . CHECK ANTENNA (Antenna connection error) 3. Push and hold the desired station preset 1 to * 6 until the radio mutes. button * . LOADING (When the initial setting is performed) . UPDATING (When the satellite radio subscription is not active) 4. The station indicator will then come on and the sound will resume. Memorizing is now complete. SCAN tuning: Push the SCAN tuning button to tune from low to high frequencies and stop at each broadcasting station/channel for 5 seconds.
Black plate (222,1) . CH Name . Category . Name When the DISC·AUX or DISC button is pushed with the CD loaded and the radio playing, the radio will automatically be turned off and the CD will start to play. . Title Menu (models with navigation system): . Other When the “Menu” key on the display is selected while the CD is being played, the menu screen will be displayed. The following menu options are available.
Black plate (223,1) CD: . Disc title . Track title REPEAT (RPT), RANDOM (RDM): CD with compressed audio files: . Folder title . File title . Song title . Album title . Artist When the RPT button is pushed while the CD is played, the play pattern can be changed as follows: (CD) (CD with compressed audio files) DVD (Digital Versatile Disc) PLAYER OPERATION (models with navigation system) Precautions Start the engine when using the DVD entertainment system.
Black plate (224,1) time. To turn it on again, push the DISC·AUX button again. CAUTION . DVD operation keys: Only operate the DVD while the vehicle engine is running. Operating the DVD for extended periods of time with the engine OFF can discharge the vehicle battery. . Do not allow the system to get wet. Excessive moisture such as spilled liquids may cause the system to malfunction. . While playing VIDEO-CD media, this DVD player does not guarantee complete functionality of all VIDEO-CD formats.
Black plate (225,1) times this key is selected. / Title Menu (DVD-VIDEO): Some menus specific to each disc will be shown. For details, see the instructions on the disc. Commercial Skip: This function is only for DVD-VIDEO, DVD-VR. Select the “ ” or “ ” key to skip forward or backwards by the set amount as defined in the DVD Settings menu. Title Search (DVD-VIDEO, DVD-VR): The scene with the specified title will be displayed each time the “+” side or “−” side is selected.
Black plate (226,1) switched to another one. Select the “Angle” key. The angle will change each time the “+” side or “−” side is selected. be changed to the one specified. Angle Mark (DVD-VIDEO): To adjust the image quality of the screen, select the preferred adjustment items. When this item is turned on, an angle mark will be shown on the bottom of the screen if the scene can be seen from a different angle.
Black plate (227,1) Audio file operation or PLAY: When the DISC·AUX or AUX button is pushed with the system off and the USB memory inserted, the system will turn on. If another audio source is playing and a USB memory is inserted, push the DISC·AUX or AUX button repeatedly until the center display changes to the USB memory mode.
Black plate (228,1) playback mode. Folder selection: . To change to another folder in the USB memory, turn the folder selector or choose a folder displayed on the screen using the multi-function controller. Select the preferred play mode. Text (models without navigation system): When the “Text” key is selected on the screen using the multi-function controller and then the ENTER button is pushed while a USB memory is being played, the music information listed below will be displayed on the screen.
Black plate (229,1) Operation keys: the number of times the “ To operate the USB memory, select the desired key displayed on the operation screen using the multi-function controller. List: ” key is selected. Select the “List” key on the movie file operation screen to display the file list. Pause Select the “ ” key to pause the movie file. To ” resume playing the movie file, select the “ key.
Black plate (230,1) . 10 Key Search Select the “10 Key Search” key to open the number entry screen. Input the number to be searched and select the “OK” key. The specified folder/file will be played. . Display To adjust the image quality of the screen, select the preferred adjustment items. . Example Settings: Select the “Settings” key to adjust the following settings. . . . Audio File Playback Audio Select the preferred language for audio. Switch to the audio playback mode.
Black plate (231,1) Regulatory information FCC Regulatory information: — CAUTION: To maintain compliance with FCC’s RF exposure guidelines, use only the supplied antenna. Unauthorized antenna, modification, or attachments could damage the transmitter and may violate FCC regulations. Bluetooth trademark: Bluetooth® is a trademark owned by Bluetooth SIG, Inc. and licensed to Clarion Co., Ltd.
Black plate (232,1) SAA2506 2. Select the “Connect Bluetooth” key. SAA2507 3. A confirmation screen will be displayed. Select “No”. Note: Selecting “Yes” will only connect the hands free phone portion of a Bluetooth® device. SAA3005 4. Choose a PIN code to use with the compatible Bluetooth audio device using the number input screen. The PIN code will need to be entered into the Bluetooth® audio device after step 5. Select the “OK” key.
Black plate (233,1) DISC·AUX button: When the DISC·AUX button is pushed with the system off and the Bluetooth® audio device connected, the system will turn on. If another audio source is playing and the Bluetooth® audio device is connected, push the DISC·AUX button repeatedly until the display changes to the Bluetooth® audio mode. Next/Previous Track and Fast Forward/Rewind: SAA3006 5. The standby message screen will appear. Operate the compatible Bluetooth® audio device.
Black plate (234,1) REPEAT (RPT), RANDOM (RDM): button To change the play mode, push the repeatedly and the mode changes as follows. Normal ? Shuffle All Tracks ? Shuffle Group ? Repeat 1 Track ? Repeat All Tracks ? Repeat Group ? Normal Operation keys: following items. . Shuffle Choose “Shuffle OFF”, “Shuffle All Tracks” and “Shuffle Group”. . Repeat Choose from “Repeat OFF”, “Repeat 1 Track”, “Repeat All Tracks” and “Repeat Group”.
Black plate (235,1) Connected Devices: Registered devices are shown on the list. Select a Bluetooth® device from the list, the following options will be available. . Select Select device device device . . TOOTH ® HANDS-FREE PHONE SYSTEM (models with navigation system)” later in this section. “Select” to connect the selected to the vehicle. If there is a different currently connected, the selected will replace the current device.
Black plate (236,1) the U.S. and other countries. Compatibility version 2.0 PC) . First generation iPod touch® (firmware version 2.1) . Second generation iPod touch® (firmware version 2.1.1) The following models are available: Models with navigation system: . Fifth generation iPod® (version 1.2.3 or later) . iPod Classic® (version 1.1.1 or later) . . First generation iPod nano (firmware version 1.3.1) First generation iPod touch® (version 2.0.0 or later) .
Black plate (237,1) flash memory. The following touch-panel buttons shown on the screen are also available: . : returns to the previous screen. . : plays/pauses the music selected. NOTE: If the hard drive/flash memory needs to be replaced due to a malfunction, all stored music data will be erased. Next/Previous Track and Fast Forward/Rewind: or button is pushed for When the more than 1.5 seconds while the iPod® is playing, the iPod® will play while fast forwarding or rewinding.
Black plate (238,1) Recording CDs 1. Operate the audio system to play a CD. For the details of playing CDs, see “FM-AM-SAT RADIO WITH COMPACT DISC (CD) PLAYER” earlier in this section. 2. Select the “Start REC” key. NOTE: . The system starts playing and recording the 1st track on the CD when the “Start REC” key is selected. . SAA2513 Models with navigation system . The recording process can be stopped at any time. All tracks that were played before the CD was stopped are stored.
Black plate (239,1) If the title information of the track being recorded is stored either in the hard drive/flash memory or in the CD, the title is automatically displayed on the screen. For title acquisition from the hard drive/flash memory, music recognition technology and related data are provided by Gracenote®. If the CD is ejected, the audio system is turned off or the ignition switch is pushed to the OFF position, the recording also stops.
Black plate (240,1) Playing recorded songs Select the Music Box® audio system by using one of the following methods. Next/Previous Track and Fast Forward/Rewind: Tag Track (models with navigation system): . Push the audio source switch on the steering wheel repeatedly until the center display changes to the Music Box® mode. (See “STEERING-WHEEL-MOUNTED CONTROLS FOR AUDIO” later in this section.) (fast forward) or (rewind) When the button is pushed for more than 1.
Black plate (241,1) There are some options available by selecting the “Menu” key on the screen during playback. Select one of the following options that are displayed on the screen if necessary. Now Playing (models with navigation system): Displays a track list to choose a preferred track for playback. My Playlists (models with navigation system): Displays the Playlist and edits the Playlist if necessary. Select the “Edit” key. The following items are available .
Black plate (242,1) “HOW TO USE MULTI-FUNCTION CONTROLLER” earlier in this section.) . Delete Songs Delete tracks in the Playlist by selecting from the displayed song list. Edit Music Information: . Edit the “Track”, “Artist” and “Genre” information of the current track using the keypad displayed on the screen. (See “HOW TO USE TOUCH SCREEN (models with navigation system)” earlier in this section.) Choose the preferred play mode from the following items. Normal . 1 Album Repeat . 1 Track Repeat .
Black plate (243,1) Music Box® settings To set the Music box® hard drive/flash memory to your preferred settings, select the “Menu” key during playback, and the “Music Box Settings” key with the multi-function controller, and then push the ENTER button. Music Box Used/Free Space: Information about “Saved Album”, “Saved Track” and “Remaining Time” is displayed.
Black plate (244,1) and to perform other functions. You may use Gracenote Data only by means of the intended End-User functions of this application or device. You agree that you will use Gracenote Data, the Gracenote Software, and Gracenote Servers for your own personal non-commercial use only. You agree not to assign, copy, transfer or transmit the Gracenote Software or any Gracenote Data to any third party.
Black plate (245,1) . Red - right channel audio input Before connecting a device to a jack, turn off the power of the portable device. With a compatible device connected to the jacks, push the DISC·AUX or AUX button repeatedly until the display switches to the AUX mode. SAA3342 SAA2496 Models with navigation system AUXILIARY INPUT JACKS (if so equipped) The auxiliary input jacks are located in the center console.
Black plate (246,1) alcohol intended for industrial use. AUX Menu . When the “Menu” key on the display is selected while in the AUX mode, the menu screen will be displayed. Display Mode: USB memory Choose the display mode from the following items. . Normal . Wide . Cinema Volume Settings (models with navigation system): Choose the volume setting from the following items. . Low . Medium .
Black plate (247,1) STEERING-WHEEL-MOUNTED CONTROLS FOR AUDIO Menu control switch (models with navigation system) or audio tuning switch (models without navigation system) While the display is showing a MAP (navigation systems only), STATUS or Audio screen, tilt the switch upward or downward to select a station, track, CD or folder. For most audio sources, tilting the switch up/down for more than 1.5 seconds provides a different function than tilting up/down for less than 1.5 seconds.
Black plate (248,1) XM Satellite Radio: DVD (models with navigation system): . Tilting up/down for less than 1.5 seconds will increase or decrease the preset channel. . . Tilting up/down for more than 1.5 seconds will go to the next or previous category. . Tilting up/down for more than 1.5 seconds will increase or decrease the title number. . Pushing the menu control switch (models with navigation system) will show the XM Menu. .
Black plate (249,1) ANTENNA Window antenna The antenna pattern is printed inside the rear window. . CAUTION . Do not place metalized film near the rear window glass or attach any metal parts to it. This may cause poor reception or noise. . When cleaning the inside of the rear window, be careful not to scratch or damage the rear window antenna. Lightly wipe along the antenna with a dampened soft cloth. — The vehicle enters a garage with a low ceiling. — The vehicle is covered with a car cover.
Black plate (250,1) BLUETOOTH® HANDS-FREE PHONE SYSTEM (models with navigation system) CAR PHONE OR CB RADIO When installing a car phone or a CB radio in your NISSAN, be sure to observe the following cautions, otherwise the new equipment may adversely affect the electronic control modules and electronic control system harness. WARNING . . . A cellular telephone should not be used while driving so full attention may be given to vehicle operation.
Black plate (251,1) procedure is required anymore. Your phone is automatically connected with the in-vehicle phone module when the ignition switch is pushed to the ON position with the registered cellular phone turned on and carried in the vehicle. — Your vehicle is outside of the telephone service area. You can register up to 5 different Bluetooth® cellular phones in the in-vehicle phone module. However, you can talk on only one cellular phone at a time.
Black plate (252,1) — Operation is subject to the following two conditions: system)” later in this section; page 4-106.
Black plate (253,1) PHONE SELECTION Up to 5 cellular phones can be registered to the system. To switch to connect another cellular phone, push PHONE button and select the “Connected Phones” key. The registered cellular phones are shown on the list. If you select a cellular phone that is different from the one currently connected, the newly selected phone will be connected to the system. VEHICLE PHONEBOOK SAA2519 CONNECTING PROCEDURE 1.
Black plate (254,1) SAA2521 1. Push the PHONE button and select the “Vehicle Phonebook” key. 2. Select the “Add New” key at the top of the screen. SAA2522 SAA2523 3. Choose the method for entering the phonebook entry. For this example, select “Enter Number by Keypad”. 5. Select the “Voicetag” key to record a name to speak when using the NISSAN Voice Recognition system. 4. Enter the digits and select the “OK” key. (See “HOW TO USE TOUCH SCREEN (models with navigation system)” earlier in this section.
Black plate (255,1) instead of “Enter Number by Keypad” in step 3. — Copy from Call History The system will show a list of incoming, outgoing or missed calls that were downloaded from the connected cellular phone (depending on the phone’s compatibility). Select one of these entries to save in the vehicle phonebook. — Copy from the Handset The system will show the connected cellular phone’s phonebook that was downloaded (depending on the phone’s compatibility).
Black plate (256,1) . Voicetag Confirm and store the voicetag. Voicetags allow easy dialing using the NISSAN Voice Recognition system. (See “NISSAN VOICE RECOGNITION SYSTEM (models with navigation system)” later in this section.) To delete an entry, select the “Delete” key at step 3. SAA2524 MAKING A CALL To make a call, follow this procedure. 1. Push the PHONE button on the instrument panel or the button on the steering wheel. The “PHONE” screen will appear on the display. SAA2621 5.
Black plate (257,1) . . Dial Number Answer Accept an incoming call to talk. Input the phone number manually using the keypad displayed on the screen. (See “HOW TO USE TOUCH SCREEN (models with navigation system)” earlier in this section.) . Hold Call Put an incoming call on hold. . Reject Call Reject an incoming call. To finish the call, perform one of the following procedures listed below. a) Select the “Hang up” key. SAA2525 RECEIVING A CALL b) Push the PHONE button on the instrument panel.
Black plate (258,1) . Keypad Using the touch tone, send digits to the connected party for using services such as voicemail. . Cancel Mute This will appear after “Mute” is selected. Mute will be canceled. SAA2526 To adjust the person’s voice to be louder or quieter, push the volume control switch (+ or −) on the steering wheel or turn the volume control knob on the instrument panel while talking on the phone. This adjustment is also available in the SETTING mode.
Black plate (259,1) Download Handset Phonebook Auto Download Download the contacts registered in a Bluetooth® cellular phone. Availability of this function depends on each cellular phone. The memory downloading procedure from the cellular phone also varies according to each cellular phone. See cellular phone Owner’s Manual for details. When this item is activated, the phonebook of a hands-free phone is automatically downloaded at the same time that the hands-free phone is connected.
Black plate (260,1) TROUBLESHOOTING GUIDE The system should respond correctly to all voice commands without difficulty. If problems are encountered, try the following solutions. Where the solutions are listed by number, try each solution in turn, starting with number 1, until the problem is resolved. Symptom Solution 1. Ensure that the command is valid. (See “NISSAN VOICE RECOGNITION SYSTEM (models with navigation system)” later in this section; page 4-106.) 2.
Black plate (261,1) BLUETOOTH® HANDS-FREE PHONE SYSTEM (models without navigation system) (if so equipped) WARNING . . Use a phone after stopping your vehicle in a safe location. If you have to use a phone while driving, exercise extreme caution at all times so full attention may be given to vehicle operation. If you find yourself unable to devote full attention to vehicle operation while talking on the phone, pull off the road to a safe location and stop your vehicle before doing so.
Black plate (262,1) . . If the Bluetooth® Hands-Free Phone System seems to be malfunctioning, please contact a NISSAN dealer. Some cellular phones or other devices may cause interference or a buzzing noise to come from the audio system speakers. Storing the device in a different location may reduce or eliminate the noise. . Refer to the cellular phone Owner’s Manual regarding the telephone pairing procedure specific to your phone, battery charging, cellular phone antenna, etc. .
Black plate (263,1) applicable to the relevant language set in the LANGUAGE setting screen. (See “HOW TO USE SETTING BUTTON” earlier in this section.) . If the vehicle is in motion, some commands may not be available so full attention may be given to vehicle operation. . Speak a voice command within 5 seconds after the beep sound. If no voice command is given, the system will ask you for a number. If no further command is given, the session ends. .
Black plate (264,1) 4. The system acknowledges the command and announces the next set of available commands. 5. After the tone sounds, speak the phone number. 6. When you have finished speaking the phone number, the system repeats it back and announces the available commands. 7. After system responds, speak “Dial” and the system dials the spoken numbers. Operating tips: SAA2574 2. A list of commands appears on the screen, and the system announces, “Please say a command after the beep.
Black plate (265,1) Personal vocabulary (voicetags): Voice Recognition System is equipped with the function called “voicetags”, which can be associated with the phone number and name in the phonebook. Using the voice tag will automatically generate a speed dial to the registered number. See “PHONEBOOK REGISTRATION” earlier in this section. You can call the identified number using the following command: “Dial” followed by the voice tag.
Black plate (266,1) List of voice commands: COMMAND ACTION “Call/Dial” “” Dials the specified . “Call/Dial” “Redial” Dials the last number. “Call” “” Dials the specified . “Phonebook” “” Displays the specified in the phonebook. “Phonebook” “List Names” Displays all the names in the phonebook. “Phonebook” “Transfer Entry” Transfers the phonebook data to the system. “Phonebook” “Delete Entry” Deletes the phonebook registered in the system.
Black plate (267,1) SAA2575 PAIRING PROCEDURE Up to 5 cellular phones can be registered. 1. Push the button on the steering wheel. The system announces the available commands. 2. Speak: “Connect Phone”. The system acknowledges the command and announces the next set of available commands. SAA2576 3. Speak: “Add Phone”. The system acknowledges the command and asks you to initiate connecting from the phone handset. INFO: The Add Phone command is not available when the vehicle is moving. SAA2577 4.
Black plate (268,1) SAA2578 5. The system asks the user to speak a name for the phone. Speak: “Yes”. The system acknowledges the command and registers the cellular phone. If the name is too long or too short, the system tells the user, then prompts the user for a name again. Also, if more than one phone is connected and the name sounds too much like a name already used, the system tells the user, then prompts the user for name again.
Black plate (269,1) . 5. Once the call has ended, press the button on the steering wheel. RECEIVING A CALL “Mute on/off” — Use the Mute command to mute the user’s voice so the other party cannot hear it. Use the mute command again to unmute the user’s voice. When the ring tone is heard, press the button on the steering wheel. . Once the call has ended, press the button on the steering wheel. NOTE: To reject a call when the ring tone is heard, press the button on the steering wheel.
Black plate (270,1) Once the name and location are confirmed, the system begins the call. . Number When prompted by the system, speak the number to call. . Use the Redial command to call the last number of outgoing calls. The system acknowledges the command, repeats the number and begins dialing. If a redial number does not exist, the system announces, “There is no number to redial” and ends the VR session. SAA2582 PHONE SETTINGS . Call . The system acknowledges the name.
Black plate (271,1) . List Names Use the List Names command to hear the names and locations registered in the phonebook. When the system acknowledges the command, the system announces all voicetags registered in the system. store another location, the system ends the VR session. . Use the Delete Entry command to delete a specific number or all numbers in the phonebook. The system announces the names of the phone numbers already stored in the system.
Black plate (272,1) outgoing call. . the user tries to connect a phone that has already been connected to the vehicle system, the system announces the name that the phone is already using. The connecting procedure will then be cancelled. Callback Use the Callback command to dial the last incoming call. . Help The Add Phone command is not available when the vehicle is moving. The system announces the available commands. .
Black plate (273,1) to the list again. Once the user chooses to delete a phone or all phones, the system asks the user to confirm. NOTE: When the user deletes a phone, the associated phone book for that phone will also be deleted. . Replace Phone Use the Replace Phone command to change the priority level of the active phone. The priority level determines which phone is active when more than one paired Bluetooth® phone is in the vehicle.
Black plate (274,1) NISSAN VOICE RECOGNITION SYSTEM (models with navigation system) . The vehicle is driven during voice adaptation mode. . The ignition switch is placed in the OFF or LOCK position. NISSAN Voice Recognition allows hands-free operation of the Phone, Navigation, Information and Audio systems in one of two modes, Standard Mode or Alternate Command Mode. Alternate Command Mode be turned off and Standard Mode be used for the best recognition performance.
Black plate (275,1) SAA2529 SAA2530 Activating Standard Mode 4. Select the “Alternate Command Mode” key. When the Alternate Command Mode is active, perform the following steps to switch to the Standard Mode. 5. The indicator turns off and the Standard Mode activates. 1. Push the SETTING button on the instrument panel. 2. Select the “Others” key. 3. Select the “Voice Recognition” key. SAA2531 1. Push the INFO button on the instrument panel. 2. Select the “Others” key. Displaying user guide 3.
Black plate (276,1) Available items: . Getting Started Describes the basics of how to operate the NISSAN Voice Recognition system. . Let’s Practice Mode that allows practicing by following the instructions of the system voice. . Using the Address Book Tutorial for entering a destination by using the Address Book. . Finding a Street Address (if so equipped) Tutorial for entering a destination by street address. . Placing Calls Tutorial for making a phone call by voice command operation. .
Black plate (277,1) beep sounds. Before starting To get the best recognition performance from NISSAN Voice Recognition, observe the following: . The interior of the vehicle should be as quiet as possible. Close the windows to eliminate the surrounding noises (traffic noise and vibration sounds, etc.), which may prevent the system from correctly recognizing the voice commands. . Wait until the tone sounds before speaking a command. SAA2533 Useful tips for correct operation .
Black plate (278,1) detailed information of the each command. Operating tips: SAA2535 2. A list of commands appears on the screen, and the system announces, “Would you like to access Phone, Navigation, Information, Audio or Help?”. 3. After the tone sounds and the icon on the to , speak a screen changes from command. Selecting the “Practice” key will start the practice mode. See “Let’s Practice” earlier in this section. 4.
Black plate (279,1) speak “oh” instead of “zero”. Please speak “zero” for the number “0 (zero)”, “oh” for the letter “o (oh)”.
Black plate (280,1) Command List Category Command: Command Action Phone Operates the Phone function Navigation Operates the Navigation function Information Displays the vehicle Information function Audio Operates the Audio function. Help Displays User Guide . Phone Command: Command Action Dial Number Makes a call to a spoken phone number up to 10 digits. Vehicle Phonebook Makes a call to a contact that is stored in the Vehicle Phonebook.
Black plate (281,1) . Navigation Command: Command Action Home Sets a route to your home that is stored in the Address Book. Address Searches for a location by the street address specified, and sets a route to the location. Places Sets a route to a facility near the current vehicle location. Address Book Searches for stored information in the Address Book. Previous Destinations Sets a route to a previous destination. .
Black plate (282,1) .
Black plate (283,1) Voice command examples To use the NISSAN Voice Recognition function, speaking one command is sometimes sufficient, but at other times it is necessary to speak two or more commands. As examples, some additional basic operations by voice commands are described here. For navigation system commands, see the separate Navigation System Owner’s Manual. SAA1859 SAA2535 Example 1 - Placing a call to the phone number 800-662-6200: 2.
Black plate (284,1) SAA2536 4. Speak “Dial Number”. SAA2537 5. Speak “8 0 0”. Selecting the “Manual Controls” key switches the screen to the keypad to input the phone number manually. SAA2538 6. The system announces, “Please say the next three digits or dial, or say change number.” 7. Speak “6 6 2”.
Black plate (285,1) SAA2539 SAA2540 8. The system announces, “Please say the last four digits” or say change number. 10. The system announces, “Dial or Change Number?” 9. Speak “6 2 0 0”. 11. Speak “Dial”. . You can only say a phone number using the 3-3-4 grouping, 7 digits, and 10 digits using this command. Please use the “International Call” command for all other formats. .
Black plate (286,1) SAA1859 SAA2535 Example 2 - Placing an international call to the phone number 011-81-111-222-3333: 2. The system announces, “Would you like to access Phone, Navigation, Information or Help?” 1. Push the TALK steering wheel. 3. Speak “Phone”. switch located on the SAA2536 4. Speak “International Call”.
Black plate (287,1) NISSAN VOICE RECOGNITION ALTERNATE COMMAND MODE The following section is applicable when Alternate Command Mode is activated. When Alternate Command Mode is activated, an expanded list of commands can be used after switch. In this mode, pressing the TALK available commands are not fully shown on the display or prompted. Review the expanded command list when this mode is active. See examples of Alternate Command Mode screens. SAA2541 5. Speak “011811112223333”. SAA2542 6.
Black plate (288,1) SAA2529 Activating Alternate Command Mode When the Standard Mode is active, perform the following steps to switch to the Alternate Command Mode. 1. Push the SETTING button on the instrument panel. 2. Highlight the “Others” key. 3. Highlight the “Voice Recognition” key. SAA2543 SAA2544 4. Highlight the “Alternate Command Mode” key. 1. Push the INFO button on the instrument panel. 5. The confirmation message is displayed on the screen.
Black plate (289,1) SAA2545 5. Select a category from the list. SAA2546 6. Select an item. 7. If necessary, scroll the screen using the multi-function controller to view the entire list. 8. Press the BACK button to return to the previous screen.
Black plate (290,1) Command List Phone Commands: Command Action Dial Number Makes a call to a spoken phone number. Vehicle Phonebook Makes a call to a contact that is stored in the Vehicle Phonebook. Handset Phonebook Call History Makes a call to a contact that is stored in the mobile phone. Incoming Calls Makes a call to the incoming call number. Outgoing Calls Makes a call to the dialed number. Missed Calls Makes a call to the Missed calls number.
Black plate (291,1) Information Commands: Command Action Fuel Economy Displays fuel economy information. Maintenance Displays maintenance information. Where am I? Displays your current location. Traffic Information Turns the traffic information system ON and OFF. Weather Information Displays weather information. Weather Map Displays a weather map. Audio Commands: Command Action Music Box® Turns on the Music Box® hard drive audio system. CD Starts to play a CD.
Black plate (292,1) Help Commands: Command Command List Action Navigation Commands Displays the navigation command list. Phone Commands Displays the phone command list. Audio Commands Displays the audio command list. Information Commands Displays the information command list. Help Commands Displays the help command list. User Guide Displays the User Guide. Speaker Adaptation The system can memorize the voices of up to three persons.
Black plate (293,1) multi-function controller and push the ENTER button. 5. Highlight an item using the multi-function controller and push the ENTER button. . Describes the available voice recognition settings. . Available items: . Getting Started Describe the basics of how to operate the NISSAN Voice Recognition system. . Displaying user guide You can confirm how to use voice commands by accessing a simplified User Guide, which contains basic instructions and tutorials for several voice commands. 1.
Black plate (294,1) . Wait until a tone sounds before speaking a command. . Speak in a natural voice without pausing between words. SAA1859 Giving voice command 1. Push and release the TALK located on the steering wheel. switch SAA2548 2. A list of commands appears on the screen, and the system announces, “Please say a command”. 3. After the tone sounds and the icon on the to , speak a screen changes from command. Operating tips: . Voice commands cannot be accepted when . the icon is .
Black plate (295,1) system announces, “Please say again”. Repeat the command in a clear voice. . Push the BACK button once to return to the previous screen. . If you want to cancel the command, push and hold the TALK switch for 1 second. The message “Voice canceled” will be announced. . To skip the voice guidance function and give the command immediately, press the TALK switch to interrupt the system. Remember to speak after the tone. .
Black plate (296,1) 7. Select a voice command and then push the ENTER button. The voice recognition system starts. SAA2550 4. Select the user whose voice is memorized by the system. 5. Select the “Start Speaker Adaptation Learning” key. SAA2551 6. Select a category to be learned by the system from the following list. . Phone Commands . Navigation Commands . Information Commands . Audio Commands . Help Commands The voice commands in the category are displayed.
Black plate (297,1) Minimize voice feedback (for Alternate Command Mode) To minimize the voice feedback from the system, perform the following steps. 1. Push the SETTING button on the instrument panel. 2. Select the “Others” key. 3. Select the “Voice Recognition” key. 4. Select the “Minimize Voice Feedback” key. SAA2552 8. The system requests that you repeat a command after a tone. 9. After the tone sounds and the icon on the screen changes from to , speak the command that the system requested. 10.
Black plate (298,1) TROUBLESHOOTING GUIDE The system should respond correctly to all voice commands without difficulty. If problems are encountered, follow the solutions given in this guide for the appropriate error. Where the solutions are listed by number, try each solution in turn, starting with number one, until the problem is resolved. Symptom/error message Displays “COMMAND NOT RECOGNIZED” or the system fails to interpret the command correctly. Solution 1.
Black plate (299,1) MEMO Center display, heater, air conditioner, audio, phone and voice recognition systems 4-131 Model "Z51-D" EDITED: 2010/ 7/ 23
Black plate (300,1) MEMO 4-132 Center display, heater, air conditioner, audio, phone and voice recognition systems Model "Z51-D" EDITED: 2010/ 7/ 23
Black plate (16,1) 5 Starting and driving Precautions when starting and driving . . . . . . . . . . . . . . . . . . . . . 5-2 Exhaust gas (carbon monoxide) . . . . . . . . . . . . . . . . . . . . . . . . . 5-2 Three-way catalyst. . . . . . . . . . . . . . . . . . . . . . . . . . . . . . . . . . . . . . . . . . 5-2 Tire Pressure Monitoring System (TPMS). . . . . . . . . . . . . 5-3 Avoiding collision and rollover . . . . . . . . . . . . . . . . . . . . . . . . . . .
Black plate (302,1) PRECAUTIONS WHEN STARTING AND DRIVING dangerous. It can cause unconsciousness or death. WARNING . . Do not leave children or adults who would normally require the support of others alone in your vehicle. Pets should not be left alone either. They could accidentally injure themselves or others through inadvertent operation of the vehicle.
Black plate (303,1) vehicle inspected promptly by a NISSAN dealer. WARNING . . The exhaust gas and the exhaust system are very hot. Keep people, animals or flammable materials away from the exhaust system components. Do not stop or park the vehicle over flammable materials such as dry grass, waste paper or rags. They may ignite and cause a fire. CAUTION . Do not use leaded gasoline. Deposits from leaded gasoline will seriously reduce the three-way catalyst’s ability to help reduce exhaust pollutants.
Black plate (304,1) alternate tires and wheels allow the TPMS to continue to function properly. . Tire pressure rises and falls depending on the heat caused by the vehicle’s operation and the outside temperature. Low outside temperature can lower the temperature of the air inside the tire which can cause a lower tire inflation pressure. This may cause the low tire pressure warning light to illuminate. If the warning light illuminates in low ambient temperature, check the tire pressure for all four tires.
Black plate (305,1) as this may cause a malfunction of the tire pressure sensors. CAUTION . The TPMS may not function properly when the wheels are equipped with tire chains or the wheels are buried in snow. . Do not place metalized film or any metal parts (antenna, etc.) on the windows. This may cause poor reception of the signals from the tire pressure sensors, and the TPMS will not function properly.
Black plate (306,1) ON-PAVEMENT AND OFF-ROAD DRIVING PRECAUTIONS Utility vehicles have a significantly higher rollover rate than other types of vehicles. They have higher ground clearance than passenger cars to make them capable of performing in a variety of on-pavement and off-road applications. This gives them a higher center of gravity than ordinary cars. An advantage of higher ground clearance is a better view of the road, allowing you to anticipate problems.
Black plate (307,1) may cause a collision and result in personal injury. . The vehicle generally moves or pulls in the direction of the flat tire. . Do not rapidly apply the brakes. . Do not rapidly release the accelerator pedal. . Do not rapidly turn the steering wheel. 1. Remain calm and do not overreact. 2. Maintain a firm grip on the steering wheel with both hands and try to hold a straight course. 3. When appropriate, slowly release the accelerator pedal to gradually slow the vehicle. 4.
Black plate (308,1) vehicle. If you drive up them, you may stall. If you drive down them, you may not be able to control your speed. If you drive across them, you may roll over. . Do not shift ranges while driving on downhill grades as this could cause loss of control of the vehicle. . Stay alert when driving to the top of a hill. At the top there could be a drop-off or other hazard that could cause an accident. .
Black plate (309,1) PUSH-BUTTON IGNITION SWITCH movement which could result in serious vehicle damage or personal injury. (AWD models) . When a wheel is off the ground due to an unlevel surface, do not spin the wheel excessively. . Accelerating quickly, sharp steering maneuvers or sudden braking may cause loss of control. . If at all possible, avoid sharp turning maneuvers, particularly at high speeds. Your vehicle has a higher center of gravity than a conventional passenger car.
Black plate (310,1) vehicle. . The cargo area is not included in the operating range, but the Intelligent Key may function. . If the Intelligent Key is placed on the instrument panel, inside the glove box or door pocket, the Intelligent Key may not function. . If the Intelligent Key is placed near the door or window outside the vehicle, the Intelligent Key may function.
Black plate (311,1) The ignition lock is designed so that the ignition switch position cannot be switched to LOCK until the selector lever is moved to the P (Park) position. When the ignition switch cannot be pushed toward the LOCK position, proceed as follows: 1. Move the selector lever into the P (Park) position. 2. Push the ignition switch to the OFF position. (The ignition switch position indicator will not illuminate.
Black plate (312,1) INTELLIGENT KEY BATTERY DISCHARGE CAUTION If the battery of the Intelligent Key is almost B of the key port discharged, the guide light * A blinks and the indicator appears on the dot * matrix liquid crystal display. (See “DOT MATRIX LIQUID CRYSTAL DISPLAY” in the “2. Instruments and controls” section.) Do not leave the vehicle with the pushbutton ignition switch in ACC or ON positions when the engine is not running for an extended period. This can discharge the battery.
Black plate (313,1) BEFORE STARTING THE ENGINE STARTING THE ENGINE . Make sure the area around the vehicle is clear. 1. Apply the parking brake. Make sure the Intelligent Key is in the correct direction when inserting it to the key port. The engine may not start if it is in the incorrect direction. . Check fluid levels such as engine oil, coolant, brake fluid and window washer fluid as frequently as possible, or at least whenever you refuel. . Check that all windows and lights are clean.
Black plate (314,1) DRIVING THE VEHICLE the engine with your foot off the accelerator pedal by depressing the brake pedal and pushing the pushbutton ignition switch to start the engine. If the engine starts, but fails to run, repeat the above procedure. CAUTION Do not operate the starter for more than 15 seconds at a time. If the engine does not start, push the ignition switch to OFF and wait 10 seconds before cranking again, otherwise the starter could be damaged. 4.
Black plate (315,1) CAUTION . When stopping the vehicle on an uphill grade, do not hold the vehicle by depressing the accelerator pedal. The foot brake should be used for this purpose. . Do not downshift abruptly on slippery roads. This may cause a loss of control. WARNING Apply the parking brake if the selector lever is in any position while the engine is not running. Failure to do so could cause the vehicle to move unexpectedly or roll away and result in serious personal injury or property damage.
Black plate (316,1) Accelerator downshift — In D position — R (Reverse): Use this position to back up. Make sure the vehicle is completely stopped before selecting the R (Reverse) position. The brake pedal must be depressed and the selector lever button pushed in to move the selector lever from P (Park), N (Neutral) or any driving position to R (Reverse). For passing or hill climbing, fully depress the accelerator pedal to the floor.
Black plate (317,1) suitable tool. seconds. Then place the ignition switch back in the ON position. The vehicle should return to its normal operating condition. If it does not return to its normal operating condition, have a NISSAN dealer check the transmission and repair if necessary. C and move 5. Push the selector lever button * the selector lever to the N (Neutral) position D while holding down the shift lock * release. The vehicle may be moved to the desired location.
Black plate (318,1) PARKING BRAKE CRUISE CONTROL PRECAUTIONS ON CRUISE CONTROL WARNING . Be sure the parking brake is fully released before driving. Failure to do so can cause brake failure and lead to an accident. . If the cruise control system malfunctions, it will cancel automatically. The CRUISE indicator light on the meter panel will then blink to warn the driver. . Do not release the parking brake from outside the vehicle. . . Do not use the gear shift in place of the parking brake.
Black plate (319,1) . on slippery roads (rain, snow, ice, etc.) . in very windy areas switch and release it. Take your foot off the accelerator pedal. Your vehicle will maintain the set speed. Doing so could cause a loss of vehicle control and result in an accident. . To pass another vehicle, depress the accelerator pedal. When you release the pedal, the vehicle will return to the previously set speed. . The vehicle may not maintain the set speed on winding or hilly roads.
Black plate (320,1) BREAK-IN SCHEDULE canceled. To reset at a faster cruising speed, use one of the following methods: . Depress the accelerator pedal. When the vehicle attains the desired speed, push and release the SET/COAST switch. . Push and hold the RESUME/ACCELERATE switch. When the vehicle attains the desired speed, release the switch. . Push, then quickly release the RESUME/ ACCELERATE switch. Each time you do this, the set speed will increase by about 1 MPH (1.6 km/h).
Black plate (321,1) ALL-WHEEL DRIVE (AWD) (if so equipped) INCREASING FUEL ECONOMY . Accelerate slowly and smoothly. Maintain cruising speeds with a constant accelerator position. . Drive at moderate speeds on the highway. Driving at high speed lowers fuel economy. . Avoid unnecessary stopping and braking. Keep a safe distance behind other vehicles. . Select a gear range suitable to road conditions. . Avoid unnecessary engine idling. . Keep your engine tuned up. .
Black plate (322,1) LOCK mode The AWD LOCK indicator light illuminate. will AUTO mode The AWD LOCK indicator light will turn off. AWD mode SSD0418 ALL-WHEEL DRIVE (AWD) LOCK SWITCH OPERATIONS The AWD LOCK switch located on the lower side of the instrument panel. This switch is used to select the AUTO or LOCK mode depending on the driving conditions. Each time you push the lower part of the switch A , the AWD mode will switch: * AUTO ? LOCK ? AUTO.
Black plate (323,1) If any malfunction occurs in the AWD system while the engine is running, the warning light will come on. WARNING . When driving straight, shift the AWD LOCK switch to AUTO. Do not operate the AWD LOCK switch when making a turn or backing up. . Do not operate the AWD LOCK switch with the front wheel spinning. . Engine idling speed is high while warming up the engine. Be especially careful when starting or driving on slippery surfaces. .
Black plate (324,1) PARKING/PARKING ON HILLS checked by a NISSAN dealer as soon as possible. . The powertrain may be damaged if you continue driving with the warning light blinking. . Never drive on dry hard surface roads in the LOCK mode, as this will overload the powertrain and may cause a serious malfunction. SSD0488 go and cannot be moved without depressing the foot brake pedal. WARNING . . Do not stop or park the vehicle over flammable materials such as dry grass, waste paper or rags.
Black plate (325,1) POWER STEERING 3. To help prevent the vehicle from rolling into traffic when parked on an incline, it is a good practice to turn the wheels as illustrated. . . . WARNING 1 HEADED DOWNHILL WITH CURB: * Turn the wheels into the curb and move the vehicle forward until the curb side wheel gently touches the curb. If the engine is not running or is turned off while driving, the power assist for the steering will not work. Steering will be harder to operate.
Black plate (326,1) or accelerating could cause the wheels to skid and result in an accident. . If the engine is not running or is turned off while driving, the power assist for the brakes will not work. Braking will be harder. ANTI-LOCK BRAKING SYSTEM (ABS) WARNING . Wet brakes When the vehicle is washed or driven through water, the brakes may get wet. As a result, your braking distance will be longer and the vehicle may pull to one side during braking.
Black plate (327,1) VEHICLE DYNAMIC CONTROL (VDC) SYSTEM WARNING Do not pump the brake pedal. Doing so may result in increased stopping distances. Self-test feature The ABS includes electronic sensors, electric pumps, hydraulic solenoids and a computer. The computer has a built-in diagnostic feature that tests the system each time you start the engine and move the vehicle at a low speed in forward or reverse.
Black plate (328,1) determine some action is required to help keep the vehicle on the steered path. . You may feel a pulsation in the brake pedal and hear a noise or vibration from under the hood. This is normal and indicates that the VDC system is working properly. . Adjust your speed and driving to the road conditions. See “Slip indicator light” in the “2. Instruments and controls” section and “Vehicle Dynamic Control (VDC) off indicator light” in the “2. Instruments and controls” section.
Black plate (329,1) COLD WEATHER DRIVING . . surface. FREEING A FROZEN DOOR LOCK TIRE EQUIPMENT If wheels or tires other than the NISSAN recommended ones are used, the VDC system may not operate properly and the indicator may flash or both and indicator lights may illuminate. To prevent a door lock from freezing, apply deicer through the key hole. If the lock becomes frozen, heat the key before inserting it into the key hole or use the remote keyless entry keyfob.
Black plate (330,1) SPECIAL WINTER EQUIPMENT It is recommended that the following items be carried in the vehicle during winter: . . Allow more stopping distance under these conditions. Braking should be started sooner than on dry pavement. 1. Turn the engine off. . A sturdy, flat board to be placed under the jack to give it firm support. Allow greater following distances on slippery roads. . Watch for slippery spots (glare ice). These may appear on an otherwise clear road in shaded areas.
Black plate (331,1) starting the engine. Damage to the cord could result in an electrical shock and can cause serious injury. . Use a heavy-duty 3-wire, 3-pronged extension cord rated for at least 10A. Plug the extension cord into a Ground Fault Interrupt (GFI) protected, grounded 110-VAC outlet. Failure to use the proper extension cord or a grounded outlet can result in a fire or electrical shock and cause serious personal injury.
Black plate (332,1) MEMO 5-32 Starting and driving Model "Z51-D" EDITED: 2010/ 7/ 23
Black plate (19,1) 6 In case of emergency Emergency engine shut off . . . . . . . . . . . . . . . . . . . . . . . . . . . . . . . . . . . 6-2 Flat tire . . . . . . . . . . . . . . . . . . . . . . . . . . . . . . . . . . . . . . . . . . . . . . . . . . . . . . . . . . . . 6-2 Tire Pressure Monitoring System (TPMS). . . . . . . . . . . . . 6-2 Changing a flat tire . . . . . . . . . . . . . . . . . . . . . . . . . . . . . . . . . . . . . . . . . 6-3 Jump starting . . . . . . . . . . . . . . . . . . . . . . .
Black plate (334,1) EMERGENCY ENGINE SHUT OFF FLAT TIRE To shut off the engine in an emergency situation while driving perform the following procedure: TIRE PRESSURE MONITORING SYSTEM (TPMS) . Rapidly push the push-button ignition switch 3 consecutive times, or . Push and hold the push-button ignition switch for more than 2 seconds. This vehicle is equipped with the Tire Pressure Monitoring System (TPMS). It monitors tire pressure of all tires except the spare.
Black plate (335,1) as this may cause a malfunction of the tire pressure sensors. CHANGING A FLAT TIRE If you have a flat tire, follow the instructions below. . Never change tires when the vehicle is on a slope, ice or slippery areas. This is hazardous. . Never change tires if oncoming traffic is close to your vehicle. Wait for professional road assistance. Stopping the vehicle 1. Safely move the vehicle off the road and away from traffic. 2. Turn on the hazard warning flashers. 3.
Black plate (336,1) 4. Type A: Getting the spare tire and tools 1. Open the lift gate. Remove the cargo floor board. 2. Remove the cargo cover (if so equipped). (See “CARGO COVER” in the “2. Instruments and controls” section.) Type B: Turn the clips counterclockwise and remove the cargo floor box. 3. Open the cargo floor board. (See “CARGO FLOOR BOX” in the “2. Instruments and controls” section.
Black plate (337,1) SCE0853 Type B 5. Type B: Open the cargo floor board. SCE0716 Jacking tools 6. Remove the jacking tools and the spare tire. SCE0700 Spare tire Spare tire: Turn the clamp to remove the tire. Jacking tools: Remove the jack by turning it, then remove the other tools.
Black plate (338,1) Jacking up the vehicle and removing the damaged tire Carefully read the caution label attached to the jack body and the following instructions. WARNING . Never get under the vehicle while it is supported only by the jack. If it is necessary to work under the vehicle, support it with safety stands. . Use only the jack provided with your vehicle to lift the vehicle. Do not use the jack provided with your vehicle on other vehicles.
Black plate (339,1) SCE0572 SCE0751 Jack-up point 1. Place the jack directly under the jack-up point as illustrated so the top of the jack contacts the vehicle at the jack-up point. Align the jack head between the two notches in the front or the rear as shown. Also fit the groove of the jack head between the notches as shown. The jack should be used on level firm ground. 2. Loosen each wheel nut one or two turns by turning counterclockwise with the wheel nut wrench.
Black plate (340,1) tened to specifications at each lubrication interval. than 2 times, until they are tight. 4. Lower the vehicle slowly until the tire touches the ground. Then, with the wheel nut wrench, tighten the wheel nuts securely in the sequence as illustrated. Lower the vehicle completely. . COLD pressure: After the vehicle has been parked for three hours or more or driven less than 1 mile (1.6 km). WARNING SCE0039 .
Black plate (341,1) JUMP STARTING spare tire are designed for emergency use. See specific instructions under the heading “WHEELS AND TIRES” in the “8. Maintenance and do-it-yourself” section. To start your engine with a booster battery, the instructions and precautions below must be followed. protectors (for example, goggles or industrial safety spectacles) and remove rings, metal bands, or any other jewelry. Do not lean over the battery when jump starting. WARNING .
Black plate (342,1) unnecessary electrical systems (lights, heater, air conditioner, etc.). 3. Remove vent caps on the battery (if so equipped). Cover the battery with a firmly wrung out moist cloth to reduce explosion hazard. 4. Connect jumper cables in the sequence as 1 ? * 2 ? * 3 ? * 4 ). illustrated (* If the battery is discharged, the ignition switch cannot be moved from the OFF position. Connect the jumper cables to B before pushing the booster vehicle * the ignition switch.
Black plate (343,1) PUSH STARTING IF YOUR VEHICLE OVERHEATS Do not attempt to start the engine by pushing. CAUTION CAUTION Continuously Variable Transmission (CVT) models cannot be push-started or tow-started. Attempting to do so may cause transmission damage. . Do not continue to drive if your vehicle overheats. Doing so could cause engine damage or a vehicle fire. . To avoid the danger of being scalded, never remove the radiator cap while the engine is still hot.
Black plate (344,1) TOWING YOUR VEHICLE 6. After the engine cools down, check the coolant level in the reservoir tank with the engine running. Add coolant to the reservoir tank if necessary. Have your vehicle repaired at a NISSAN dealer. When towing your vehicle, all State (Provincial in Canada) and local regulations for towing must be followed. Incorrect towing equipment could damage your vehicle. Towing instructions are available from a NISSAN dealer.
Black plate (345,1) SCE0439 All-Wheel Drive (AWD) models TOWING RECOMMENDED BY NISSAN All-Wheel Drive (AWD) models NISSAN recommends that towing dollies be used when towing your vehicle or place the vehicle on a flatbed truck as illustrated. CAUTION Never tow AWD models with any of the wheels on the ground as this may cause serious and expensive damage to the drivetrain.
Black plate (346,1) . (Neutral) position. When towing a CVT model with the rear wheels on the ground (if you do not use towing dollies): Always release the parking brake. SCE0438 Two-Wheel Drive (2WD) models Two-Wheel Drive (2WD) models or backward), as this may cause serious and expensive damage to the drivetrain. If it is necessary to tow the vehicle with the rear wheels raised, always use towing dollies under the front wheels.
Black plate (347,1) Pulling a stuck vehicle If your vehicle is stuck in sand, snow, mud, etc., use a tow strap or other device designed specifically for vehicle recovery. Always follow the manufacturer’s instructions for the recovery device. Front: Securely install the vehicle recovery hook (stored in the cargo area) as illustrated. Make sure that the hook is properly secured in the original place after use. CAUTION SCE0718 Tie down and recovery hook VEHICLE RECOVERY (freeing a stuck vehicle) .
Black plate (348,1) . Pulling devices such as ropes or canvas straps are not recommended for use in vehicle towing or recovery. to remove the vehicle. Rocking a stuck vehicle If your vehicle is stuck in sand, snow, mud, etc., use the following procedure: 1. Turn off the Vehicle Dynamic Control (VDC) system. 2. Make sure the area in front and behind the vehicle is clear of obstructions. 3. Turn the steering wheel right and left to clear an area around the front tires. 4.
Black plate (22,1) 7 Appearance and care Cleaning exterior . . . . . . . . . . . . . . . . . . . . . . . . . . . . . . . . . . . . . . . . . . . . . . . . 7-2 Washing . . . . . . . . . . . . . . . . . . . . . . . . . . . . . . . . . . . . . . . . . . . . . . . . . . . . . . 7-2 Waxing . . . . . . . . . . . . . . . . . . . . . . . . . . . . . . . . . . . . . . . . . . . . . . . . . . . . . . . . 7-2 Removing spots . . . . . . . . . . . . . . . . . . . . . . . . . . . . . . . . . . . . . . . . . . . . .
Black plate (352,1) CLEANING EXTERIOR In order to maintain the appearance of your vehicle, it is important to take proper care of it. To protect the paint surface, wash your vehicle as soon as you can: . after a rainfall to prevent possible damage from acid rain . after driving on coastal roads . when contaminants such as soot, bird droppings, tree sap, metal particles or bugs get on the paint surface . when dust or mud builds up on the surface CAUTION .
Black plate (353,1) REMOVING SPOTS Remove tar and oil spots, industrial dust, insects, and tree sap as quickly as possible from the paint surface to avoid lasting damage or staining. Special cleaning products are available at a NISSAN dealer or any automotive accessory stores. UNDERBODY In areas where road salt is used in winter, the underbody must be cleaned regularly. This will prevent dirt and salt from building up and causing the acceleration of corrosion on the underbody and suspension.
Black plate (354,1) CLEANING INTERIOR Occasionally remove loose dust from the interior trim, plastic parts and seats using a vacuum cleaner or soft bristled brush. Wipe the vinyl and leather surfaces with a clean, soft cloth dampened in mild soap solution, then wipe clean with a dry soft cloth. and damaging to the leather surfaces and should be removed promptly.
Black plate (355,1) CORROSION PROTECTION SEAT BELTS The seat belts can be cleaned by wiping them with a sponge dampened in a mild soap solution. Allow the belts to dry completely before using them. See “SEAT BELTS” in the “1. Safety — Seats, seat belts and supplemental restraint system” section. WARNING SAI0038 Floor mat positioning aid This model includes front floor mat brackets to act as floor mat positioning aid. NISSAN floor mats have been specially designed for your vehicle model.
Black plate (356,1) Air pollution this may damage them. Industrial pollution, the presence of salt in the air in coastal areas, or heavy road salt use will accelerate the corrosion process. Road salt will also accelerate the disintegration of paint surfaces. TO PROTECT YOUR VEHICLE FROM CORROSION . Wash and wax your vehicle often to keep the vehicle clean. . Always check for minor damage to the paint and repair it as soon as possible. .
Black plate (25,1) 8 Maintenance and do-it-yourself Maintenance requirement . . . . . . . . . . . . . . . . . . . . . . . . . . . . . . . . . . . . . 8-2 Scheduled maintenance. . . . . . . . . . . . . . . . . . . . . . . . . . . . . . . . . . . 8-2 General maintenance . . . . . . . . . . . . . . . . . . . . . . . . . . . . . . . . . . . . . . 8-2 Where to go for service. . . . . . . . . . . . . . . . . . . . . . . . . . . . . . . . . . . 8-2 General maintenance . . . . . . . . . . . . . . . . . . . . . . .
Black plate (360,1) MAINTENANCE REQUIREMENT GENERAL MAINTENANCE Your new NISSAN has been designed to have minimum maintenance requirements with long service intervals to save you both time and money. However, some day-to-day and regular maintenance is essential to maintain your NISSAN’s fine mechanical condition, as well as its emission and engine performance. Performing general maintenance checks requires minimal mechanical skill and only a few general automotive tools.
Black plate (361,1) Lights*: Clean the headlights on a regular basis. Make sure that the headlights, stop lights, tail lights, turn signal lights, and other lights are all operating properly and installed securely. Also check headlight aim. For additional information regarding tires, refer to “Important Tire Safety Information” (US) or “Tire Safety Information” (Canada) in the Warranty Information Booklet.
Black plate (362,1) Windshield defroster: Check that the air comes out of the defroster outlets properly and in sufficient quantity when operating the heater or air conditioner. Windshield wiper and washer*: Check that the wipers and washer operate properly and that the wipers do not streak. Under the hood and vehicle The maintenance items listed here should be checked periodically (for example, each time you check the engine oil or refuel). Battery*: Check the fluid level in each cell.
Black plate (363,1) MAINTENANCE PRECAUTIONS When performing any inspection or maintenance work on your vehicle, always take care to prevent serious accidental injury to yourself or damage to the vehicle. The following are general precautions which should be closely observed. enclosed space such as a garage, be sure there is proper ventilation for exhaust gases to escape. . WARNING .
Black plate (364,1) ENGINE COMPARTMENT CHECK LOCATIONS done by a NISSAN dealer. SDI2172 VQ35DE ENGINE 1. 2. 3. 4. 5. 8-6 Power steering fluid reservoir Drive belt location Engine oil filler cap Brake fluid reservoir Air cleaner 6. 7. 8. 9. 10. 11.
Black plate (365,1) ENGINE COOLING SYSTEM The engine cooling system is filled at the factory with Genuine NISSAN Long Life Antifreeze/ Coolant (blue) to provide year-round anti-freeze and coolant protection. The anti-freeze solution contains rust and corrosion inhibitors. Additional engine cooling system additives are not necessary. WARNING . Never remove the radiator or coolant reservoir cap when the engine is hot. Wait until the engine and radiator cool down.
Black plate (366,1) ENGINE OIL CHANGING ENGINE COOLANT and pour recommended oil through the 3 . opening. Do not overfill * Major cooling system repairs should be performed by a NISSAN dealer. The service procedures can be found in the appropriate NISSAN Service Manual. 6. Recheck oil level with the dipstick. It is normal to add some oil between oil maintenance intervals or during the breakin period, depending on the severity of operating conditions.
Black plate (367,1) 4. Raise and support the vehicle using a suitable floor jack and safety jack stands. . Place the safety jack stands under the vehicle jack-up points. . A suitable adapter should be attached to the jack stand saddle. CAUTION Make sure the correct lifting and support points are used to avoid vehicle damage. SDI2175 SDI2355 Engine oil and filter 1. Place a large drain pan under the drain plug A . * 2. Remove the oil filler cap B . * 3.
Black plate (368,1) CAUTION Be careful not to burn yourself, as the engine oil is hot. . Waste oil must be disposed of properly. . Check your local regulations. Perform steps 4 to 9 when the engine oil filter change is needed. 4. Remove the plastic cover over the oil filter location by removing the small plastic clips as illustrated. C 5. Loosen the oil filter * with an oil filter wrench. Remove the oil filter by turning it by hand. 6. Wipe the engine oil filter mounting surface with a clean rag.
Black plate (369,1) CONTINUOUSLY VARIABLE TRANSMISSION (CVT) FLUID POWER STEERING FLUID CAUTION CAUTION . Use only Genuine NISSAN CVT Fluid NS-2. Do not mix with other fluids. . Using transmission fluid other than Genuine NISSAN CVT Fluid NS-2 will damage the CVT, which is not covered by the NISSAN new vehicle limited warranty. . Do not overfill. . Use Genuine NISSAN PSF or equivalent. When checking or replacement is required, we recommend a NISSAN dealer for servicing.
Black plate (370,1) BRAKE FLUID WINDOW WASHER FLUID For additional brake fluid information, see “CAPACITIES AND RECOMMENDED FUEL/ LUBRICANTS” in the “9. Technical and consumer information” section of this manual. WARNING . Use only new fluid from a sealed container. Old, inferior or contaminated fluid may damage the brake system. The use of improper fluids can damage the brake system and affect the vehicle’s stopping ability. . Clean the filler cap before removing. .
Black plate (371,1) BATTERY Recommended fluid: Genuine NISSAN Windshield Washer Concentrate Cleaner & Antifreeze or equivalent CAUTION . . . Do not substitute engine anti-freeze coolant for window washer solution. This may result in damage to the paint. Do not fill the window washer reservoir tank with washer fluid concentrates at full strength. Some methyl alcohol based washer fluid concentrates may permanently stain the grille if spilled while filling the window washer reservoir tank.
Black plate (372,1) JUMP STARTING If jump starting is necessary, see “JUMP STARTING” in the “6. In case of emergency” section. If the engine does not start by jump starting, the battery may have to be replaced. Contact a NISSAN dealer. DI0137MA Check the fluid level in each cell. (Remove the battery cover if it is necessary.) It should be 1 and LOWER between the UPPER LEVEL * 2 lines.
Black plate (373,1) VARIABLE VOLTAGE CONTROL SYSTEM (if so equipped) DRIVE BELT or adjusted by a NISSAN dealer. CAUTION . Do not ground accessories directly to the battery terminal. Doing so will bypass the variable voltage control system and the vehicle battery may not charge completely. . Use electrical accessories with the engine running to avoid discharging the vehicle battery.
Black plate (374,1) SPARK PLUGS AIR CLEANER WARNING Be sure the engine and ignition switch are off and that the parking brake is engaged securely. CAUTION Be sure to use the correct socket to remove the spark plugs. An incorrect socket can damage the spark plugs. SDI2020 SDI2180 1 * Pull the tabs If replacement is required, see a NISSAN dealer for servicing. The air cleaner filter should not be cleaned and reused.
Black plate (375,1) WINDSHIELD WIPER BLADES . isn’t there, and the engine backfires, you could be burned. Do not drive with the air cleaner removed, and be careful when working on the engine with the air cleaner removed. CLEANING Never pour fuel into the throttle body or attempt to start the engine with the air cleaner removed. Doing so could result in serious injury. Clean the outside of the windshield with a washer solution or a mild detergent.
Black plate (376,1) SDI2048 REPLACING CAUTION Replace the wiper blades if they are worn. 1. Lift the wiper arm away from the windshield. A , and 2. Push and hold the release tab * move the wiper blade down the wiper arm 1 . * 3. Insert the new wiper blade onto the wiper arm until a click sounds. 4. Rotate the wiper blade so that the dimple is in the groove. . After wiper blade replacement, return the wiper arm to its original position; otherwise it may be damaged when the hood is opened. .
Black plate (377,1) REAR WINDOW WIPER BLADE BRAKES Contact a NISSAN dealer if checking or replacement is required. If the brakes do not operate properly, have the brakes checked by a NISSAN dealer. affect the function or performance of the brake system. SELF-ADJUSTING BRAKES Proper brake inspection intervals should be followed. For additional information, see the maintenance log section of your “NISSAN Service and Maintenance Guide”. Your vehicle is equipped with self-adjusting brakes.
Black plate (378,1) FUSES 3. Remove the fuse/fusible link holder cover by 1 . pushing the tab * 4. Remove the fuse with the fuse puller located in the passenger compartment fuse box. SDI1754 SDI2181 ENGINE COMPARTMENT CAUTION Never use a fuse of a higher or lower amperage rating than that specified on the fuse box cover. This could damage the electrical system or cause a fire. If any electrical equipment does not operate, check for an open fuse. A , replace it with a new 5. If the fuse is open * B .
Black plate (379,1) SDI2704 SDI2196 3. Remove the fuse with the fuse puller PASSENGER COMPARTMENT 2 . * 4. If the fuse is open, replace it with a new fuse. CAUTION Never use a fuse of a higher or lower amperage rating than that specified on the fuse box cover. This could damage the electrical system or cause a fire. If any electrical equipment does not operate, check for an open fuse. 5. If a new fuse also opens, have the electrical system checked and repaired by a NISSAN dealer.
Black plate (380,1) INTELLIGENT KEY BATTERY REPLACEMENT How to remove the extended storage switch: 1. To remove the extended storage switch, be sure the ignition switch is in the OFF or LOCK position. CAUTION Be careful not to allow children to swallow the battery and removed parts. 2. Be sure the headlight switch is in the OFF position. 3. Remove the fuse box cover. 1 found on each 4. Pinch the locking tabs * side of the storage switch. 5. Pull the storage switch straight out from the 2 .
Black plate (381,1) and can radiate radio frequency energy and, if not installed and used in accordance with the instructions, may cause harmful interference to radio communications. However, there is no guarantee that interference will not occur in a particular installation.
Black plate (382,1) LIGHTS 1. 2. 3. 4. 5. 6. 7. 8. 9. 10. 11. 12. 13. 14. 15.
Black plate (383,1) HEADLIGHTS Halogen headlight model: Fog may temporarily form inside the lens of the exterior lights in the rain or in a car wash. A temperature difference between the inside and the outside of the lens causes the fog. This is not a malfunction. If large drops of water collect inside the lens, contact a NISSAN dealer. The headlight is a semi-sealed beam type which uses a replaceable headlight (halogen) bulb. CAUTION .
Black plate (384,1) Disconnect the battery negative cable before replacing bulbs. To replace the headlight bulb, if necessary, remove the rubber cover by pulling out the two 1 .
Black plate (385,1) EXTERIOR AND INTERIOR LIGHTS Item Wattage (W) Bulb No. Headlight High/Low beams (Xenon)* 35 D2S High beam (Halogen) 65 HB3 Low beam (Halogen) Front turn signal/park light* 55 H11 27/8 1157NA Front turn signal light** 21 WY21W Front park light** 5 WY5W Front fog light (if so equipped) 35 H8 Front side marker 5 WY5W 21 WY21W *: See a NISSAN dealer for replacement.
Black plate (386,1) Replacement procedures All other lights are either type A, B, C, D, E or F. When replacing a bulb, first remove the lens and/or cover. SDI2200 Side marker light (Halogen headlight model) 1. Remove the rubber cover. (See “HEADLIGHTS” earlier in this section.) 2. Remove the bulb as illustrated.
Black plate (387,1) SDI2030 Front map light SDI1500B Cargo light SDI2184 Front fog light (if so equipped) SDI2031 Rear personal light SDI2032 Vanity mirror light Maintenance and do-it-yourself 8-29 Model "Z51-D" EDITED: 2010/ 7/ 23
Black plate (388,1) WHEELS AND TIRES If you have a flat tire, see “FLAT TIRE” in the “6. In case of emergency” section. TIRE PRESSURE Tire Pressure Monitoring System (TPMS) This vehicle is equipped with the Tire Pressure Monitoring System (TPMS). It monitors tire pressure of all tires except the spare. When the low tire pressure warning light is lit and the CHECK TIRE PRESSURE warning appears on the dot matrix liquid crystal display, one or more of your tires is significantly under-inflated.
Black plate (389,1) 3 Original * size: The size of the tires originally installed on the vehicle at the factory. 4 Cold tire pressure: Inflate the tires to * this pressure when the tires are cold. Tires are considered COLD after the vehicle has been parked for 3 or more hours, or driven less than 1 mile (1.6 km) at moderate speeds. The recommended cold tire inflation is set by the manufacturer to provide the best balance of tire wear, vehicle handling, driveability, tire noise, etc.
Black plate (390,1) tion shown on the Tire and Loading Information label. SIZE 5. Add air to the tire as needed. If too much air is added, press the core of the valve stem briefly with the tip of the gauge stem to release pressure. Recheck the pressure and add or release air as needed. 6. Install the valve stem cap. 7. Check the pressure of all other tires, including the spare.
Black plate (391,1) 5. Two-digit number (16): This number is the wheel or rim diameter in inches. 6. Two- or three-digit number (94): This number is the tire’s load index. It is a measurement of how much weight each tire can support. You may not find this information on all tires because it is not required by law. 7. H: Tire speed rating. You should not drive the vehicle faster than the tire speed rating.
Black plate (392,1) 5. Three-digit code: Date of Manufacture 6. Four numbers represent the week and year the tire was built. For example, the numbers 3103 means the 31st week of 2003. If these numbers are missing, then look on the other sidewall of the tire. 3 Tire ply composition and material * SDI1607 Example 2 TIN (Tire Identification Number) for a * new tire (example: DOT XX XX XXX XXXX) 1. DOT: Abbreviation for the “Department of Transportation”.
Black plate (393,1) TYPES OF TIRES WARNING . . When changing or replacing tires, be sure all four tires are of the same type (Example: Summer, All Season or Snow) and construction. A NISSAN dealer may be able to help you with information about tire type, size, speed rating and availability. Replacement tires may have a lower speed rating than the factory equipped tires, and may not match the potential maximum vehicle speed. Never exceed the maximum speed rating of the tire. .
Black plate (394,1) . ONLY use spare tires specified for the AWD model. If excessive tire wear is found, it is recommended that all four tires be replaced with tires of the same size, brand, construction and tread pattern. The tire pressure and wheel alignment should also be checked and corrected as necessary. Contact a NISSAN dealer. TIRE CHAINS Use of tire chains may be prohibited according to location. Check the local laws before installing tire chains.
Black plate (395,1) Wheel nut tightening torque: 80 ft-lb (108 N·m) . The wheel nuts must be kept tightened to the specification at all times. It is recommended that wheel nuts be tightened to the specification at each tire rotation interval. WARNING . . . . After rotating the tires, check and adjust the tire pressure. Retighten the wheel nuts when the vehicle has been driven for 600 miles (1,000 km) (also in cases of a flat tire, etc.).
Black plate (396,1) WARNING . . The use of tires other than those recommended or the mixed use of tires of different brands, construction (bias, bias-belted or radial), or tread patterns can adversely affect the ride, braking, handling, ground clearance, body-to-tire clearance, tire chain clearance, speedometer calibration, headlight aim and bumper height. Some of these effects may lead to accidents and could result in serious personal injury.
Black plate (397,1) . Clean the inner side of the wheels when the wheel is changed or the underside of the vehicle is washed. . Do not use abrasive cleaners when washing the wheels. . . . The TEMPORARY USE ONLY spare tire should be used for emergency use. It should be replaced with the standard tire at the first opportunity to avoid possible tire or differential damage. . Do not use more than one spare tire at the same time. .
Black plate (398,1) MEMO 8-40 Maintenance and do-it-yourself Model "Z51-D" EDITED: 2010/ 7/ 23
Black plate (28,1) 9 Technical and consumer information Capacities and recommended fuel/lubricants . . . . . . . . . . . . 9-2 Fuel recommendation . . . . . . . . . . . . . . . . . . . . . . . . . . . . . . . . . . . . . . 9-3 Engine oil and oil filter recommendation. . . . . . . . . . . . . . . 9-5 Air conditioning system refrigerant and lubricant recommendations . . . . . . . . . . . . . . . . . . . . . . . . . . . . . . . . . . . . . . . . . . . 9-6 Specifications. . . . . . . . . . . . . . . . . . . .
Black plate (400,1) CAPACITIES AND RECOMMENDED FUEL/LUBRICANTS The following are approximate capacities. The actual refill capacities may be a little different. When refilling, follow the procedure instructed in the “8. Maintenance and do-it-yourself” section to determine the proper refill capacity. Capacity (Approximate) Fuel Recommended specifications US measure Imp measure Liter 21-5/8 gal 18 gal 82 See “FUEL RECOMMENDATION” later in this section. .
Black plate (401,1) FUEL RECOMMENDATION Use unleaded regular gasoline with an octane rating of at least 87 AKI (Anti-Knock Index) number (Research octane number 91). CAUTION . Using a fuel other than that specified could adversely affect the emission control system, and may also affect warranty coverage. . Under no circumstances should a leaded gasoline be used, because this will damage the three-way catalyst. . Do not use E-85 fuel in your vehicle. Your vehicle is not designed to run on E-85 fuel.
Black plate (402,1) pumps to be identified by a small, square, orange and black label with the common abbreviation or the appropriate percentage for that region. Aftermarket fuel additives NISSAN does not recommend the use of any aftermarket fuel additives (for example, fuel injector cleaner, octane booster, intake valve deposit removers, etc.) which are sold commercially.
Black plate (403,1) Oil viscosity The engine oil viscosity or thickness changes with temperature. Because of this, it is important to select the engine oil viscosity based on the temperatures at which the vehicle will be operated before the next oil change. Choosing an oil viscosity other than that recommended could cause serious engine damage. Selecting the correct oil filter STI0505 1. 2.
Black plate (404,1) upon how you use your vehicle. Operation under the following conditions may require more frequent oil and filter changes. . repeated short distance driving at cold outside temperatures . driving in dusty conditions . extensive idling . towing a trailer . stop and go commuting Refer to the “NISSAN Service and Maintenance Guide” for the maintenance schedule. system components. The refrigerant HFC-134a (R-134a) in your NISSAN vehicle will not harm the earth’s ozone layer.
Black plate (405,1) SPECIFICATIONS WHEELS AND TIRES ENGINE Model VQ35DE Type Gasoline, 4-cycle Cylinder arrangement 6-cylinder, V-slanted at 608 Bore 6 Stroke in (mm) 3.760 6 3.205 (95.5 6 81.4) Displacement cu in (cm3) 213.45 (3,498) Firing order 1-2-3-4-5-6 Idle speed rpm Ignition timing (B.T.D.C.) degree/rpm Spark plug Standard FXE22HR-11 Spark plug gap (Normal) in (mm) 0.043 (1.1) Camshaft operation No adjustment is necessary.
Black plate (406,1) WHEN TRAVELING OR REGISTERING YOUR VEHICLE IN ANOTHER COUNTRY DIMENSIONS AND WEIGHTS Overall length in (mm) 189.9 (4,822) Overall width in (mm) 74.1 (1,883) Overall height within (mm) out roof rack rail 67.0 (1,703) Overall height with roof rack rail in (mm) 68.0 (1,728) Front tread in (mm) 63.4 (1,610) Rear tread Wheelbase in (mm) in (mm) 63.4 (1,610) Gross vehicle weight rating lb (kg) Gross axle weight rating Front lb (kg) Rear lb (kg) 9-8 111.
Black plate (407,1) STI0374 VEHICLE IDENTIFICATION NUMBER (chassis number) The vehicle identification number is located as shown. Remove the cover to access the number. STI0562 ENGINE SERIAL NUMBER The number is stamped on the engine as shown. STI0448 F.M.V.S.S./C.M.V.S.S. CERTIFICATION LABEL The Federal/Canadian Motor Vehicle Safety Standards (F.M.V.S.S./C.M.V.S.S.) certification label is affixed as shown.
Black plate (408,1) STI0563 STI0373 STI0339 EMISSION CONTROL INFORMATION LABEL TIRE AND LOADING INFORMATION LABEL AIR CONDITIONER SPECIFICATION LABEL The emission control information label is attached to the underside of the hood as shown. The cold tire pressure is shown on the Tire and Loading Information label affixed to the pillar as illustrated. The air conditioner specification label is attached as shown.
Black plate (409,1) INSTALLING FRONT LICENSE PLATE Use the following steps to mount the license plate: Before mounting the license plate, confirm that the following parts are enclosed in the plastic bag. . License plate bracket . Screw 6 2 1. Park the vehicle on flat, level ground. B on the license plate 2. Line up the tabs * bracket under the top of the front bumper A . Hold the license plate bracket in place. * 3. Install the license plate bracket with screws. 4.
Black plate (410,1) VEHICLE LOADING INFORMATION WARNING . . . It is extremely dangerous to ride in a cargo area inside the vehicle. In a collision, people riding in these areas are more likely to be seriously injured or killed. Do not allow people to ride in any area of your vehicle that is not equipped with seats and seat belts. Be sure everyone in your vehicle is in a seat and using a seat belt properly. . .
Black plate (411,1) Steps for determining correct load limit 1. Locate the statement “The combined weight of occupants and cargo should never exceed XXX kg or XXX lbs” on your vehicle’s placard. 2. Determine the combined weight of the driver and passengers that will be riding in your vehicle. 3. Subtract the combined weight of the driver and passengers from XXX kg or XXX lbs. 4. The resulting figure equals the available amount of cargo and luggage load capacity.
Black plate (412,1) A or 7 lb. (31 N) lb. (98 N) to a single hook * B when securing cargo. to a single hook * load from your trailer will be transferred to your vehicle. Consult this manual to determine how this reduces the available cargo and luggage load capacity of your vehicle. WARNING Before driving a loaded vehicle, confirm that you do not exceed the Gross Vehicle Weight Rating (GVWR) or the Gross Axle Weight Rating (GAWR) for your vehicle. (See “MEASUREMENT OF WEIGHTS” later in this section.
Black plate (413,1) TOWING A TRAILER LOADING TIPS . The GVW must not exceed GVWR or GAWR as specified on the F.M.V.S.S./ C.M.V.S.S. certification label. . Do not load the front and rear axle to the GAWR. Doing so will exceed the GVWR. WARNING . . . Properly secure all cargo with ropes or straps to help prevent it from sliding or shifting. Do not place cargo higher than the seatbacks. In a sudden stop or collision, unsecured cargo could cause personal injury.
Black plate (414,1) for proper towing. outside temperatures on graded roads can affect engine performance and cause overheating. The transmission high fluid temperature protection mode, which helps reduce the chance of transmission damage, could activate and automatically decrease engine power. Vehicle speed may decrease under high load. Plan your trip carefully to account for trailer and vehicle load, weather and road conditions.
Black plate (415,1) CAUTION Vehicle damage resulting from improper towing procedures are not covered by NISSAN warranties. STI0542 Tongue load When using a weight carrying or a weight distributing hitch, keep the tongue load between 10 to 15% of the total trailer load within the maximum tongue load limits shown in the following “Towing Load/Specification” chart. If the tongue load becomes excessive, rearrange cargo to allow for proper tongue load.
Black plate (416,1) required to achieve the rating. Additional passengers, cargo and/or optional equipment, such as the trailer hitch, will add weight to the vehicle and reduce your vehicle’s maximum towing capacity and trailer tongue load. The vehicle and trailer need to be weighed to confirm the vehicle is within the GVWR, Front GAWR, Rear GAWR, Gross Combined Weight Rating (GCWR) and Towing capacity.
Black plate (417,1) The available towing capacity may be less than the maximum towing capacity due to the passenger and cargo load in the vehicle. Remember to keep trailer tongue weight between 10 to 15% of the trailer weight. If the tongue load becomes excessive, rearrange the cargo to obtain the proper tongue load. Do not exceed the 10 to 15% tongue weight specification even if the calculated available tongue weight is greater than 15%.
Black plate (418,1) TOWING SAFETY . Trailer hitch Choose a proper hitch for your vehicle and trailer. A genuine NISSAN trailer hitch is available from a NISSAN dealer. Make sure the trailer hitch is securely attached to the vehicle to help avoid personal injury or property damage due to sway caused by crosswinds, rough road surfaces or passing trucks. WARNING Trailer hitch components have specific weight ratings.
Black plate (419,1) Tire pressures . When towing a trailer, inflate the vehicle tires to the recommended cold tire pressure indicated on the Tire and Loading Information label. . trailer lights while using the vehicle tail light, stoplight and turn signal circuits as a signal source. The module/converter must draw no more than 15 milliamps from the stop and tail lamp circuits. Using a module/converter that exceeds these power requirements may damage the vehicle’s electrical system.
Black plate (420,1) from traffic. Steering stability, and braking performance will be somewhat different than under normal driving conditions. . Always secure items in the trailer to prevent load shift while driving. . Lock the trailer hitch coupler with a pin or lock to prevent the coupler from inadvertently becoming unlatched. . Avoid abrupt starts, acceleration or stops. . Avoid sharp turns or lane changes. . Always drive your vehicle at a moderate speed.
Black plate (421,1) vehicle handling. If swaying does occur, firmly grip the steering wheel, steer straight ahead, and immediately (but gradually) reduce vehicle speed. This combination will help stabilize the vehicle. Never increase speed. without applying the brakes. . Avoid holding the brake pedal down too long or too frequently. This could cause the brakes to overheat, resulting in reduced braking efficiency. Do the following if the trailer begins to sway: . 1.
Black plate (422,1) UNIFORM TIRE QUALITY GRADING may cause serious and expensive damage to the powertrain. . For emergency towing procedures refer to “TOWING RECOMMENDED BY NISSAN” in the “6. In case of emergency” section of this manual. Continuously Variable Transmission (CVT) All-Wheel Drive (AWD) models: Do not tow an AWD vehicle with any of the wheels on the ground.
Black plate (423,1) loading, either separately or in combination, can cause heat build-up and possible tire failure. EMISSION CONTROL SYSTEM WARRANTY REPORTING SAFETY DEFECTS (US only) Your NISSAN is covered by the following emission warranties. For USA For USA: . Emission Defects Warranty . Emissions Performance Warranty Details of these warranties may be found with other vehicle warranties in your Warranty Information Booklet which comes with your NISSAN.
Black plate (424,1) READINESS FOR INSPECTION/ MAINTENANCE (I/M) TEST For Canada If you believe that your vehicle has a defect which could cause a crash or could cause injury or death, you should immediately inform Transport Canada in addition to notifying NISSAN. If Transport Canada receives complaints, it may open an investigation, and if it finds that a safety defect exists in a group of vehicles, it may request that NISSAN conduct a recall campaign.
Black plate (425,1) EVENT DATA RECORDERS (EDR) “ready”. Contact a NISSAN dealer to set “ready condition” or to prepare the vehicle for testing. This vehicle is equipped with an Event Data Recorder (EDR). The main purpose of an EDR is to record, in certain crash or near crash-like situations, such as an air bag deployment or hitting a road obstacle, data that will assist in understanding how a vehicle’s systems performed.
Black plate (426,1) OWNER’S MANUAL/SERVICE MANUAL ORDER INFORMATION Genuine NISSAN Service Manuals for this model year and prior can be purchased. A genuine NISSAN Service Manual is the best source of service and repair information for your vehicle. This manual is the same one used by the factory trained technicians working at a NISSAN dealer. Genuine NISSAN Owner’s Manuals can also be purchased.
Black plate (1,1) 10 Index A ABS (Anti-lock Braking System). . . . . . . . . . . . . . . . . . 5-26 Adjustable headrest . . . . . . . . . . . . . . . . . . . . . . . . . . . . . . . 1-12 Advanced air bag system . . . . . . . . . . . . . . . . . . . . . . . . . 1-49 Air bag system Advanced air bag system . . . . . . . . . . . . . . . . . . . . . 1-49 Front passenger air bag and status light . . . . 1-50 Front-seat mounted side-impact supplemental air bag system. . . . . . . . . . . . . . . . . .
Black plate (2,1) Cold weather driving . . . . . . . . . . . . . . . . . . . . . . . . . . . . . . 5-29 Compact Disc (CD) changer (See audio system) . . . . . . . . . . . . . . . . . . . . . . . . . . . . . . . . 4-48 Compact Disc (CD) player (See audio system) . . . . . . . . . . . . . . . . . . . . . . . . . . . . . . . . 4-54 Compass . . . . . . . . . . . . . . . . . . . . . . . . . . . . . . . . . . . . . . . . . . . . . 2-7 Console box . . . . . . . . . . . . . . . . . . . . . . . . . . . . . . . . .
Black plate (3,1) Fuel Capacities and recommended fuel/lubricants . . . . . . . . . . . . . . . . . . . . . . . . . . . . . . . . . . . . 9-2 Fuel economy . . . . . . . . . . . . . . . . . . . . . . . . . . . . . . . . . . 5-21 Fuel economy information (display). . . . . . . . . . . . . 4-9 Fuel octane rating. . . . . . . . . . . . . . . . . . . . . . . . . . . . . . . . 9-3 Fuel recommendation. . . . . . . . . . . . . . . . . . . . . . . . . . . . 9-3 Fuel-filler cap. . . . . . . . . . . . . . . . . . . .
Black plate (4,1) Cargo lights . . . . . . . . . . . . . . . . . . . . . . . . . . . . . . . . . . . . 2-57 Fog light switch . . . . . . . . . . . . . . . . . . . . . . . . . . . . . . . . 2-36 Headlight switch . . . . . . . . . . . . . . . . . . . . . . . . . . . . . . . 2-33 Headlights bulb replacement . . . . . . . . . . . . . . . . . 8-25 Indicator lights . . . . . . . . . . . . . . . . . . . . . . . . . . . . . . . . . 2-15 Interior light control switch . . . . . . . . . . . . . . . . . . . .
Black plate (5,1) Power Front seat adjustment . . . . . . . . . . . . . . . . . . . . . . . . . . . 1-4 Power door lock . . . . . . . . . . . . . . . . . . . . . . . . . . . . . . . . . 3-4 Power outlet. . . . . . . . . . . . . . . . . . . . . . . . . . . . . . . . . . . . 2-41 Power steering fluid . . . . . . . . . . . . . . . . . . . . . . . . . . . 8-11 Power steering system . . . . . . . . . . . . . . . . . . . . . . . . 5-25 Power windows . . . . . . . . . . . . . . . . . . . . . . . . . . . . . . . .
Black plate (6,1) Steering Heated steering wheel . . . . . . . . . . . . . . . . . . . . . . . . 2-38 Power steering fluid . . . . . . . . . . . . . . . . . . . . . . . . . . . 8-11 Power steering system . . . . . . . . . . . . . . . . . . . . . . . . 5-25 Steering lock release malfunction indicator . . 2-18 Steering-wheel-mounted controls for audio . 4-79 Tilt/telescopic steering . . . . . . . . . . . . . . . . . . . . . . . . 3-26 Storage . . . . . . . . . . . . . . . . . . . . . . . . . . . . . . . . .
Black plate (7,1) Voice command (Bluetooth® Hands-Free Phone System). . . . . . . . . 4-98 Voice command (NISSAN voice recognition system) . . . . 4-112, 4-122 W Warning Dot matrix display . . . . . . . . . . . . . . . . . . . . . . . . . . . . . . 2-17 Hazard warning flasher switch . . . . . . . . . . . . . . . . 2-37 Lights . . . . . . . . . . . . . . . . . . . . . . . . . . . . . . . . . . . . . . . . . . . 2-10 Tire pressure monitoring system (TPMS) . . . . . . . . . . . . . . . . . . . . . . . . . . .
Black plate (2,1) GAS STATION INFORMATION FUEL RECOMMENDATION: ENGINE OIL RECOMMENDATION: Use unleaded regular gasoline with an octane rating of at least 87 AKI (Anti-Knock Index) number (Research octane number 91). . Engine oil with API Certification Mark . Viscosity SAE 5W-30 CAUTION . Using a fuel other than that specified could adversely affect the emission control systems, and may also affect warranty coverage. .